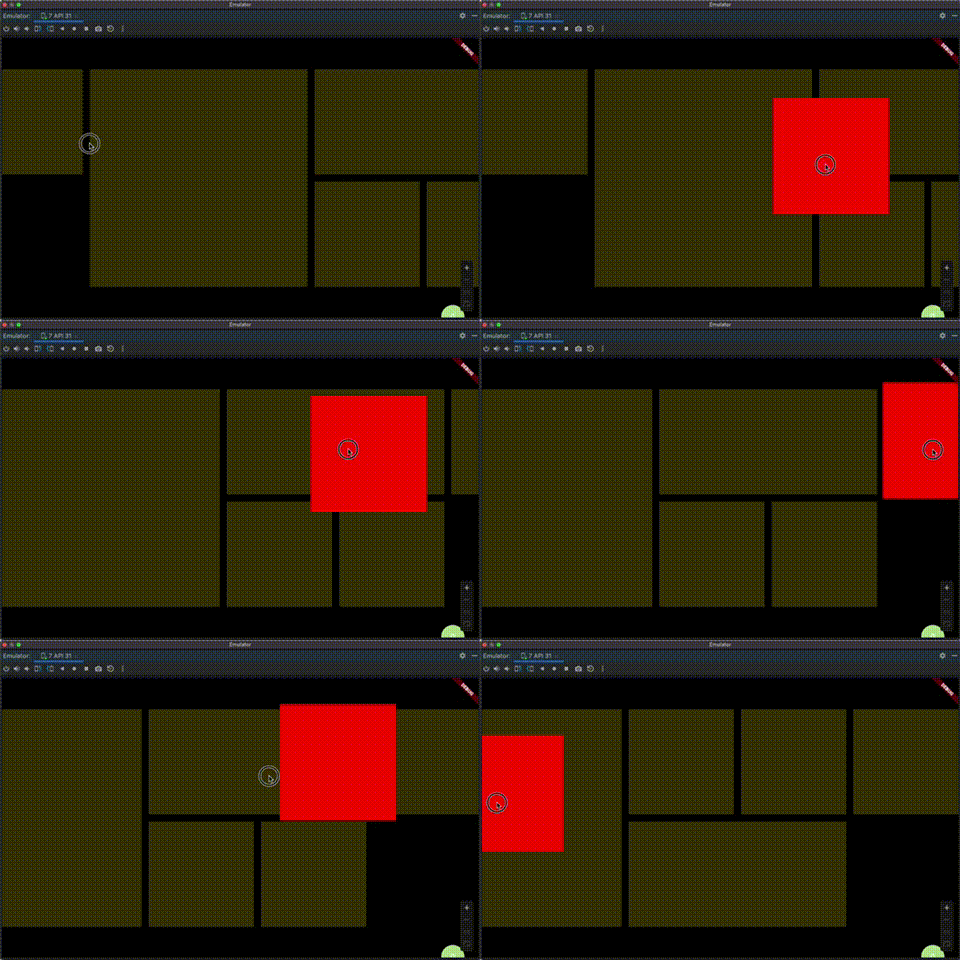
Flutter拖拽动画插件drag_anim的使用
Flutter拖拽动画插件drag_anim的使用
注意事项
- 自动检测位置变化进行位移动画,需要widget不会被重新创建根据情况添加key。
- 如果滑动组件在
buildItems下则可以嵌套DragAnimNotification也可以设置isDragAnimNotification = true。 DragAnim不是滑动组件的子widget的时候需要传scrollController,否则无法到边缘自动滚动。- 理论支持各种widget,例子是用
flutter_staggered_grid_view进行测试。 - 注意需要widget不会被销毁,重新创建。
dependencies:
  ...
  drag_anim: <latest_version>

以下是一个完整的示例代码:
import 'package:flutter/material.dart';
import 'package:drag_anim/drag_anim.dart';

class HomeEditCard {
  final String key;
  final int mainAxisCellCount;
  final int crossAxisCellCount;

  HomeEditCard({
    required this.key,
    required this.mainAxisCellCount,
    required this.crossAxisCellCount,
  });
}

class MyHomePage extends StatelessWidget {
  final List<HomeEditCard> list = [
    HomeEditCard(key: "1", mainAxisCellCount: 2, crossAxisCellCount: 2),
    HomeEditCard(key: "2", mainAxisCellCount: 1, crossAxisCellCount: 1),
    // 更多卡片...
  ];

  [@override](/user/override)
  Widget build(BuildContext context) {
    return DragAnimNotification(
      child: Center(
        child: Container(
          alignment: Alignment.centerLeft,
          height: 468,
          child: ListView(
            physics: const BouncingScrollPhysics(),
            scrollDirection: Axis.horizontal,
            children: [
              DragAnim<HomeEditCard>(
                scrollDirection: Axis.horizontal,
                buildItems: (List<Widget> children) {
                  return StaggeredGrid.count(
                    crossAxisCount: 4,
                    mainAxisSpacing: 15,
                    crossAxisSpacing: 15,
                    children: children,
                  );
                },
                items: (HomeEditCard element, DragItems dragItems) {
                  return StaggeredGridTile.count(
                    key: ValueKey<String>(element.key ?? ''),
                    mainAxisCellCount: element.mainAxisCellCount,
                    crossAxisCellCount: element.crossAxisCellCount,
                    child: dragItems(Container(
                      color: Colors.yellow.withOpacity(0.3),
                    )),
                  );
                },
                buildFeedback: (HomeEditCard data, Widget widget) {
                  return Container(
                    width: 250,
                    height: 250,
                    color: Colors.red,
                  );
                },
                dataList: list,
              ),
            ],
          ),
        ),
      ),
    );
  }
}
更多关于Flutter拖拽动画插件drag_anim的使用的实战教程也可以访问 https://www.itying.com/category-92-b0.html
1 回复
更多关于Flutter拖拽动画插件drag_anim的使用的实战系列教程也可以访问 https://www.itying.com/category-92-b0.html
drag_anim 是一个用于实现拖拽动画的 Flutter 插件。它可以帮助开发者轻松地在应用中实现拖拽并带有动画效果的功能。以下是如何使用 drag_anim 插件的基本步骤:
1. 添加依赖
首先,在 pubspec.yaml 文件中添加 drag_anim 插件的依赖:
dependencies:
  flutter:
    sdk: flutter
  drag_anim: ^1.0.0  # 请检查最新的版本号
然后运行 flutter pub get 来安装依赖。
2. 导入插件
在你的 Dart 文件中导入 drag_anim 插件:
import 'package:drag_anim/drag_anim.dart';
3. 使用 DragAnim 组件
DragAnim 是一个可以包裹你希望拖拽的组件的 widget。你可以通过设置不同的参数来控制拖拽行为。
DragAnim(
  child: Container(
    width: 100,
    height: 100,
    color: Colors.blue,
    child: Center(child: Text('Drag Me')),
  ),
  onDragEnd: (details) {
    print('Drag ended at: ${details.offset}');
  },
  onDragStart: (details) {
    print('Drag started at: ${details.offset}');
  },
  onDragUpdate: (details) {
    print('Dragging at: ${details.offset}');
  },
  dragDirection: DragDirection.vertical, // 设置拖拽方向
  dragThreshold: 50.0, // 设置拖拽阈值
  enableDrag: true, // 是否启用拖拽
)
4. 参数说明
child: 需要被拖拽的组件。onDragEnd: 拖拽结束时的回调。onDragStart: 拖拽开始时的回调。onDragUpdate: 拖拽过程中的回调。dragDirection: 拖拽方向,可以是DragDirection.horizontal、DragDirection.vertical或DragDirection.all。dragThreshold: 拖拽的阈值,表示在拖拽过程中需要达到的最小距离才能触发事件。enableDrag: 是否启用拖拽功能。
5. 自定义动画
你可以通过 animationDuration 和 animationCurve 参数来自定义拖拽动画的持续时间和动画曲线。
DragAnim(
  child: Container(
    width: 100,
    height: 100,
    color: Colors.blue,
    child: Center(child: Text('Drag Me')),
  ),
  animationDuration: Duration(milliseconds: 500),
  animationCurve: Curves.easeInOut,
)
6. 处理拖拽事件
你可以通过 onDragEnd、onDragStart 和 onDragUpdate 回调来处理拖拽事件,例如记录拖拽的位置或执行其他操作。
DragAnim(
  child: Container(
    width: 100,
    height: 100,
    color: Colors.blue,
    child: Center(child: Text('Drag Me')),
  ),
  onDragEnd: (details) {
    print('Drag ended at: ${details.offset}');
  },
  onDragStart: (details) {
    print('Drag started at: ${details.offset}');
  },
  onDragUpdate: (details) {
    print('Dragging at: ${details.offset}');
  },
)
7. 完整示例
以下是一个完整的示例代码:
import 'package:flutter/material.dart';
import 'package:drag_anim/drag_anim.dart';

void main() {
  runApp(MyApp());
}

class MyApp extends StatelessWidget {
  [@override](/user/override)
  Widget build(BuildContext context) {
    return MaterialApp(
      home: Scaffold(
        appBar: AppBar(title: Text('DragAnim Example')),
        body: Center(
          child: DragAnim(
            child: Container(
              width: 100,
              height: 100,
              color: Colors.blue,
              child: Center(child: Text('Drag Me')),
            ),
            onDragEnd: (details) {
              print('Drag ended at: ${details.offset}');
            },
            onDragStart: (details) {
              print('Drag started at: ${details.offset}');
            },
            onDragUpdate: (details) {
              print('Dragging at: ${details.offset}');
            },
            dragDirection: DragDirection.vertical,
            dragThreshold: 50.0,
            enableDrag: true,
            animationDuration: Duration(milliseconds: 500),
            animationCurve: Curves.easeInOut,
          ),
        ),
      ),
    );
  }
}


