


HarmonyOS 鸿蒙Next开发案例 | 像素单位转换
HarmonyOS 鸿蒙Next开发案例 | 像素单位转换
场景介绍
在日常应用页面布局设计时,开发者需要知道每个组件的样式及位置,这时就需要了解像素单位及相互转换方法,ArkUI 开发框架提供了4种像素单位供开发者使用,分别是: px 、 vp 、 fp 和 lpx ,框架采用 vp 为基准数据单位,本篇就简单为大家介绍下像素单位的基本知识与像素单位转换API的使用。通过像素转换案例,向开发者讲解了如何使用像素单位设置组件的尺寸、字体的大小以及不同像素单位之间的转换方法。
效果呈现
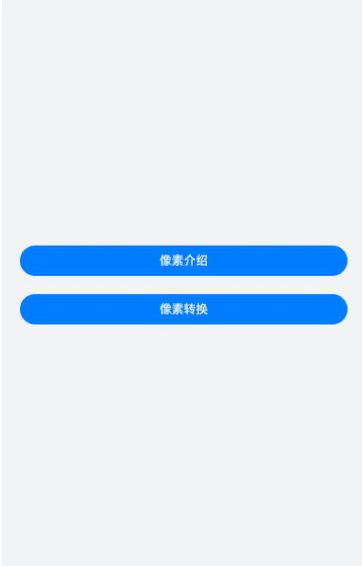
本例最终效果如下:
运行环境
本例基于以下环境开发,开发者也可以基于其他适配的版本进行开发:
- IDE: DevEco Studio 3.1.1 Release
- SDK: 3.1.0(API 9)
实现思路
本篇案例主要功能包括:①像素单位基本知识介绍;②像素单位转换相关API的使用。
- 构建入口页面:该页面包含两个button组件,通过点击按钮事件,实现到详细页面的跳转
- 像素单位介绍页面:
- 构建IntroducitonViewModel.ets
- 创建自定义接口IntroductionItem,根据IntroductionItem接口参数,创建对象数组INTRODUCE_LIST,向对象数组INTRODUCE_LIST中填充像素单位介绍页面所需参数内容。
- 构建IntroducitonPage.ets
- 通过ForEach循环渲染上一步骤中对象数组中的每个Item;通过if判断组件的显隐,同时添加样式,完成像素介绍页面。
- 像素转换页面:
- 构建ConvertionViewModel.ets
- 创建自定义接口ConversionItem,根据ConversionItem接口参数,创建对象数组ConversionViewModel,向对象数组ConversionViewModel中填充像素转换页面所需参数内容。
- 构建ConvertionPage.ets
- 通过ForEach循环渲染上一步构建的ConversionViewModel的每个子菜单Item,同时添加样式,构建像素介绍页面。
开发步骤
-
构建入口页面:该页面包含两个button按钮,通过点击按钮事件,实现到详细页的跳转。
具体代码如下:
// entry/src/main/ets/pages/IndexPage.ets import router from '[@ohos](/user/ohos).router'; [@Entry](/user/Entry) [@Component](/user/Component) struct IndexPage { jumpPage(url: string) { router.pushUrl({ url }) } build() { Column({ space: 24 }) { Button('像素介绍') .height('40vp') .width('100%') .backgroundColor($r('app.color.blue_background')) .onClick(() => this.jumpPage('pages/IntroductionPage')) Button('像素转换') .height('40vp') .width('100%') .backgroundColor($r('app.color.blue_background')) .onClick(() => this.jumpPage('pages/ConversionPage')) } .backgroundColor($r('app.color.page_background')) .justifyContent(FlexAlign.Center) .padding(24) .width('100%') .height('100%') } } -
像素单位介绍页面创建。
此页面主要系统介绍像素单位的概念,包含px、vp、lpx以及fp,并在页面中 为Text组件的宽度属性设置不同的像素单位(如px、vp、lpx),fp像素单位则设置为Text组件的字体大小。
-
从效果图看,此页面由4个功能相同的菜单组成,我们先构建功能菜单。
-
创建IntroducitonViewModel.ets定义每个子功能菜单Item。
具体代码如下:
// entry/src/main/ets/viewmodel/IntroducitonViewModel.ets

interface IntroductionItem {
    name: string;
    title: string;
    subTitle: string;
    value: string;
    smallFontSize: number;
    largeFontSize: number;
}

const INTRODUCE_LIST: IntroductionItem[] = [
{
    name: 'px',
    title: '屏幕物理像素单位。',
    subTitle: null,
    value: '200px',
    smallFontSize: 0,
    largeFontSize: 0
},
{
    name: 'vp',
    title: '屏幕密度相关像素,根据屏幕像素密度转换为屏幕物理像素。',
    value: '200vp',
    subTitle: '像素密度为160dpi的设备上1vp=1px,1vp对应的物理屏幕像素=(屏幕像素密度/160)px',
    smallFontSize: 0,
    largeFontSize: 0
},
{
    name: 'lpx',
    title: '视窗逻辑像素单位,lpx单位为实际屏幕宽度与逻辑宽度(通过designWidth配置)的比值。',
    subTitle: null,
    value: '200lpx',
    smallFontSize: 0,
    largeFontSize: 0
},
{
    name: 'fp',
    title: '字体像素,与vp类似,随系统字体大小设置变化。',
    subTitle: '默认情况下与vp相同,即1vp=1fp,如果用户手动调整了系统字体,scale为缩放比例,设置后的字体大小(单位fp) = 设置前的字体大小 * scale',
    value: '',
    smallFontSize: 14,
    largeFontSize: 24
}
];

class IntroductionViewModel {
    getIntroductionList() {
        let introductionItems = INTRODUCE_LIST;
        return introductionItems;
    }
}

let introductionViewModel = new IntroductionViewModel();
export default introductionViewModel as IntroductionViewModel;
-
-
渲染像素单位介绍页面,通过ForEach循环渲染上一步构建的IntroductionViewModel的每个子菜单Item;通过if判断组件的显隐,为显示的组件,添加样式,构建像素介绍页面。
具体代码如下:
// entry/src/main/ets/pages/IntroducitonPages.ets
import IntroductionViewModel from '../viewmodel/IntroductionViewModel';

interface IntroductionItem {
    name: string;
    title: Resource;
    subTitle: Resource;
    value: string;
    smallFontSize: number;
    largeFontSize: number;
}

@Extend(Text) function titleTextStyle() {
    .fontColor($r('app.color.title_font'))
    .fontFamily('HarmonyHeiTi_Medium')
    .fontWeight(500)
}

[@Entry](/user/Entry)
[@Component](/user/Component)
struct IntroductionPage {
    build() {
        Column() {
            Navigation() {
                List({ space: 12 }) {
                //通过ForEach循环渲染Item,构建像素介绍页面
                    ForEach(IntroductionViewModel.getIntroductionList(), (item: IntroductionItem) => {
                        //渲染每个Item
                        ListItem() {
                            Column() {
                                Text(item.name)
                                    .titleTextStyle()
                                    .fontSize('16fp')
                                Text(item.title)
                                    .titleTextStyle()
                                    .fontSize('14fp')
                                    .fontFamily('HarmonyHeiTi')
                                    .lineHeight('20fp')
                                    .margin({ top: '8vp'})
                                    .fontWeight(400)
                                if (item.subTitle) {
                                    Text(item.subTitle)
                                        .titleTextStyle()
                                        .opacity(0.6)
                                        .lineHeight('16fp')
                                        .fontSize('12fp')
                                        .fontFamily($r('app.string.HarmonyHeiTi'))
                                        .margin({ top: '20vp' })
                                        .fontWeight(400)
                                }

                                if (item.value.length > 0) {
                                    Text(item.value)
                                        .titleTextStyle()
                                        .fontColor($r('app.color.item_background'))
                                        .fontSize('16fp')
                                        .textAlign(TextAlign.Center)
                                        .backgroundColor($r('app.color.blue_background'))
                                        .height('28vp')
                                        .width(item.value)
                                        .borderRadius('4vp')
                                        .margin({ top: '12vp' })
                                } else {
                                    Column() {
                                        Text($r('app.string.font_desc', item.smallFontSize))
                                            .titleTextStyle()
                                            .fontSize(item.smallFontSize)
                                        Text($r('app.string.font_desc', item.largeFontSize))
                                            .titleTextStyle()
                                            .fontSize(item.largeFontSize)
                                            .margin({ top: '6vp' })
                                    }
                                        .alignItems(HorizontalAlign.Start)
                                        .backgroundColor($r('app.color.font_background'))
                                        .width('100%')
                                        .borderRadius('12vp')
                                        .padding('12vp')
                                        .margin({ top: '12vp' })
                                }
                            }
                            .alignItems(HorizontalAlign.Start)
                            .width('100%')
                            .padding('12vp')
                            .borderRadius('24vp')
                            .backgroundColor('#FFFFFF')
                        }
                        .padding({
                        left: '12vp',
                        right: '12vp'
                        })
                    })
                }
                .width('100%')
                .height('100%')
            }
            .titleMode(NavigationTitleMode.Mini)
            .title('像素介绍')
        }
        .backgroundColor($r('app.color.page_background'))
        .width('100%')
        .height('100%')
    }
}
-
-
像素转换页面创建。
此页面主要是通过使用像素转换API,实现不同像素单位之间的相互转换功能。
-
从效果图看,此页面由3个功能相同的菜单组成,我们先构建功能菜单。
-
创建ConversionViewModel.ets定义每个子功能菜单Item。
具体代码如下:
// entry/src/main/ets/viewmodel/ConversionViewModel.ets

interface ConversionItem {
    title: string;
    subTitle: string;
    value: number;
    conversionTitle: string;
    conversionSubTitle: string;
    conversionValue: number;
    notice: string;
}

class ConversionViewModel {
    getConversionList() {
        let conversionItems = CONVERSION_LIST;
        return conversionItems;
    }
}

export const CONVERSION_LIST: ConversionItem[] = [
{
    title: 'vp > px',
    subTitle: `vp2px(60)`,
    value: vp2px(60),
    conversionTitle: 'px > vp',
    conversionSubTitle: `px2vp(60)`,
    conversionValue: px2vp(60),
    notice: null
},
{
    title: 'fp > px',
    subTitle: `fp2px(60)`,
    value: fp2px(60),
    conversionTitle: 'px > fp',
    conversionSubTitle: `px2fp(60})`,
    conversionValue: px2fp(60),
    notice: null
},
{
    title: 'lpx > px',
    subTitle: `lpx2px(60)`,
    value: lpx2px(60),
    conversionTitle: 'px > lpx',
    conversionSubTitle: `px2lpx(60)`,
    conversionValue: px2lpx(60),
    notice: 'lpx与px之间的转换,需要根据实际情况设置designWidth'
}
];

let conversionViewModel = new ConversionViewModel();
export default conversionViewModel as ConversionViewModel;
-
-
渲染像素单位介绍页面,通过ForEach循环渲染上一步构建的ConversionViewModel的每个子菜单Item,同时添加样式,构建像素介绍页面。
具体代码如下:
// entry/src/main/ets/pages/ConversionPage.ets

import ConversionViewModel from '../viewmodel/ConversionViewModel';

interface ConversionItem {
    title: string;
    subTitle: string;
    value: number;
    conversionTitle: string;
    conversionSubTitle: string;
    conversionValue: number;
    notice: string;
}

@Extend(Text) function descTextStyle() {
    .fontColor($r('app.color.title_font'))
    .fontSize('14fp')
    .fontFamily($r('app.string.HarmonyHeiTi'))
    .lineHeight('20fp')
    .fontWeight(400)
    .margin({ top: '8vp' })
}

@Extend(Text) function titleTextStyle() {
    .fontColor($r('app.color.title_font'))
    .fontSize('16fp')
    .fontFamily($r('app.string.HarmonyHeiTi_Medium'))
    .fontWeight(500)
}

@Styles function blueStyle() {
    .backgroundColor($r('app.color.blue_background'))
    .height('28vp')
    .borderRadius('4vp')
    .margin({ top: '4vp' })
}

[@Entry](/user/Entry)
[@Component](/user/Component)
struct ConversionPage {
    build() {
        Column() {
            Navigation() {
                List({ space: 12 }) {
                //通过ForEach循环渲染Item,构建像素转换页面
                    ForEach(ConversionViewModel.getConversionList(), (item: ConversionItem) => {
                        //渲染每个Item
                        ListItem() {
                            Column() {
                                Text(item.title)
                                    .titleTextStyle()
                                    .margin({ top: '6vp' })
                                Text(item.subTitle)
                                    .descTextStyle()
                                    .opacity(0.6)
                                Row()
                                .blueStyle()
                                    // 为宽度属性设置不同的像素单位
                                    .width(item.value)
                                Text(item.conversionTitle)
                                    .titleTextStyle()
                                    .margin({ top: '18vp' })
                                Text(item.conversionSubTitle)
                                    .descTextStyle()
                                    .opacity(0.6)
                                Row()
                                    .blueStyle()
                                    // 为宽度属性设置不同的像素单位
                                    .width(item.conversionValue)
                                if (item.notice) {
                                    Text(item.notice)
                                        .descTextStyle()
                                        .fontColor($r('app.color.notice_font'))
                                }
                            }
                            .alignItems(HorizontalAlign.Start)
                            .width('100%')
                            .padding('12vp')
                            .borderRadius('24vp')
                            .backgroundColor('#FFFFFF')
                        }
                        .padding({
                        left: '12vp',
                        right: '12vp'
                        })
                    })
                }
                .width('100%')
                .height('100%')
            }
            .titleMode(NavigationTitleMode.Mini)
            .title('像素转换')
        }
        .backgroundColor($r('app.color.page_background'))
        .width('100%')
        .height('100%')
    }
}
-
更多关于HarmonyOS 鸿蒙Next开发案例 | 像素单位转换的实战教程也可以访问 https://www.itying.com/category-93-b0.html

更多关于HarmonyOS 鸿蒙Next开发案例 | 像素单位转换的实战系列教程也可以访问 https://www.itying.com/category-93-b0.html
姓名: John Doe
职位: 软件工程师
简介: 拥有超过10年的软件开发经验,专注于Web应用和移动应用开发。