Flutter图像绘制插件image_painter_hap的使用
Flutter图像绘制插件image_painter_hap的使用
A flutter implementation of painting over image.
概述

特性
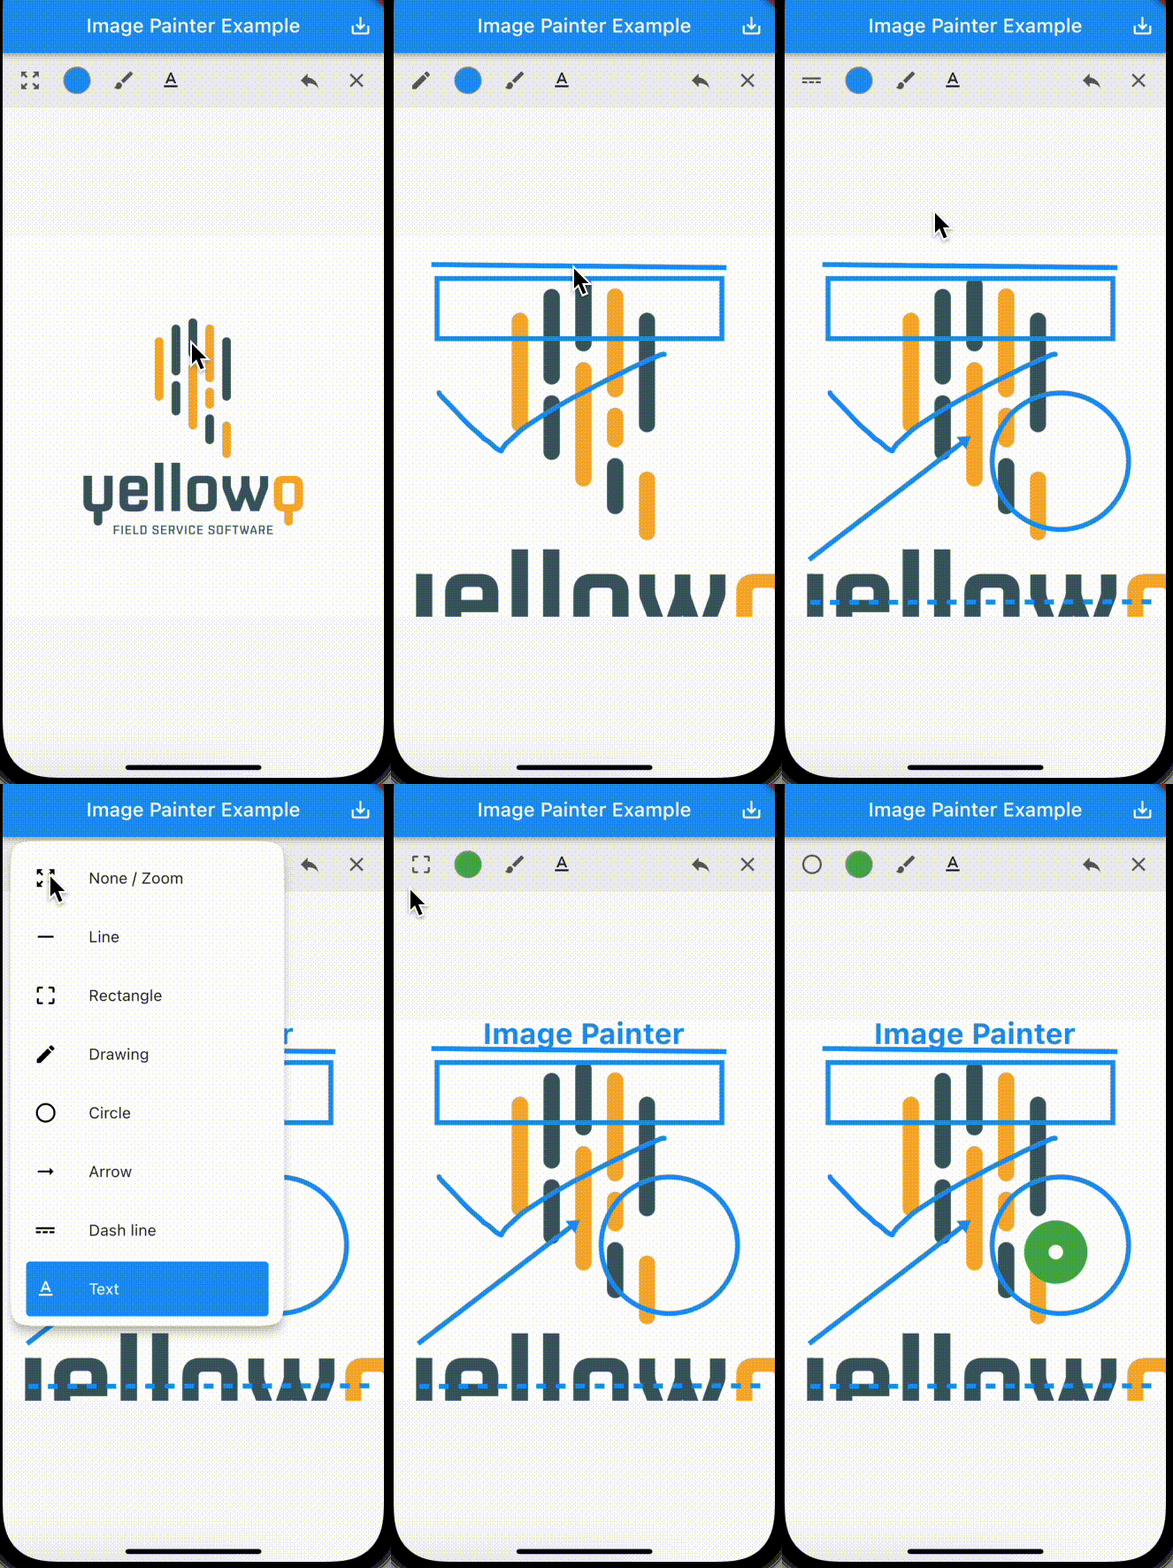
- 可用的七种绘图模式。线、矩形、圆形、自由式/签名、虚线、箭头和文本。
- 四种构造函数用于从网络URL、资源图像、文件图像和内存中添加图像。
- 构造函数中的控件,如strokeWidth和颜色。
- 导出图像作为内存字节,可以转换为图像。实现见示例。
- 能够撤销和清除绘画。
注意 仅在flutter稳定通道上测试并工作。在使用该包之前,请确保你在flutter的稳定通道上。
开始使用
在你的flutter项目的pubspec.yaml文件中,添加以下依赖:
dependencies:
  ...
  image_painter: latest
在你的库中添加以下导入:
import 'package:image_painter/image_painter.dart';
对于如何开始使用flutter的帮助,请参阅在线文档。
使用库
检查示例
库的基本用法:
ImagePainter.network: 在从网络URL加载的图像上进行绘制。
final _imageKey = GlobalKey<ImagePainterState>();
// 提供控制器给画笔。
ImagePainter.network("https://sample_image.png",
                    key: _imageKey, scalable: true),

/// 导出图像:
Uint8List byteArray = await _imageKey.currentState?.exportImage();
// 现在你可以使用`Uint8List`数据并将其转换为文件。
File imgFile = new File('directoryPath/fileName.png');
imgFile.writeAsBytesSync(byteArray);
更多详细的实现指南,请查看示例。
示例代码
import 'dart:io';

import 'package:flutter/material.dart';
import 'package:image_painter/image_painter.dart';
import 'package:open_file/open_file.dart';
import 'package:path_provider/path_provider.dart';

void main() => runApp(ExampleApp());

class ExampleApp extends StatelessWidget {
  [@override](/user/override)
  Widget build(BuildContext context) {
    return MaterialApp(
      title: 'Image Painter Example',
      theme: ThemeData(
        primarySwatch: Colors.blue,
        visualDensity: VisualDensity.adaptivePlatformDensity,
      ),
      home: ImagePainterExample(),
    );
  }
}

class ImagePainterExample extends StatefulWidget {
  [@override](/user/override)
  _ImagePainterExampleState createState() => _ImagePainterExampleState();
}

class _ImagePainterExampleState extends State<ImagePainterExample> {
  final _imageKey = GlobalKey<ImagePainterState>();

  void saveImage() async {
    final image = await _imageKey.currentState?.exportImage();
    final directory = (await getApplicationDocumentsDirectory()).path;
    await Directory('$directory/sample').create(recursive: true);
    final fullPath =
        '$directory/sample/${DateTime.now().millisecondsSinceEpoch}.png';
    final imgFile = File('$fullPath');
    if (image != null) {
      imgFile.writeAsBytesSync(image);
      ScaffoldMessenger.of(context).showSnackBar(
        SnackBar(
          backgroundColor: Colors.grey[700],
          padding: const EdgeInsets.only(left: 10),
          content: Row(
            mainAxisAlignment: MainAxisAlignment.spaceBetween,
            children: [
              const Text("Image Exported successfully.",
                  style: TextStyle(color: Colors.white)),
              TextButton(
                onPressed: () => OpenFile.open("$fullPath"),
                child: Text(
                  "Open",
                  style: TextStyle(
                    color: Colors.blue[200],
                  ),
                ),
              )
            ],
          ),
        ),
      );
    }
  }

  [@override](/user/override)
  Widget build(BuildContext context) {
    return Scaffold(
      appBar: AppBar(
        title: const Text("Image Painter Example"),
        actions: [
          IconButton(
            icon: const Icon(Icons.save_alt),
            onPressed: saveImage,
          )
        ],
      ),
      body: ImagePainter.asset(
        "assets/sample.jpg",
        key: _imageKey,
        scalable: true,
        initialStrokeWidth: 2,
        textDelegate: TextDelegate(),
        initialColor: Colors.green,
        initialPaintMode: PaintMode.line,
      ),
    );
  }
}
更多关于Flutter图像绘制插件image_painter_hap的使用的实战教程也可以访问 https://www.itying.com/category-92-b0.html
更多关于Flutter图像绘制插件image_painter_hap的使用的实战系列教程也可以访问 https://www.itying.com/category-92-b0.html
image_painter_hap 是一个用于在 Flutter 应用中绘制和编辑图像的插件。它允许用户在图像上进行自由绘制、添加文本、形状等操作,并且可以导出编辑后的图像。以下是如何使用 image_painter_hap 插件的基本步骤:
1. 添加依赖
首先,你需要在 pubspec.yaml 文件中添加 image_painter_hap 插件的依赖。
dependencies:
  flutter:
    sdk: flutter
  image_painter_hap: ^1.0.0  # 请使用最新版本
然后运行 flutter pub get 来安装依赖。
2. 导入插件
在你的 Dart 文件中导入 image_painter_hap 插件。
import 'package:image_painter_hap/image_painter_hap.dart';
3. 使用 ImagePainter 组件
ImagePainter 是 image_painter_hap 插件的核心组件。你可以将它添加到你的 UI 中,并传递一个图像源(如 AssetImage 或 NetworkImage)来进行绘制。
class MyHomePage extends StatelessWidget {
  [@override](/user/override)
  Widget build(BuildContext context) {
    return Scaffold(
      appBar: AppBar(
        title: Text('Image Painter Example'),
      ),
      body: Center(
        child: ImagePainter(
          image: AssetImage('assets/sample_image.jpg'), // 使用本地图片
          // image: NetworkImage('https://example.com/sample_image.jpg'), // 使用网络图片
          onSave: (Uint8List? imageBytes) {
            // 处理保存的图像数据
            if (imageBytes != null) {
              // 保存或显示图像
            }
          },
        ),
      ),
    );
  }
}
4. 处理保存的图像
ImagePainter 提供了一个 onSave 回调函数,当用户保存编辑后的图像时,会返回一个 Uint8List 类型的数据。你可以使用这个数据来保存图像或显示在应用中。
onSave: (Uint8List? imageBytes) {
  if (imageBytes != null) {
    // 保存图像到文件
    final file = File('path_to_save_image.png');
    file.writeAsBytesSync(imageBytes);

    // 或者在应用中显示图像
    setState(() {
      _savedImage = Image.memory(imageBytes);
    });
  }
},
5. 自定义绘制工具
ImagePainter 提供了一些默认的绘制工具,如画笔、橡皮擦、文本、形状等。你可以通过 toolbarOptions 参数来自定义工具栏的选项。
ImagePainter(
  image: AssetImage('assets/sample_image.jpg'),
  onSave: (Uint8List? imageBytes) {
    // 处理保存的图像数据
  },
  toolbarOptions: ToolbarOptions(
    showColorPicker: true,
    showText: true,
    showShapes: true,
    showEraser: true,
  ),
),
6. 导出图像
你可以通过调用 ImagePainter 的 save 方法来手动导出编辑后的图像。
final GlobalKey<ImagePainterState> _imagePainterKey = GlobalKey();

// 在需要保存图像时调用
_imagePainterKey.currentState?.save();
7. 其他功能
image_painter_hap 还提供了其他一些功能,如撤销/重做、清除画布、设置画笔粗细和颜色等。你可以根据需求进一步探索和使用这些功能。
8. 示例代码
以下是一个完整的示例代码:
import 'package:flutter/material.dart';
import 'package:image_painter_hap/image_painter_hap.dart';

void main() {
  runApp(MyApp());
}

class MyApp extends StatelessWidget {
  [@override](/user/override)
  Widget build(BuildContext context) {
    return MaterialApp(
      title: 'Image Painter Example',
      theme: ThemeData(
        primarySwatch: Colors.blue,
      ),
      home: MyHomePage(),
    );
  }
}

class MyHomePage extends StatelessWidget {
  final GlobalKey<ImagePainterState> _imagePainterKey = GlobalKey();

  [@override](/user/override)
  Widget build(BuildContext context) {
    return Scaffold(
      appBar: AppBar(
        title: Text('Image Painter Example'),
        actions: [
          IconButton(
            icon: Icon(Icons.save),
            onPressed: () {
              _imagePainterKey.currentState?.save();
            },
          ),
        ],
      ),
      body: Center(
        child: ImagePainter(
          key: _imagePainterKey,
          image: AssetImage('assets/sample_image.jpg'),
          onSave: (Uint8List? imageBytes) {
            if (imageBytes != null) {
              // 保存或显示图像
              final file = File('path_to_save_image.png');
              file.writeAsBytesSync(imageBytes);
            }
          },
          toolbarOptions: ToolbarOptions(
            showColorPicker: true,
            showText: true,
            showShapes: true,
            showEraser: true,
          ),
        ),
      ),
    );
  }
}


