Flutter手机号码验证插件phone_verification的使用
Flutter手机号码验证插件phone_verification的使用
本插件帮助Flutter开发者向用户发送OTP并验证用户的手机号码。 ⭐建议在真实设备上使用此插件,而不是模拟器。 ⚠ 目前仅支持Android。
特性
- 免费的OTP验证系统。
- 可靠。
- 4位数OTP。
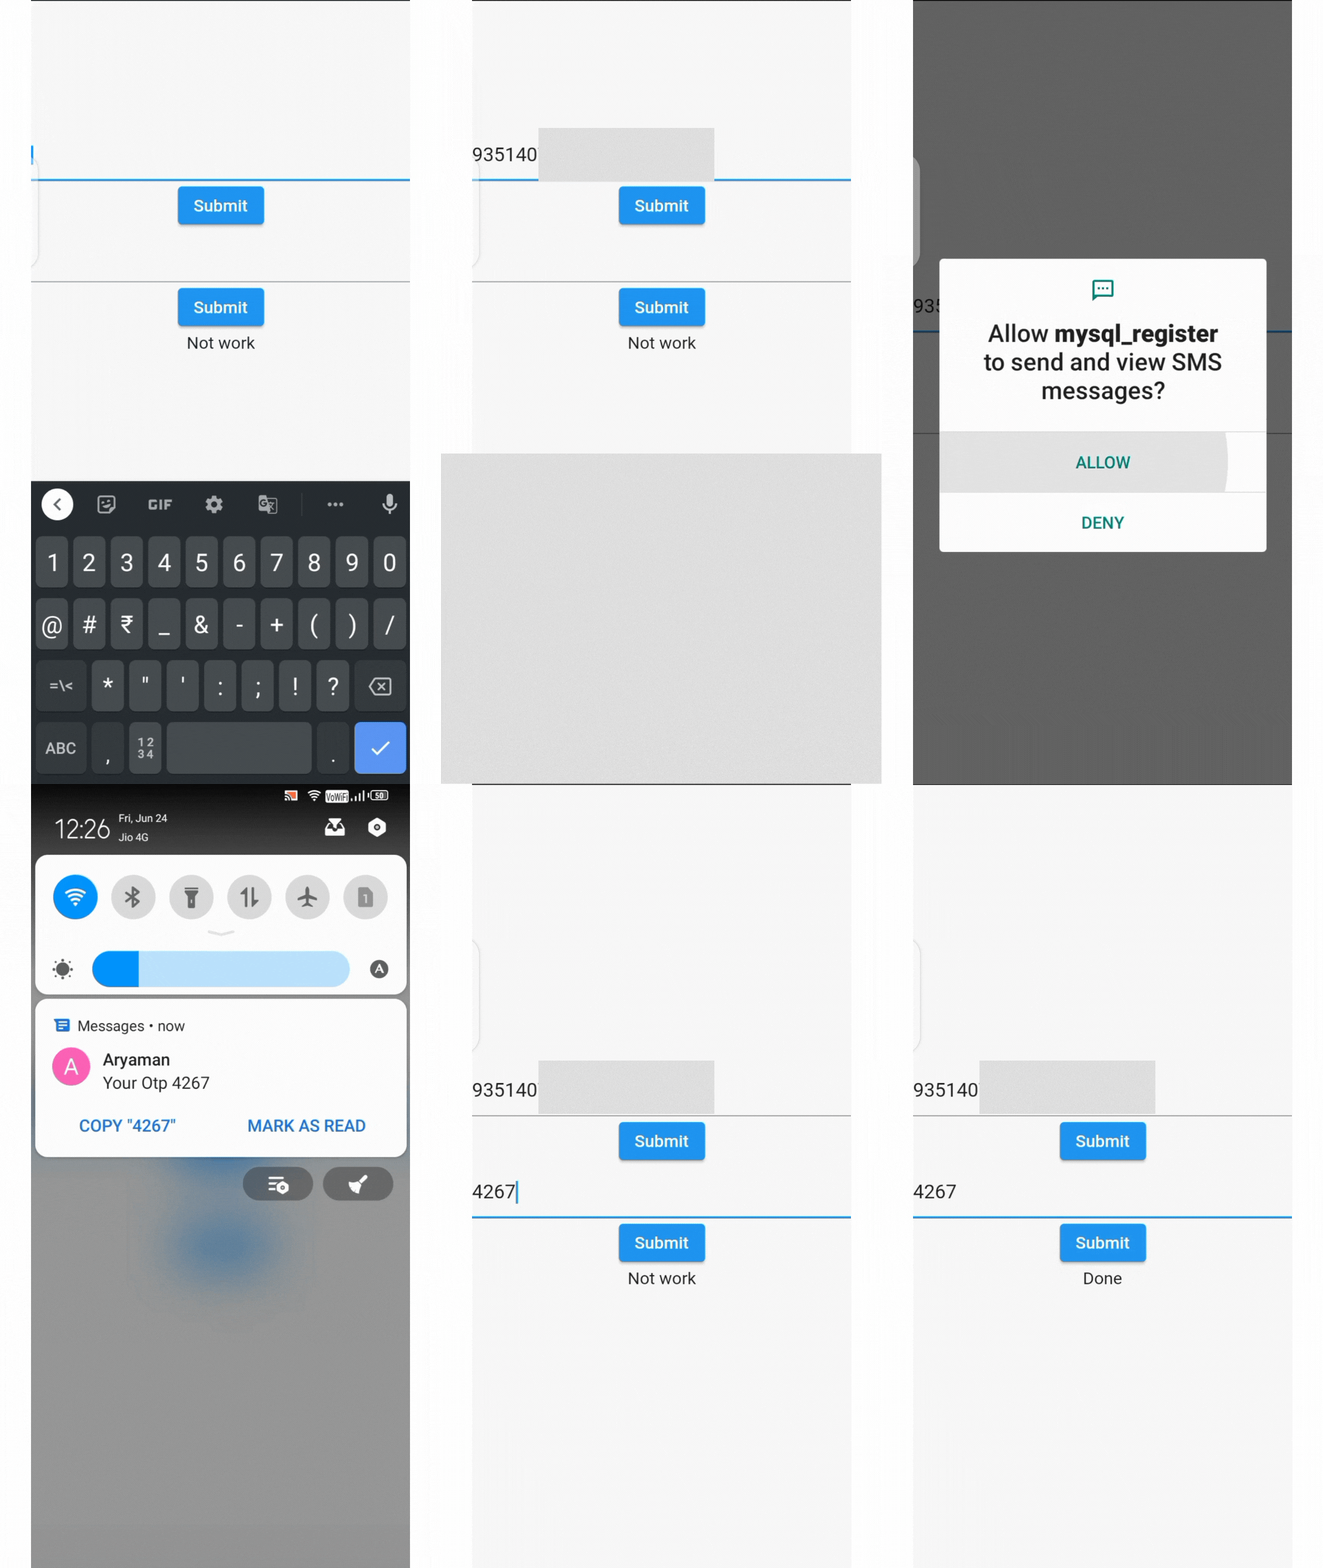
Demo
由于隐私问题,我隐藏了我的号码

Android
- 在
android/app/build.gradle文件中更改以下SDK版本:
    compileSdkVersion 31 // 更改为31

    defaultConfig {
       --------------------------------------
        --------------------------------------
        minSdkVersion 21 // 更改为21
        targetSdkVersion 30 // 更改为30
        --------------------------------------
        --------------------------------------
    }
- 在
android/app/src/main/AndroidManifest.xml文件中添加以下两行:
<manifest xmlns:android="http://schemas.android.com/apk/res/android"
    package="com.example.mysql_register">
  <!-- 添加这些行 -->
    <uses-permission android:name="android.permission.INTERNET"/>
    <uses-permission android:name="android.permission.SEND_SMS" />
 <!-- 添加这些行 -->
   <application
安装
- 首先,在
pubspec.yaml文件中添加最新的phone_verification包依赖:
dependencies:
  phone_verification: ^0.0.1
- 其次,在你的文件中导入该包:
import 'package:phone_verification/phone_verification.dart';
- 调用
PhoneVerification类的实例:
PhoneVerification phoneverification = PhoneVerification(number: usernumber);
// 这里 usernumber 是要验证的手机号码
发送OTP
- 在以下代码中,
usernumber应不包含国家代码。Your Otp是你想随OTP一起发送的消息,你可以根据需要更改它。
PhoneVerification phoneverification = PhoneVerification(number: '93514xxxxx');

phoneverification.sendotp('Your Otp');
或者
PhoneVerification(number: '93514xxxxx').sendotp('Your Otp');
验证OTP
- 将用户输入的OTP传递给
verifyotp()方法,这里enteredotp是用户输入的OTP。
String check = 'No action';

ElevatedButton(
  onPressed: () async {
    // 编写以下代码以进行验证
    bool verify = await PhoneVerification(number: '93514xxxxx').verifyotp(enteredotp.toString());

    // 如果验证成功则返回true,否则返回false
    if (verify == true) {
      check = 'Verify';
    } else {
      check = 'error';
    }
  },
  child: Text("Tap To Verify"),
),
或者
String check = 'No action';

ElevatedButton(
  onPressed: () async {
    // 编写以下代码以进行验证
    PhoneVerification phoneverification = PhoneVerification(number: '93514xxxxx');
    bool verify = await phoneverification.verifyotp(enteredotp.toString());

    // 如果验证成功则返回true,否则返回false
    check = verify == true ? 'verify' : 'error';
  },
  child: Text("Tap To Verify"),
),
更多关于Flutter手机号码验证插件phone_verification的使用的实战教程也可以访问 https://www.itying.com/category-92-b0.html
更多关于Flutter手机号码验证插件phone_verification的使用的实战系列教程也可以访问 https://www.itying.com/category-92-b0.html
在 Flutter 中,phone_verification 是一个用于手机号码验证的插件,通常用于发送和验证短信验证码。以下是如何使用 phone_verification 插件的基本步骤。
1. 添加依赖
首先,在 pubspec.yaml 文件中添加 phone_verification 插件的依赖:
dependencies:
  flutter:
    sdk: flutter
  phone_verification: ^0.0.1 # 请检查最新版本
然后运行 flutter pub get 来安装依赖。
2. 导入插件
在需要使用 phone_verification 的 Dart 文件中导入插件:
import 'package:phone_verification/phone_verification.dart';
3. 初始化插件
在使用插件之前,通常需要对其进行初始化。你可以通过调用 PhoneVerification.initialize 方法来完成初始化:
void main() async {
  WidgetsFlutterBinding.ensureInitialized();
  await PhoneVerification.initialize(
    // 这里可以传递一些初始化参数,如果有的话
  );
  runApp(MyApp());
}
4. 发送验证码
接下来,你可以使用 PhoneVerification.sendOTP 方法来发送短信验证码:
Future<void> sendOTP(String phoneNumber) async {
  try {
    await PhoneVerification.sendOTP(
      phoneNumber: phoneNumber,
      // 其他可选参数,例如:
      // timeout: Duration(seconds: 60),
      // onCodeSent: (String verificationId, int? resendToken) {
      //   // 处理验证码发送成功后的逻辑
      // },
      // onVerificationFailed: (FirebaseAuthException exception) {
      //   // 处理验证失败的情况
      // },
      // onCodeAutoRetrievalTimeout: (String verificationId) {
      //   // 处理自动验证码超时的情况
      // },
    );
  } catch (e) {
    print('Failed to send OTP: $e');
  }
}
5. 验证验证码
当用户输入验证码后,你可以使用 PhoneVerification.verifyOTP 方法来验证验证码:
Future<void> verifyOTP(String verificationId, String smsCode) async {
  try {
    await PhoneVerification.verifyOTP(
      verificationId: verificationId,
      smsCode: smsCode,
    );
    print('Verification successful!');
  } catch (e) {
    print('Failed to verify OTP: $e');
  }
}
6. 处理回调
在发送验证码时,你可以处理各种回调,例如验证码发送成功、验证失败或自动验证码超时的情况:
await PhoneVerification.sendOTP(
  phoneNumber: phoneNumber,
  onCodeSent: (String verificationId, int? resendToken) {
    // 验证码发送成功后的逻辑
    print('Verification ID: $verificationId');
  },
  onVerificationFailed: (FirebaseAuthException exception) {
    // 验证失败的情况
    print('Verification failed: ${exception.message}');
  },
  onCodeAutoRetrievalTimeout: (String verificationId) {
    // 自动验证码超时的情况
    print('Auto retrieval timed out: $verificationId');
  },
);
7. 完整示例
以下是一个完整的示例,展示了如何使用 phone_verification 插件进行手机号码验证:
import 'package:flutter/material.dart';
import 'package:phone_verification/phone_verification.dart';

void main() async {
  WidgetsFlutterBinding.ensureInitialized();
  await PhoneVerification.initialize();
  runApp(MyApp());
}

class MyApp extends StatelessWidget {
  [@override](/user/override)
  Widget build(BuildContext context) {
    return MaterialApp(
      home: PhoneVerificationScreen(),
    );
  }
}

class PhoneVerificationScreen extends StatefulWidget {
  [@override](/user/override)
  _PhoneVerificationScreenState createState() => _PhoneVerificationScreenState();
}

class _PhoneVerificationScreenState extends State<PhoneVerificationScreen> {
  final _phoneNumberController = TextEditingController();
  final _smsCodeController = TextEditingController();
  String _verificationId = '';

  Future<void> _sendOTP() async {
    final phoneNumber = _phoneNumberController.text;
    try {
      await PhoneVerification.sendOTP(
        phoneNumber: phoneNumber,
        onCodeSent: (String verificationId, int? resendToken) {
          setState(() {
            _verificationId = verificationId;
          });
          print('Verification ID: $verificationId');
        },
        onVerificationFailed: (FirebaseAuthException exception) {
          print('Verification failed: ${exception.message}');
        },
        onCodeAutoRetrievalTimeout: (String verificationId) {
          print('Auto retrieval timed out: $verificationId');
        },
      );
    } catch (e) {
      print('Failed to send OTP: $e');
    }
  }

  Future<void> _verifyOTP() async {
    final smsCode = _smsCodeController.text;
    try {
      await PhoneVerification.verifyOTP(
        verificationId: _verificationId,
        smsCode: smsCode,
      );
      print('Verification successful!');
    } catch (e) {
      print('Failed to verify OTP: $e');
    }
  }

  [@override](/user/override)
  Widget build(BuildContext context) {
    return Scaffold(
      appBar: AppBar(
        title: Text('Phone Verification'),
      ),
      body: Padding(
        padding: const EdgeInsets.all(16.0),
        child: Column(
          children: [
            TextField(
              controller: _phoneNumberController,
              decoration: InputDecoration(labelText: 'Phone Number'),
            ),
            SizedBox(height: 16),
            ElevatedButton(
              onPressed: _sendOTP,
              child: Text('Send OTP'),
            ),
            SizedBox(height: 16),
            TextField(
              controller: _smsCodeController,
              decoration: InputDecoration(labelText: 'SMS Code'),
            ),
            SizedBox(height: 16),
            ElevatedButton(
              onPressed: _verifyOTP,
              child: Text('Verify OTP'),
            ),
          ],
        ),
      ),
    );
  }
}


