


Flutter动态展开视图插件flutter_expand_view的使用
Flutter动态展开视图插件flutter_expand_view的使用
动画
示例项目
在example文件夹中有一个示例项目。您可以查看它。否则,请继续阅读以快速入门。
使用
自定义数量
import 'package:flutter/material.dart';
import 'package:flutter_expand_view/expand_child_widget.dart';
import 'package:flutter_expand_view/expanded_collapse_right_widget.dart';
void main() {
runApp(MyApp());
}
class MyApp extends StatelessWidget {
// 这个小部件是你的应用的根。
[@override](/user/override)
Widget build(BuildContext context) {
return MaterialApp(
title: 'Flutter Demo',
theme: ThemeData(
primarySwatch: Colors.blue,
visualDensity: VisualDensity.adaptivePlatformDensity,
),
home: TestScreen(),
);
}
}
class TestScreen extends StatelessWidget {
[@override](/user/override)
Widget build(BuildContext context) {
return Scaffold(
appBar: AppBar(
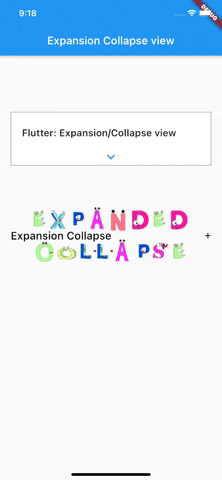
title: Text('Expansion Collapse view'),
),
body: Column(
children: [
SizedBox(height: 100), // 空白区域
Container(
margin: const EdgeInsets.fromLTRB(20, 5, 20, 5),
width: MediaQuery.of(context).size.width - 40,
decoration: BoxDecoration(
color: Colors.white,
border: Border.all(color: Colors.grey),
),
child: Padding(
padding: const EdgeInsets.only(top: 8),
child: Column(
children: [
Container(
margin: const EdgeInsets.only(left: 20),
height: 60,
child: Row(
mainAxisAlignment: MainAxisAlignment.spaceBetween,
children: [
Text(
'Flutter: Expansion/Collapse view',
style: TextStyle(
fontSize: 18, fontWeight: FontWeight.w600),
),
],
),
),
ExpandChildWidget(
arrowPadding: const EdgeInsets.only(bottom: 0),
expand: false, // 是否展开
child: Column(
children: [
Container(
child: Row(
mainAxisAlignment: MainAxisAlignment.spaceEvenly,
children: [
Container(
width: MediaQuery.of(context).size.width - 50,
height: 100,
color: Colors.blueAccent,
)
],
),
)
],
),
),
],
),
),
),
SizedBox(height: 100), // 空白区域
ExpandedCollapseRightWidget(
expand: false, // 是否展开
collapseImage: 'assets/Ic_12_collapse@1.5x.svg', // 收缩图标路径
expandImage: 'assets/Ic_12_expand@1.5x.svg', // 展开图标路径
header: Container(
margin: const EdgeInsets.only(left: 20),
child: Text(
'Expansion Collapse',
style: TextStyle(
fontSize: 20,
fontWeight: FontWeight.w500,
color: Colors.black),
),
),
child: Column(
children: [
Container(
child: Row(
mainAxisAlignment: MainAxisAlignment.spaceEvenly,
children: [
Container(
width: MediaQuery.of(context).size.width - 50,
height: 100,
color: Colors.blueAccent,
)
],
),
)
],
),
),
SizedBox(height: 100), // 空白区域
],
),
);
}
}
更多关于Flutter动态展开视图插件flutter_expand_view的使用的实战教程也可以访问 https://www.itying.com/category-92-b0.html
1 回复

更多关于Flutter动态展开视图插件flutter_expand_view的使用的实战系列教程也可以访问 https://www.itying.com/category-92-b0.html
flutter_expand_view 是一个用于在 Flutter 应用中实现动态展开和收起视图的插件。通过这个插件,你可以轻松地创建一个可以展开和收起的内容区域,类似于常见的折叠面板或手风琴效果。
安装
首先,你需要在 pubspec.yaml 文件中添加 flutter_expand_view 插件的依赖:
dependencies:
  flutter:
    sdk: flutter
  flutter_expand_view: ^1.0.0  # 请检查最新版本
然后运行 flutter pub get 来安装依赖。
基本用法
flutter_expand_view 提供了一个 ExpandView 小部件,你可以用它来创建可展开和收起的内容区域。
import 'package:flutter/material.dart';
import 'package:flutter_expand_view/flutter_expand_view.dart';

void main() {
  runApp(MyApp());
}

class MyApp extends StatelessWidget {
  @override
  Widget build(BuildContext context) {
    return MaterialApp(
      home: Scaffold(
        appBar: AppBar(title: Text('ExpandView Example')),
        body: SingleChildScrollView(
          child: Column(
            children: [
              ExpandView(
                header: Text('Header 1'),
                body: Text('This is the content of the first expandable view.'),
              ),
              ExpandView(
                header: Text('Header 2'),
                body: Text('This is the content of the second expandable view.'),
              ),
              ExpandView(
                header: Text('Header 3'),
                body: Text('This is the content of the third expandable view.'),
              ),
            ],
          ),
        ),
      ),
    );
  }
}
参数说明
header: 展开视图的标题部分,通常是一个Widget,比如Text或Row。body: 展开视图的内容部分,可以是任何Widget。isExpanded: 控制视图是否默认展开,默认为false。duration: 展开和收起的动画时长,默认为300ms。curve: 动画曲线,默认为Curves.easeInOut。onExpansionChanged: 展开状态改变时的回调函数。
示例:自定义展开视图
你可以通过自定义 header 和 body 来创建更复杂的展开视图。例如,使用 Icon 和 Text 来装饰头部,并在内容区域添加多个小部件。
ExpandView(
  header: Row(
    children: [
      Icon(Icons.info, color: Colors.blue),
      SizedBox(width: 10),
      Text('Custom Header'),
    ],
  ),
  body: Column(
    children: [
      Text('This is the first line of content.'),
      Text('This is the second line of content.'),
      ElevatedButton(
        onPressed: () {
          print('Button Pressed');
        },
        child: Text('Click Me'),
      ),
    ],
  ),
  isExpanded: true,
  duration: Duration(milliseconds: 500),
  curve: Curves.easeInOutBack,
  onExpansionChanged: (isExpanded) {
    print('Expansion state changed: $isExpanded');
  },
)