


Flutter视频引导插件video_walkthrough的使用
Flutter视频引导插件video_walkthrough的使用
video_walkthrough 是一个为 Android 和 iOS 设计的新 Flutter 包,它帮助开发者创建他们的应用程序的动画视频引导。
显示一些爱心并收藏仓库以支持项目
使用
示例
import 'package:flutter/material.dart';
import 'package:video_walkthrough/video_walkthrough.dart';
import 'package:video_walkthrough/walkthrough.dart';

void main() {
  runApp(MyApp());
}

class MyApp extends StatelessWidget {
  MyApp({Key? key}) : super(key: key);

  final List<Walkthrough> list = [
    Walkthrough(
      title: "标题 1",
      content: "内容 1",
      titleStyle: TextStyle(color: Colors.white),
      contentStyle: TextStyle(color: Colors.white),
    ),
    Walkthrough(
      title: "标题 2",
      content: "内容 2",
      titleStyle: TextStyle(color: Colors.white),
      contentStyle: TextStyle(color: Colors.white),
    ),
    Walkthrough(
      title: "标题 3",
      content: "内容 3",
      titleStyle: TextStyle(color: Colors.white),
      contentStyle: TextStyle(color: Colors.white),
    ),
  ];

  @override
  Widget build(BuildContext context) {
    return MaterialApp(
      debugShowCheckedModeBanner: false,
      home: WelcomeScreen(
        videoScale: 1.0,
        video: "assets/video.mp4",
        volume: 0.0,
        walkthroughList: list,
        pageRoute: MaterialPageRoute(builder: (context) => MyApp()),
      ),
    );
  }
}
代码说明
// 视频名称,将会在背景中显示
video: "assets/video.mp4",

// 视频音量
volume: 0.0,

// 引导列表,将会显示在屏幕上
walkthroughList: list,

// 导航到结束后的屏幕
pageRoute: MaterialPageRoute(builder: (context) => MyApp()),
如何使用
import 'package:flutter/material.dart';
import 'package:video_walkthrough/video_walkthrough.dart';
import 'package:video_walkthrough/walkthrough.dart';

class TestScreen extends StatelessWidget {
  TestScreen({Key? key}) : super(key: key);

  // 这里我们有一个 OnbordingScreen 的列表,我们想要拥有,每个 OnbordingScreen 都有一个 imagePath, title 和 desc。
  final List<Walkthrough> list = [
    Walkthrough(
      title: "标题 1",
      content: "内容 1",
    ),
    Walkthrough(
      title: "标题 2",
      content: "内容 2",
    ),
    Walkthrough(
      title: "标题 3",
      content: "内容 3",
    ),
    Walkthrough(
      title: "标题 4",
      content: "内容 4",
    ),
  ];

  @override
  Widget build(BuildContext context) {
    // 移除 AppBar 中的返回按钮是将 `automaticallyImplyLeading` 设置为 false
    // 这里我们需要传递列表和导航到下一页的路由。
    return VideoWalkThrough(
      video: "assets/video.mp4", // 字符串,视频将显示在背景中
      volume: 0, // 视频音量
      walkthroughList: list, // 内容列表
      pageRoute: MaterialPageRoute(builder: (context) => TestScreen()), // 导航到结束后的屏幕
    );
  }
}
动画视频示例
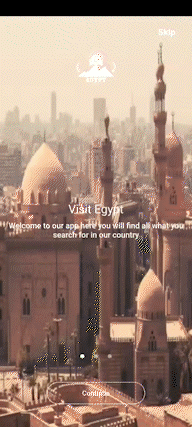
截图


添加依赖
在你的 pubspec.yaml 文件中添加以下依赖:
dependencies:
  flutter:
    sdk: flutter
  video_walkthrough:
更多关于Flutter视频引导插件video_walkthrough的使用的实战教程也可以访问 https://www.itying.com/category-92-b0.html
1 回复

更多关于Flutter视频引导插件video_walkthrough的使用的实战系列教程也可以访问 https://www.itying.com/category-92-b0.html
video_walkthrough 是一个用于在 Flutter 应用中展示视频引导的插件。它允许开发者轻松地在应用中集成视频教程或引导,帮助用户更好地理解应用的功能和操作步骤。
安装
首先,你需要在 pubspec.yaml 文件中添加 video_walkthrough 插件的依赖:
dependencies:
  flutter:
    sdk: flutter
  video_walkthrough: ^0.1.0  # 请检查最新版本
然后运行 flutter pub get 来安装依赖。
基本用法
-
导入包:
在你的 Dart 文件中导入
video_walkthrough包:import 'package:video_walkthrough/video_walkthrough.dart'; -
创建引导内容:
你可以通过
VideoWalkthrough组件来创建视频引导。你需要提供一个视频 URL 和引导步骤的描述。class MyVideoWalkthrough extends StatelessWidget { [@override](/user/override) Widget build(BuildContext context) { return VideoWalkthrough( videoUrl: 'https://example.com/video.mp4', // 视频URL steps: [ VideoWalkthroughStep( title: 'Step 1: Introduction', description: 'Welcome to the app! This is a quick guide to get you started.', startAt: Duration(seconds: 0), endAt: Duration(seconds: 10), ), VideoWalkthroughStep( title: 'Step 2: Navigation', description: 'Learn how to navigate through the app using the bottom menu.', startAt: Duration(seconds: 10), endAt: Duration(seconds: 20), ), // 添加更多步骤 ], onComplete: () { // 引导完成后的回调 print('Video walkthrough completed!'); }, ); } } -
在应用中使用:
你可以在应用的任何地方使用
MyVideoWalkthrough组件,例如在用户首次启动应用时展示引导。class MyApp extends StatelessWidget { [@override](/user/override) Widget build(BuildContext context) { return MaterialApp( home: Scaffold( appBar: AppBar( title: Text('Video Walkthrough Demo'), ), body: MyVideoWalkthrough(), ), ); } }
自定义选项
video_walkthrough 插件提供了一些自定义选项,允许你根据应用的需求调整引导的外观和行为。
- 自动播放:你可以设置视频是否自动播放。
- 控制按钮:可以自定义播放、暂停、跳过等按钮的样式和行为。
- 进度条:可以自定义视频进度条的样式。
- 步骤指示器:可以自定义步骤指示器的样式和位置。
示例代码
以下是一个完整的示例代码,展示了如何使用 video_walkthrough 插件:
import 'package:flutter/material.dart';
import 'package:video_walkthrough/video_walkthrough.dart';
void main() => runApp(MyApp());
class MyApp extends StatelessWidget {
  [@override](/user/override)
  Widget build(BuildContext context) {
    return MaterialApp(
      home: Scaffold(
        appBar: AppBar(
          title: Text('Video Walkthrough Demo'),
        ),
        body: MyVideoWalkthrough(),
      ),
    );
  }
}
class MyVideoWalkthrough extends StatelessWidget {
[@override](/user/override)
Widget build(BuildContext context) {
return VideoWalkthrough(
videoUrl: 'https://example.com/video.mp4',
steps: [
VideoWalkthroughStep(
title: 'Step 1: Introduction',
description: 'Welcome to the app! This is a quick guide to get you started.',
startAt: Duration(seconds: 0),
endAt: Duration(seconds: 10),
),
VideoWalkthroughStep(
title: 'Step 2: Navigation',
description: 'Learn how to navigate through the app using the bottom menu.',
startAt: Duration(seconds: 10),
endAt: Duration(seconds: 20),
),
],
onComplete: () {
print('Video walkthrough completed!');
},
);
}
}