Flutter WooCommerce集成插件flutter_wp_woocommerce的使用

Flutter WooCommerce集成插件flutter_wp_woocommerce的使用

woocommerce

Woocommerce SDK for Flutter。

Getting Started

pubspec.yaml文件中添加包并导入。

import 'package:flutter_wp_woocommerce/woocommerce.dart';

创建一个项目实例。

示例:

WooCommerce woocommerce = WooCommerce(
  baseUrl: yourBaseUrl,
  consumerKey: yourConsumerKey,
  consumerSecret: consumerSecret);

参数 [baseUrl] 是您的站点的基本URL。例如:http://me.com, https://me.comhttp://my.me.com

参数 [consumerKey] 是由WooCommerce提供的消费者密钥,例如:ck_12abc34n56j

参数 [consumerSecret] 是由WooCommerce提供的消费者密钥,例如:cs_1uab8h3s3op

可选参数 [apiPath] 是从您的基本URL到WooCommerce端点的直接URL。 示例:"/wp-json/wc/v3/"。 如果默认的Wordpress WooCommerce路径被更改了,这是有用的,否则默认适用。

可选参数 [isDebug] 告诉库是否应该打印调试日志。 /// 如果你在调试或开发中很有用。

Woo Commerce SDK的目标是让使用Flutter和Woo Commerce构建令人惊叹的电子商务应用程序尽可能简单, 希望它能提高您的工作效率。

Features

  • 用户认证。
  • 客户管理。
  • 购物车管理。
  • 订单管理。
  • 产品管理。
  • 分类。
  • 标签。
  • 变体。
  • 支持对返回列表的方法进行过滤。
  • 支持自定义端点。
  • 运费,运费方法,运费地点。
  • 支付。
  • 税,税类别。
  • 等等更多功能。

Notes

安装Jwt Token插件,以便能够登录。

Examples

将您的凭据放入示例应用中以快速演示。
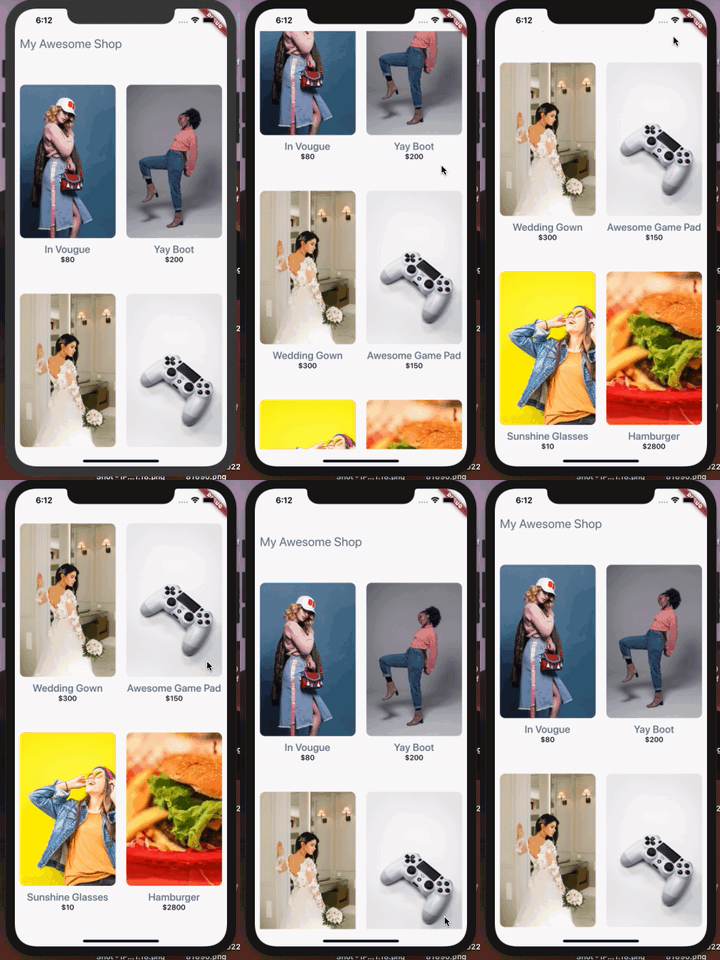
示例

Auth

// 登录 - 成功后返回访问令牌。

final token = woocommerce.authenticateViaJWT(username: username, password: password);

// 登录 - 签入用户并返回已登录用户的详细信息(WooUser对象)。

final customer = woocommerce.loginCustomer(username: username, password: password);

// 检查用户是否已登录。

bool isLoggedIn = await woocommerce.isCustomerLoggedIn();

// 获取已登录用户ID
int id = await fetchLoggedInUserId();

// 登出用户。
await logUserOut();

// 创建新的WooCommerce客户并返回WooCustomer对象。
WooCustomer user = WooCustomer(username: username, password: password, email: email);
final result = woocommerce.createCustomer();

Products

查看SDK引用此处以获取过滤选项。

// 获取所有产品 - 返回产品对象列表,默认每页10个。

final myProducts = await woocommerce.getProducts();

// 获取所有特色产品 - 返回特色产品列表,查看API引用以获取更多过滤选项。

final myFeaturedProducts = await woocommerce.getProducts(featured: true);

// 获取所有标记为类别ID '22' 的产品。

final mySpecificProduct = await getProducts(category: '22');

Cart

// 添加到购物车 - 返回添加的购物车项对象(接受数量,产品ID和要添加的产品变体的ID列表)

final myCart = await woocommerce.addToMyCart(quantity: 2, id: 17);

// 创建订单。 - 返回创建的订单对象(接受一个orderPayload对象)。

OrderPayload orderPayload = OrderPayload(customerId: customerId, setPaid=true);
final order = await woocommerce.CreateOrder(orderPayload);

Custom Requests

自定义请求 - 向WooCommerce API发送自定义身份验证请求。

final response = await woocommerce.put(endpoint, data);

final anotherResponse = await woocommerce.get(endpoint);

更多关于Flutter WooCommerce集成插件flutter_wp_woocommerce的使用的实战教程也可以访问 https://www.itying.com/category-92-b0.html

1 回复

更多关于Flutter WooCommerce集成插件flutter_wp_woocommerce的使用的实战系列教程也可以访问 https://www.itying.com/category-92-b0.html


要在Flutter应用中集成WooCommerce,你可以使用 flutter_wp_woocommerce 插件。这个插件提供了与WooCommerce REST API的交互功能,允许你在Flutter应用中执行各种操作,如获取产品、创建订单、管理客户等。

以下是使用 flutter_wp_woocommerce 插件的基本步骤:

1. 安装插件

首先,你需要在 pubspec.yaml 文件中添加 flutter_wp_woocommerce 插件的依赖:

dependencies:
  flutter:
    sdk: flutter
  flutter_wp_woocommerce: ^1.0.0  # 请使用最新版本

然后,运行 flutter pub get 来安装插件。

2. 初始化 WooCommerce 客户端

在Dart代码中,你需要初始化 WooCommerce 客户端。你需要提供WooCommerce商店的URL、消费者密钥和消费者密钥密码。

import 'package:flutter_wp_woocommerce/flutter_wp_woocommerce.dart';

void main() async {
  WooCommerce wooCommerce = WooCommerce(
    baseUrl: 'https://your-store.com', // 你的WooCommerce商店的URL
    consumerKey: 'ck_your_consumer_key', // 你的消费者密钥
    consumerSecret: 'cs_your_consumer_secret', // 你的消费者密钥密码
    isDebug: true, // 是否启用调试模式
  );

  runApp(MyApp(wooCommerce: wooCommerce));
}

class MyApp extends StatelessWidget {
  final WooCommerce wooCommerce;

  MyApp({required this.wooCommerce});

  @override
  Widget build(BuildContext context) {
    return MaterialApp(
      title: 'WooCommerce Flutter',
      home: MyHomePage(wooCommerce: wooCommerce),
    );
  }
}

class MyHomePage extends StatefulWidget {
  final WooCommerce wooCommerce;

  MyHomePage({required this.wooCommerce});

  @override
  _MyHomePageState createState() => _MyHomePageState();
}

class _MyHomePageState extends State<MyHomePage> {
  List<Product> products = [];

  @override
  void initState() {
    super.initState();
    fetchProducts();
  }

  Future<void> fetchProducts() async {
    try {
      List<Product> fetchedProducts = await widget.wooCommerce.getProducts();
      setState(() {
        products = fetchedProducts;
      });
    } catch (e) {
      print('Error fetching products: $e');
    }
  }

  @override
  Widget build(BuildContext context) {
    return Scaffold(
      appBar: AppBar(
        title: Text('WooCommerce Products'),
      ),
      body: ListView.builder(
        itemCount: products.length,
        itemBuilder: (context, index) {
          Product product = products[index];
          return ListTile(
            title: Text(product.name ?? 'No Name'),
            subtitle: Text(product.price ?? 'No Price'),
          );
        },
      ),
    );
  }
}

3. 使用 WooCommerce API

flutter_wp_woocommerce 插件提供了许多方法来与WooCommerce API进行交互。以下是一些常见的操作示例:

获取产品列表

List<Product> products = await wooCommerce.getProducts();

获取单个产品

Product product = await wooCommerce.getProductById(123);

创建订单

Order order = Order(
  customerId: 1,
  lineItems: [
    OrderLineItem(
      productId: 123,
      quantity: 2,
    ),
  ],
);

Order createdOrder = await wooCommerce.createOrder(order);

获取客户信息

Customer customer = await wooCommerce.getCustomerById(1);

创建客户

Customer newCustomer = Customer(
  email: 'newcustomer@example.com',
  firstName: 'John',
  lastName: 'Doe',
);

Customer createdCustomer = await wooCommerce.createCustomer(newCustomer);

4. 处理错误

在使用API时,可能会遇到各种错误,如网络错误、认证错误等。你可以使用 try-catch 块来捕获这些错误并进行处理。

try {
  List<Product> products = await wooCommerce.getProducts();
} catch (e) {
  print('Error fetching products: $e');
}

5. 调试

在开发过程中,你可以通过设置 isDebug: true 来启用调试模式,这将打印出API请求和响应的详细信息。

WooCommerce wooCommerce = WooCommerce(
  baseUrl: 'https://your-store.com',
  consumerKey: 'ck_your_consumer_key',
  consumerSecret: 'cs_your_consumer_secret',
  isDebug: true,
);
回到顶部