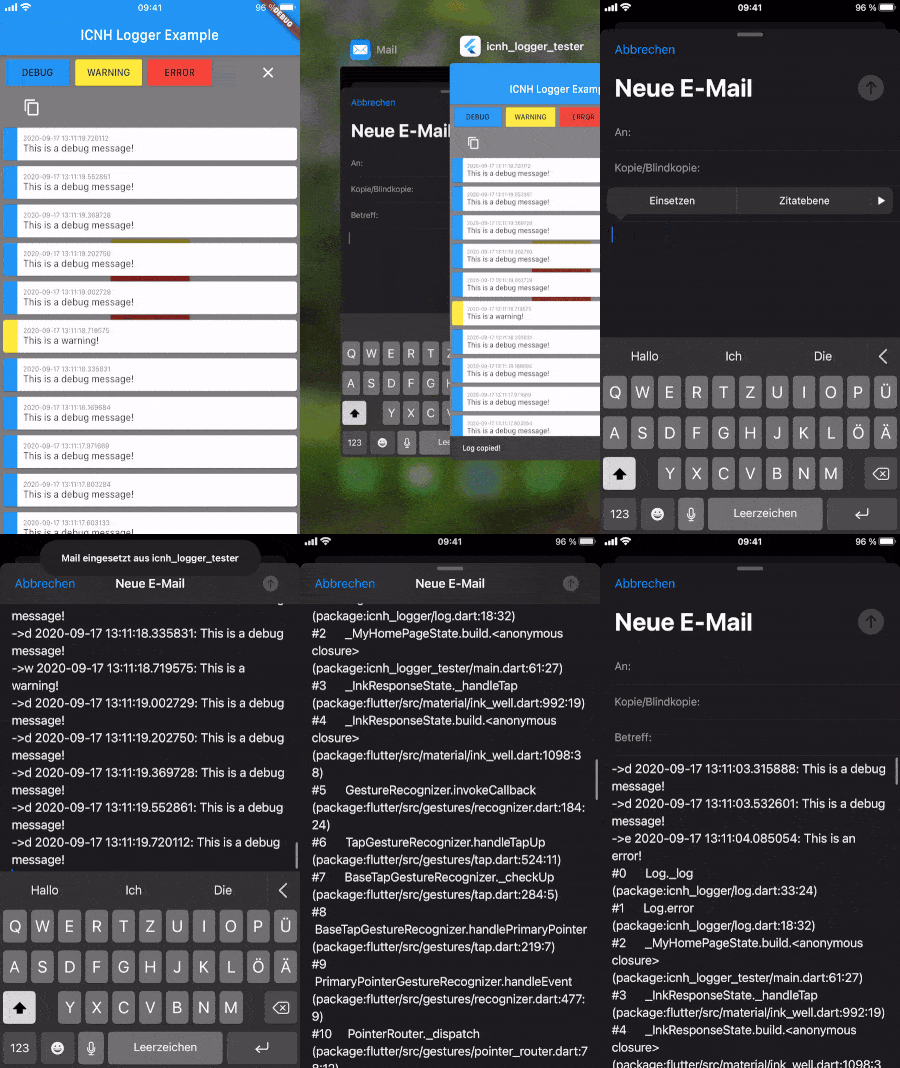
Flutter日志记录插件tiny_logger的使用
Flutter日志记录插件tiny_logger的使用
一个用于Flutter项目的日志记录工具。
使用方法
要记录一条消息,你可以这样做:
import 'package:tiny_logger/tiny_logger.dart';

log.debug('...');
log.warn('...');
log.error('...');
最好在你的analysis_options.yaml文件中配合使用avoid_print规则:
linter:
  rules:
    - avoid_print
要显示内置日志查看器,可以使用LogView组件:
bool _showLog = false;

[@override](/user/override)
Widget build(BuildContext context) {
  return Scaffold(
    appBar: AppBar(title: Text('Tiny Logger Example')),
    body: Stack(
      children: [
        Center(child: Text('Hello World!')),

        if (_showLog)
          LogView(
            onClose: () => setState(() => _showLog = false),
          ),
      ],
    ),
  );
}
示例


示例代码
import 'package:flutter/material.dart';
import 'package:tiny_logger/tiny_logger.dart';

void main() {
  // 捕获Flutter错误并记录到日志
  FlutterError.onError = (details) {
    log.error(details);
    FlutterError.dumpErrorToConsole(details);
  };
  runApp(const MyApp());
}

class MyApp extends StatelessWidget {
  const MyApp({Key key}) : super(key: key);

  [@override](/user/override)
  Widget build(BuildContext context) {
    return MaterialApp(
      title: 'Tiny Logger Demo',
      theme: ThemeData(
        primarySwatch: Colors.blue,
        visualDensity: VisualDensity.adaptivePlatformDensity,
      ),
      home: const MyHomePage(),
    );
  }
}

class MyHomePage extends StatefulWidget {
  const MyHomePage({Key key}) : super(key: key);

  [@override](/user/override)
  State<MyHomePage> createState() => _MyHomePageState();
}

class _MyHomePageState extends State<MyHomePage> {
  bool _showLog = false;

  [@override](/user/override)
  Widget build(BuildContext context) {
    return Scaffold(
      appBar: AppBar(
        title: const Text('Tiny Logger Example'),
      ),
      body: Stack(
        children: [
          Center(
            child: IntrinsicWidth(
              child: Column(
                crossAxisAlignment: CrossAxisAlignment.stretch,
                mainAxisSize: MainAxisSize.min,
                children: [
                  MaterialButton(
                    color: Colors.blue,
                    onPressed: () {
                      // 记录调试信息
                      log.debug('This is a debug message!');
                    },
                    child: const Text('Log Debug'),
                  ),
                  MaterialButton(
                    color: Colors.yellow,
                    onPressed: () {
                      // 记录警告信息
                      log.warn('This is a warning!');
                    },
                    child: const Text('Log Warning'),
                  ),
                  MaterialButton(
                    color: Colors.red,
                    onPressed: () {
                      // 记录错误信息
                      log.error('This is an error!');
                    },
                    child: const Text('Log Error'),
                  ),
                  MaterialButton(
                    color: Colors.red,
                    onPressed: () {
                      // 抛出异常
                      throw UnimplementedError('Example error');
                    },
                    child: const Text('Throw Error'),
                  ),
                  const SizedBox(height: 20),
                  MaterialButton(
                    color: Colors.red,
                    onPressed: () => setState(() => _showLog = true),
                    child: const Text('SHOW LOG'),
                  ),
                ],
              ),
            ),
          ),
          // 显示日志视图
          if (_showLog)
            LogView(
              onClose: () => setState(() => _showLog = false),
            ),
        ],
      ),
    );
  }
}
更多关于Flutter日志记录插件tiny_logger的使用的实战教程也可以访问 https://www.itying.com/category-92-b0.html
更多关于Flutter日志记录插件tiny_logger的使用的实战系列教程也可以访问 https://www.itying.com/category-92-b0.html
tiny_logger 是一个轻量级的日志记录插件,适用于 Flutter 应用程序。它可以帮助开发者在应用程序中轻松地记录日志,并根据日志级别进行过滤和管理。以下是如何在 Flutter 项目中使用 tiny_logger 插件的步骤:
1. 添加依赖
首先,你需要在 pubspec.yaml 文件中添加 tiny_logger 依赖:
dependencies:
  flutter:
    sdk: flutter
  tiny_logger: ^1.0.0  # 请使用最新版本
然后运行 flutter pub get 来获取依赖。
2. 导入包
在你的 Dart 文件中导入 tiny_logger 包:
import 'package:tiny_logger/tiny_logger.dart';
3. 初始化日志记录器
你可以通过 LoggerManager 来初始化和管理日志记录器。通常情况下,你可以在应用程序启动时初始化日志记录器。
void main() {
  LoggerManager.initialize(
    minLevel: LogLevel.debug,  // 设置最小日志级别
    printTime: true,           // 是否打印时间
    printEmoji: true,          // 是否打印表情符号
  );

  runApp(MyApp());
}
4. 记录日志
你可以使用 LoggerManager 提供的 log 方法来记录日志。日志级别包括 debug, info, warning, error, 和 fatal。
class MyApp extends StatelessWidget {
  @override
  Widget build(BuildContext context) {
    LoggerManager.log(LogLevel.debug, "This is a debug message");
    LoggerManager.log(LogLevel.info, "This is an info message");
    LoggerManager.log(LogLevel.warning, "This is a warning message");
    LoggerManager.log(LogLevel.error, "This is an error message");
    LoggerManager.log(LogLevel.fatal, "This is a fatal message");

    return MaterialApp(
      title: 'Flutter Demo',
      theme: ThemeData(
        primarySwatch: Colors.blue,
      ),
      home: MyHomePage(),
    );
  }
}
5. 自定义日志输出
你可以通过 LoggerManager 的 setLoggerOutput 方法来自定义日志输出方式。例如,将日志输出到文件或发送到远程服务器。
void main() {
  LoggerManager.initialize(
    minLevel: LogLevel.debug,
    printTime: true,
    printEmoji: true,
  );

  LoggerManager.setLoggerOutput((LogLevel level, String message) {
    // 自定义日志输出
    print("Custom Output - $level: $message");
  });

  runApp(MyApp());
}
6. 日志级别过滤
在初始化 LoggerManager 时,你可以设置 minLevel 来过滤日志。只有等于或高于该级别的日志才会被记录和输出。
LoggerManager.initialize(
  minLevel: LogLevel.warning,  // 只记录 warning 及以上级别的日志
  printTime: true,
  printEmoji: true,
);
7. 关闭日志记录
你可以通过 LoggerManager 的 disableLogging 方法来关闭日志记录。
LoggerManager.disableLogging();
8. 重新启用日志记录
如果你之前关闭了日志记录,可以通过 enableLogging 方法来重新启用。
LoggerManager.enableLogging();
9. 示例代码
以下是一个完整的示例代码,展示了如何使用 tiny_logger 插件:
import 'package:flutter/material.dart';
import 'package:tiny_logger/tiny_logger.dart';

void main() {
  LoggerManager.initialize(
    minLevel: LogLevel.debug,
    printTime: true,
    printEmoji: true,
  );

  runApp(MyApp());
}

class MyApp extends StatelessWidget {
  @override
  Widget build(BuildContext context) {
    LoggerManager.log(LogLevel.debug, "This is a debug message");
    LoggerManager.log(LogLevel.info, "This is an info message");
    LoggerManager.log(LogLevel.warning, "This is a warning message");
    LoggerManager.log(LogLevel.error, "This is an error message");
    LoggerManager.log(LogLevel.fatal, "This is a fatal message");

    return MaterialApp(
      title: 'Flutter Demo',
      theme: ThemeData(
        primarySwatch: Colors.blue,
      ),
      home: MyHomePage(),
    );
  }
}

class MyHomePage extends StatelessWidget {
  @override
  Widget build(BuildContext context) {
    return Scaffold(
      appBar: AppBar(
        title: Text("Tiny Logger Example"),
      ),
      body: Center(
        child: Text("Check the console for logs."),
      ),
    );
  }
}
10. 输出示例
在控制台中,你可能会看到类似以下的输出:
🕒 [2023-10-05 12:00:00] 🐛 DEBUG: This is a debug message
🕒 [2023-10-05 12:00:00] ℹ️ INFO: This is an info message
🕒 [2023-10-05 12:00:00] ⚠️ WARNING: This is a warning message
🕒 [2023-10-05 12:00:00] ❌ ERROR: This is an error message
🕒 [2023-10-05 12:00:00] 💀 FATAL: This is a fatal message


