


Flutter炫酷卡片效果插件fancy_card的使用
Flutter炫酷卡片效果插件fancy_card的使用
在这里,您可以使用fancycard小部件来增强您的Flutter设计:
特性
- 精美的设计
- 灵活的设计
开始使用
- 在
pubspec.yaml文件中添加插件的最新版本(并运行dart pub get):
dependencies:
  fancy_card: ^0.0.3
- 导入插件并在您的Flutter应用中使用它:
import 'package:fancy_card/fancy_card.dart';
必填字段
- 您必须传递一张图片
- 您必须传递一个标题
使用示例
以下是一个简单的示例,展示了如何在Flutter应用中使用FancyCard。
import 'package:flutter/material.dart';
class Home extends StatelessWidget {
const Home({Key? key}) : super(key: key);
[@override](/user/override)
Widget build(BuildContext context) {
return Scaffold(
appBar: AppBar(
title: const Text("Fancy Card"),
centerTitle: true,
),
body: Column(
children: [
// 使用FancyCard展示内容
FancyCard(
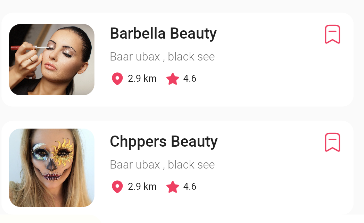
title: "Barbella Beauty", // 卡片标题
image: Image.network(
"https://blog.logrocket.com/wp-content/uploads/2022/02/Best-IDEs-Flutter-2022.png", // 图片网络地址
fit: BoxFit.cover, // 图片填充方式
),
)
],
),
);
}
}
更多关于Flutter炫酷卡片效果插件fancy_card的使用的实战教程也可以访问 https://www.itying.com/category-92-b0.html
1 回复

更多关于Flutter炫酷卡片效果插件fancy_card的使用的实战系列教程也可以访问 https://www.itying.com/category-92-b0.html
fancy_card 是一个 Flutter 插件,用于创建具有炫酷动画效果的卡片。这个插件可以帮助你轻松实现各种卡片动画效果,如翻转、缩放、旋转等,从而提升应用的用户体验。
以下是如何使用 fancy_card 插件的基本步骤:
1. 添加依赖
首先,你需要在 pubspec.yaml 文件中添加 fancy_card 插件的依赖:
dependencies:
  flutter:
    sdk: flutter
  fancy_card: ^最新版本号
你可以通过 pub.dev 查找最新的版本号。
2. 导入包
在需要使用 fancy_card 的 Dart 文件中导入包:
import 'package:fancy_card/fancy_card.dart';
3. 使用 FancyCard 组件
FancyCard 组件可以像普通的 Card 组件一样使用,但它支持更多的动画效果。以下是一个简单的示例:
import 'package:flutter/material.dart';
import 'package:fancy_card/fancy_card.dart';

void main() {
  runApp(MyApp());
}

class MyApp extends StatelessWidget {
  @override
  Widget build(BuildContext context) {
    return MaterialApp(
      home: Scaffold(
        appBar: AppBar(
          title: Text('Fancy Card Example'),
        ),
        body: Center(
          child: FancyCard(
            onTap: () {
              print('Card tapped!');
            },
            child: Container(
              padding: EdgeInsets.all(16.0),
              child: Column(
                mainAxisSize: MainAxisSize.min,
                children: [
                  Icon(Icons.star, size: 50.0, color: Colors.yellow),
                  SizedBox(height: 10.0),
                  Text(
                    'Fancy Card',
                    style: TextStyle(fontSize: 24.0, fontWeight: FontWeight.bold),
                  ),
                  SizedBox(height: 10.0),
                  Text(
                    'This is a fancy card with cool animations!',
                    style: TextStyle(fontSize: 16.0),
                  ),
                ],
              ),
            ),
          ),
        ),
      ),
    );
  }
}
4. 自定义动画效果
FancyCard 提供了多种动画效果,你可以通过设置不同的参数来自定义卡片的动画行为。例如:
flipDuration: 卡片翻转的持续时间。scaleDuration: 卡片缩放的持续时间。rotateDuration: 卡片旋转的持续时间。flipCurve: 卡片翻转的动画曲线。scaleCurve: 卡片缩放的动画曲线。rotateCurve: 卡片旋转的动画曲线。
以下是一个自定义动画效果的示例:
FancyCard(
  flipDuration: Duration(milliseconds: 800),
  scaleDuration: Duration(milliseconds: 500),
  rotateDuration: Duration(milliseconds: 1000),
  flipCurve: Curves.easeInOut,
  scaleCurve: Curves.easeIn,
  rotateCurve: Curves.elasticOut,
  onTap: () {
    print('Card tapped!');
  },
  child: Container(
    padding: EdgeInsets.all(16.0),
    child: Column(
      mainAxisSize: MainAxisSize.min,
      children: [
        Icon(Icons.star, size: 50.0, color: Colors.yellow),
        SizedBox(height: 10.0),
        Text(
          'Custom Animation',
          style: TextStyle(fontSize: 24.0, fontWeight: FontWeight.bold),
        ),
        SizedBox(height: 10.0),
        Text(
          'This card has custom animation settings!',
          style: TextStyle(fontSize: 16.0),
        ),
      ],
    ),
  ),
),