


Flutter支付集成插件t_chain_payment_sdk的使用
Flutter支付集成插件t_chain_payment_sdk的使用
简介
TChain Payment SDK 是一个用于在 Flutter 应用中集成支付功能的插件。它支持两种主要的应用场景:商户应用(Merchant App)和钱包应用(Wallet App)。以下是该插件的使用说明。
开始使用
注册项目
在开始使用 TChain Payment SDK 之前,您需要在 Tokoin 开发者页面 注册您的项目以获取 api-key,该密钥将在 SDK 中使用。
使用流程
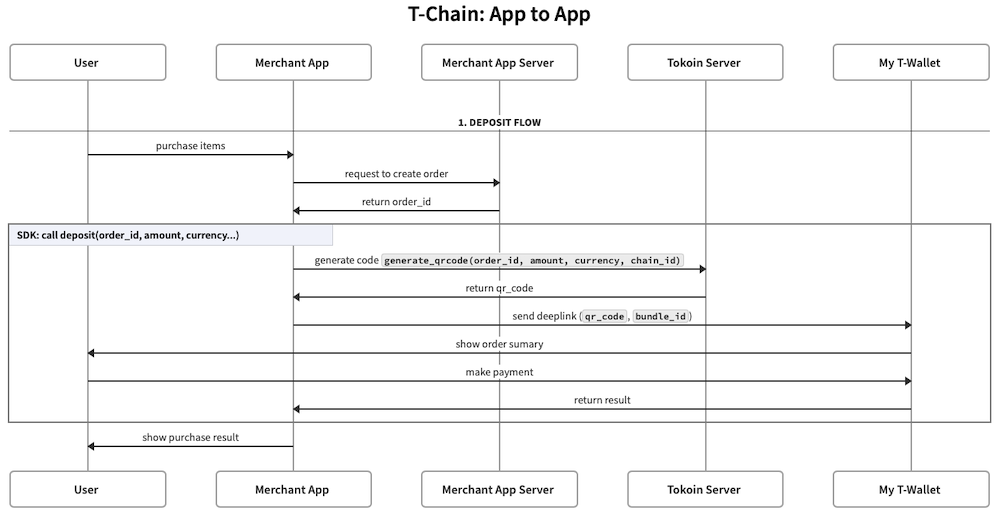
以下是两个主要的使用场景及其对应的流程图:
商户应用到钱包应用的支付流程
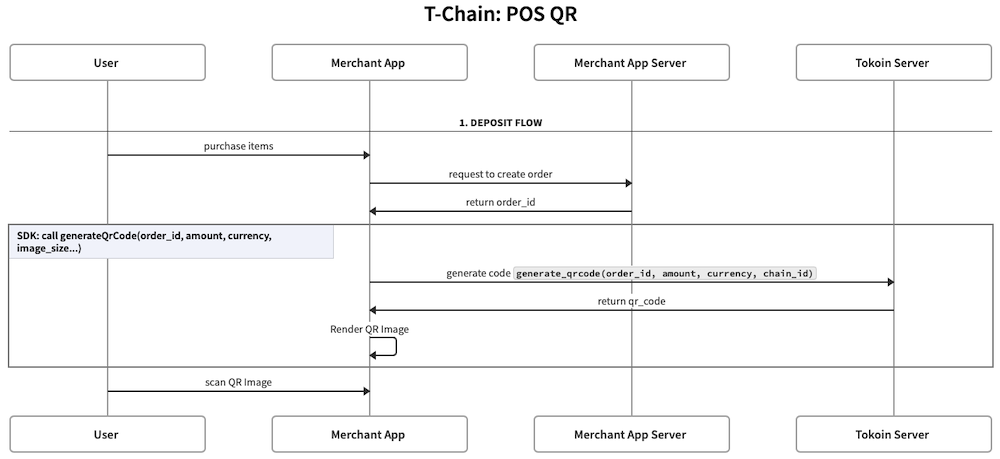
POS 账单扫码支付流程
集成步骤
商户应用集成
Android 设置
在 AndroidManifest.xml 文件中添加以下配置:
<activity
    ...
    android:launchMode="singleTask"
    ...>
    <intent-filter>
        <action android:name="android.intent.action.VIEW" />
        <category android:name="android.intent.category.DEFAULT" />
        <category android:name="android.intent.category.BROWSABLE" />
        <data android:scheme="merchant.${applicationId}" android:host="app" />
    </intent-filter>
</activity>
iOS 设置
在 Info.plist 文件中添加以下配置:
<key>CFBundleURLTypes</key>
<array>
    <dict>
        <key>CFBundleTypeRole</key>
        <string>Editor</string>
        <key>CFBundleURLName</key>
        <string>Payment Scheme Callback</string>
        <key>CFBundleURLSchemes</key>
        <array>
            <string>merchant.$(PRODUCT_BUNDLE_IDENTIFIER)</string>
        </array>
    </dict>
</array>
<key>LSApplicationQueriesSchemes</key>
<array>
    <string>$(WALLET_SCHEME)</string>
    ...
</array>
注意: WALLET_SCHEME 是钱包应用的查询方案。例如,与第一个集成的 My-T 钱包应用交互时,可以使用查询方案 mtwallet。
使用方法
Step 1: 配置 TChainPaymentSDK
TChainPaymentSDK.shared.configMerchantApp(
  apiKey: Constants.apiKey,
  bundleId: Constants.bundleId,
  env: TChainPaymentEnv.dev, // 默认为 TChainPaymentEnv.prod
  delegate: (TChainPaymentResult result) {
      // 处理支付结果(成功、取消、失败等)
  },
);
Step 2: 执行支付操作
final TChainPaymentResult result = await TChainPaymentSDK.shared.deposit(
  walletScheme: WALLET_SCHEME,
  notes: "购买商品",
  amount: 100.0,
  currency: TChainPaymentCurrency.idr,
);

// 处理支付状态
if (result.status == TChainPaymentStatus.success) {
  print("支付成功");
} else if (result.status == TChainPaymentStatus.cancelled) {
  print("支付已取消");
} else if (result.status == TChainPaymentStatus.failed) {
  print("支付失败");
} else if (result.status == TChainPaymentStatus.proceeding) {
  print("支付处理中...");
} else if (result.status == TChainPaymentStatus.waiting) {
  print("等待用户交互...");
} else if (result.status == TChainPaymentStatus.error) {
  print("发生错误: ${result.errorMessage}");
}
Step 3: 生成二维码(POS 支付场景)
final result = await TChainPaymentSDK.shared.generateQrCode(
  walletScheme: WALLET_SCHEME,
  notes: "购买商品",
  amount: 100.0,
  currency: TChainPaymentCurrency.idr,
  imageSize: 200,
);

// 保存或显示二维码
钱包应用集成
Android 设置
在 AndroidManifest.xml 文件中添加以下配置:
<intent-filter>
    <action android:name="android.intent.action.VIEW" />
    <category android:name="android.intent.category.DEFAULT" />
    <category android:name="android.intent.category.BROWSABLE" />
    <!-- 接受以 YOUR_SCHEME://YOUR_HOST 开头的 URI -->
    <data android:scheme="${WALLET_SCHEME}" android:host="app" />
</intent-filter>
iOS 设置
在 Info.plist 文件中添加以下配置:
<key>CFBundleURLTypes</key>
<array>
    <dict>
        <key>CFBundleTypeRole</key>
        <string>Editor</string>
        <key>CFBundleURLName</key>
        <string>Payment Scheme Callback</string>
        <key>CFBundleURLSchemes</key>
        <array>
            <string>$(WALLET_SCHEME)</string>
        </array>
    </dict>
</array>
使用方法
Step 1: 配置 TChainPaymentSDK
TChainPaymentSDK.shared.configWallet(
  apiKey: Constants.apiKey,
  env: TChainPaymentEnv.dev,
  onDeeplinkReceived: (uri) {
    // 处理二维码扫描逻辑
  },
);
Step 2: 打开支付界面
// 从深度链接中获取 QR 码和 Bundle ID
TChainPaymentSDK.shared.startPaymentWithQrCode(
  context,
  account: Account.fromPrivateKeyHex(hex: Constants.privateKeyHex),
  qrCode: qrCode,
  bundleId: bundleId,
);
Step 3: 实现扫码功能
如果您希望在钱包应用中实现扫码功能,可以使用以下工具函数:
// 获取商户信息
final merchantInfo = await TChainPaymentSDK.shared.getMerchantInfo(qrCode: qrCode);

// 打开支付界面
TChainPaymentSDK.shared.startPaymentWithMerchantInfo(
  context,
  account: Account.fromPrivateKeyHex(hex: Constants.privateKeyHex),
  merchantInfo: merchantInfo,
);
注意事项
- 在完成 SDK 配置后,SDK 会自动监听传入链接。如果不想接收传入链接,请调用
TChainPaymentSDK.shared.close()关闭 SDK。 - 请确保在
configMerchantApp或configWallet方法中正确配置参数,避免出现异常。
完整示例
以下是一个完整的示例代码,展示如何在 Flutter 中集成 TChain Payment SDK:
import 'package:flutter/material.dart';
import 'package:flutter_bloc/flutter_bloc.dart';
import 'package:t_chain_payment_sdk/t_chain_payment_sdk.dart';

void main() async {
  WidgetsFlutterBinding.ensureInitialized();
  runApp(MyApp());
}

class MyApp extends StatelessWidget {
  [@override](/user/override)
  Widget build(BuildContext context) {
    return MaterialApp(
      title: 'T-Chain Payment SDK Demo',
      home: PaymentScreen(),
    );
  }
}

class PaymentScreen extends StatefulWidget {
  [@override](/user/override)
  _PaymentScreenState createState() => _PaymentScreenState();
}

class _PaymentScreenState extends State<PaymentScreen> {
  final String WALLET_SCHEME = "mtwallet";

  [@override](/user/override)
  void initState() {
    super.initState();
    // 配置商户应用
    TChainPaymentSDK.shared.configMerchantApp(
      apiKey: "your_api_key_here",
      bundleId: "com.example.merchantapp",
      env: TChainPaymentEnv.dev,
      delegate: (TChainPaymentResult result) {
        if (result.status == TChainPaymentStatus.success) {
          print("支付成功");
        } else if (result.status == TChainPaymentStatus.cancelled) {
          print("支付已取消");
        } else if (result.status == TChainPaymentStatus.failed) {
          print("支付失败");
        }
      },
    );
  }

  void _startPayment() async {
    final TChainPaymentResult result = await TChainPaymentSDK.shared.deposit(
      walletScheme: WALLET_SCHEME,
      notes: "购买商品",
      amount: 100.0,
      currency: TChainPaymentCurrency.idr,
    );

    if (result.status == TChainPaymentStatus.success) {
      print("支付成功");
    } else if (result.status == TChainPaymentStatus.cancelled) {
      print("支付已取消");
    } else if (result.status == TChainPaymentStatus.failed) {
      print("支付失败");
    }
  }

  [@override](/user/override)
  Widget build(BuildContext context) {
    return Scaffold(
      appBar: AppBar(title: Text("T-Chain Payment SDK Demo")),
      body: Center(
        child: ElevatedButton(
          onPressed: _startPayment,
          child: Text("开始支付"),
        ),
      ),
    );
  }
}
更多关于Flutter支付集成插件t_chain_payment_sdk的使用的实战教程也可以访问 https://www.itying.com/category-92-b0.html

更多关于Flutter支付集成插件t_chain_payment_sdk的使用的实战系列教程也可以访问 https://www.itying.com/category-92-b0.html
t_chain_payment_sdk 是一个用于 Flutter 应用的支付集成插件,通常用于处理区块链支付或特定的支付网关。以下是如何在 Flutter 项目中使用 t_chain_payment_sdk 的基本步骤:
1. 添加依赖
首先,你需要在 pubspec.yaml 文件中添加 t_chain_payment_sdk 的依赖。
dependencies:
  flutter:
    sdk: flutter
  t_chain_payment_sdk: ^1.0.0  # 请根据实际情况填写版本号
然后运行 flutter pub get 来获取依赖。
2. 初始化 SDK
在应用启动时,通常需要初始化支付 SDK。你可以在 main.dart 文件中进行初始化。
import 'package:flutter/material.dart';
import 'package:t_chain_payment_sdk/t_chain_payment_sdk.dart';

void main() async {
  WidgetsFlutterBinding.ensureInitialized();

  // 初始化支付 SDK
  await TChainPaymentSdk.initialize(
    apiKey: 'your_api_key',  // 替换为你的 API Key
    environment: Environment.sandbox,  // 使用沙盒环境或生产环境
  );

  runApp(MyApp());
}

class MyApp extends StatelessWidget {
  @override
  Widget build(BuildContext context) {
    return MaterialApp(
      title: 'Flutter Payment Demo',
      home: PaymentScreen(),
    );
  }
}
3. 创建支付页面
接下来,创建一个支付页面,用户可以在该页面发起支付请求。
import 'package:flutter/material.dart';
import 'package:t_chain_payment_sdk/t_chain_payment_sdk.dart';

class PaymentScreen extends StatelessWidget {
  Future<void> _makePayment() async {
    try {
      // 创建支付请求
      PaymentRequest paymentRequest = PaymentRequest(
        amount: '100',  // 支付金额
        currency: 'USD',  // 货币类型
        description: 'Test Payment',  // 支付描述
        orderId: 'order_123',  // 订单 ID
      );

      // 发起支付
      PaymentResponse response = await TChainPaymentSdk.makePayment(paymentRequest);

      // 处理支付结果
      if (response.status == PaymentStatus.success) {
        print('Payment successful: ${response.transactionId}');
      } else {
        print('Payment failed: ${response.errorMessage}');
      }
    } catch (e) {
      print('Error during payment: $e');
    }
  }

  @override
  Widget build(BuildContext context) {
    return Scaffold(
      appBar: AppBar(
        title: Text('Make Payment'),
      ),
      body: Center(
        child: ElevatedButton(
          onPressed: _makePayment,
          child: Text('Pay Now'),
        ),
      ),
    );
  }
}
4. 处理支付回调
在某些情况下,你可能需要处理支付回调,例如处理异步支付结果。你可以通过监听回调事件来实现。
TChainPaymentSdk.setPaymentCallback((PaymentResponse response) {
  if (response.status == PaymentStatus.success) {
    print('Payment successful: ${response.transactionId}');
  } else {
    print('Payment failed: ${response.errorMessage}');
  }
});
5. 其他功能
t_chain_payment_sdk 可能还提供了其他功能,例如查询交易状态、退款等。你可以根据 SDK 的文档来使用这些功能。
6. 调试与发布
在开发和调试阶段,建议使用沙盒环境进行测试。在发布应用时,确保将环境切换到生产环境。
await TChainPaymentSdk.initialize(
  apiKey: 'your_production_api_key',
  environment: Environment.production,
);