


Flutter集成测试预览插件integration_test_preview的使用
Flutter集成测试预览插件integration_test_preview的使用
概述
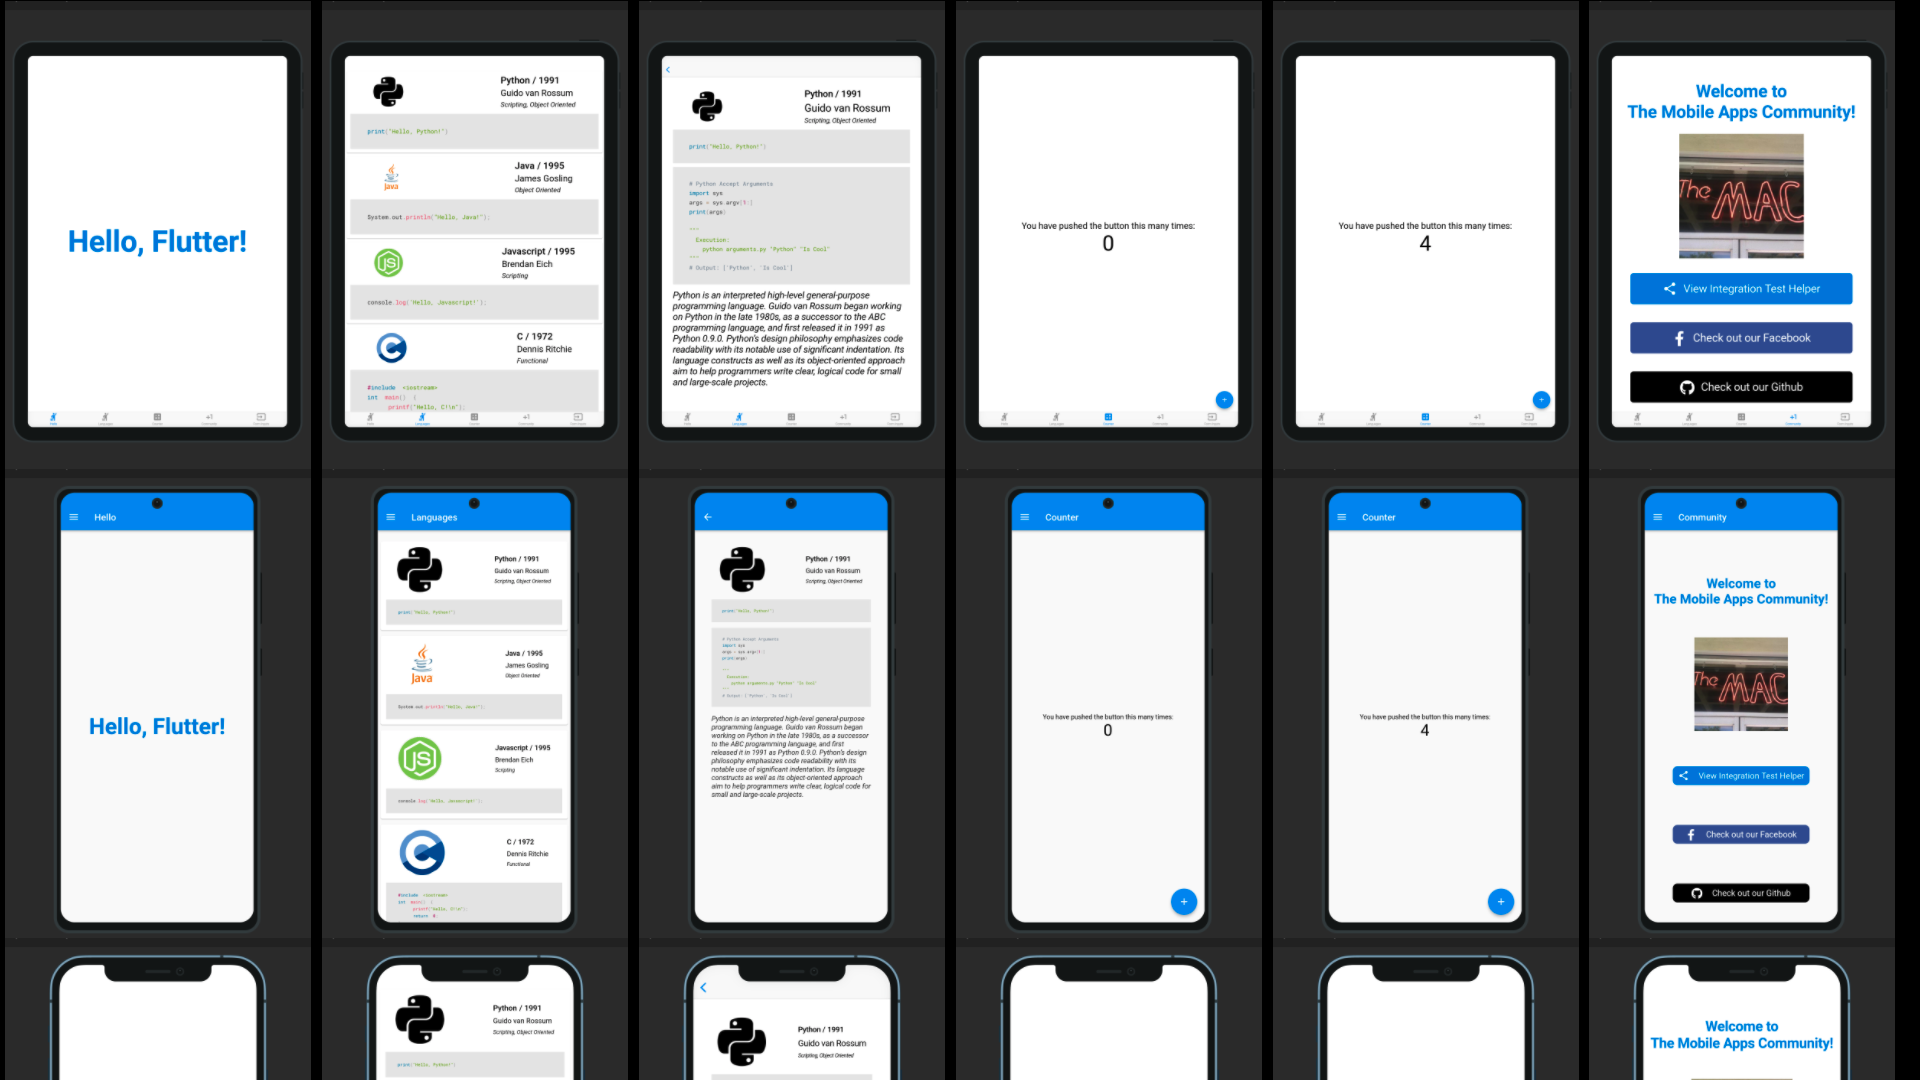
Integration Test Preview 是一个基于 integration_test_helper 和 device_preview 的 Flutter 包,用于快速部署端到端(e2e)测试。它允许用户针对不同的设备进行测试,并生成特定设备尺寸的截图,以供应用商店审核使用。此外,它还支持通过组合多个设备的屏幕截图生成一个交互式的截图画廊。
特性
Integration Test Preview 示例
通过继承 IntegrationTestPreview 子类,可以轻松测试多个屏幕类型的端到端功能。
import 'package:flutter_test/flutter_test.dart';
import 'package:integration_test_preview/integration_test_binding.dart';
import 'package:device_frame/src/devices/devices.dart';
import 'package:device_frame/src/info/info.dart';

import 'package:example/main.dart' as app;
import 'app_feature_groups.dart';

void main() async {
    const minutesPerDevice = 3;
    final List<DeviceInfo> testDevices = [
        Devices.ios.iPhone12,
        Devices.android.samsungGalaxyNote20,
        Devices.ios.iPadPro11Inches,
    ];
    final totalExpectedDuration = Duration(minutes: testDevices.length * minutesPerDevice);
    final binding = IntegrationTestPreviewBinding.ensureInitialized();

    testWidgets('Testing end to end multi-screen integration', (WidgetTester tester) async {
        final main = app.setupMainWidget();
        final integrationTestGroups = ScreenIntegrationTestGroups(binding);
        await integrationTestGroups.initializeDevices(testDevices, state: ScreenshotState.RESPONSIVE);
        await integrationTestGroups.initializeTests(tester, main);
    }, timeout: Timeout(totalExpectedDuration));
}
查看截图结果
生成的截图默认保存在 screenshots 目录下。可以通过自定义 integrationDriver 来生成一个交互式的 HTML 页面。
import 'dart:io';
import 'package:integration_test_preview/integration_test_driver.dart';

Future<void> main() => integrationDriver(
    clearScreenshots: true,
    onScreenshot: (String screenshotPath, List<int> screenshotBytes) async {
        final File image = File(screenshotPath);
        print(image);

        final dir = image.parent;
        if (!await dir.exists()) await dir.create(recursive: true);

        image.writeAsBytesSync(screenshotBytes);
        return true;
    }
);
运行后会在控制台中显示 screenshots.html 文件的路径:
Device Previews: /Users/your/project/path/screenshots.html
截图画廊示例:
使用步骤
安装依赖
通过命令行或 pubspec.yaml 安装必要的依赖包。
通过命令行安装:
flutter pub add provider
flutter pub add drawer_manager
flutter pub add integration_test_preview
通过 pubspec.yaml 安装:
dependencies:
  flutter:
    sdk: flutter

  provider: ^6.0.2
  drawer_manager: ^0.0.4

dev_dependencies:
  flutter_test:
    sdk: flutter
  integration_test:
    sdk: flutter
  integration_test_preview: <最新版本>
添加测试驱动文件
创建一个测试驱动文件 test_driver/app_features_test.dart:
import 'dart:io';
import 'package:integration_test_preview/integration_test_driver.dart';

Future<void> main() => integrationDriver(
    clearScreenshots: true,
    onScreenshot: (String screenshotPath, List<int> screenshotBytes) async {
        final File image = File(screenshotPath);
        print(image);

        final dir = image.parent;
        if (!await dir.exists()) await dir.create(recursive: true);

        image.writeAsBytesSync(screenshotBytes);
        return true;
    }
);
示例代码
以下是一个完整的示例,展示如何使用 integration_test_preview 进行集成测试。
创建平台文件
lib/platforms.dart
import 'package:flutter/cupertino.dart';
import 'package:flutter/material.dart';

class PlatformApp extends PlatformWidget {
  PlatformApp({
    Key? key,
    required MaterialApp androidApp,
    required CupertinoApp iosApp,
    required TargetPlatform defaultPlatform,
  }) : super(key: key,
      androidBuilder: (BuildContext context) => androidApp,
      iosBuilder:  (BuildContext context) => iosApp
    ) {
      PlatformWidget.setPlatform(defaultPlatform);
  }
}

class PlatformWidget extends StatefulWidget {
  static TargetPlatform? _currentPlatform;

  static get platform {
      if (_currentPlatform == null) {
        return TargetPlatform.android;
      }
      return _currentPlatform;
  }

  static get isAndroid {
      return _currentPlatform == TargetPlatform.android;
  }

  static get isIOS {
      return _currentPlatform == TargetPlatform.iOS;
  }

  static void setPlatform(TargetPlatform platform) {
      _currentPlatform = platform;
  }

  static void reassembleApplication() {
      WidgetsBinding.instance!.reassembleApplication();
  }

  const PlatformWidget({
    Key? key,
    required this.androidBuilder,
    required this.iosBuilder,
  }) : super(key: key);

  final WidgetBuilder androidBuilder;
  final WidgetBuilder iosBuilder;

  @override
  State<PlatformWidget> createState() => _PlatformWidgetState();
}

class _PlatformWidgetState extends State<PlatformWidget> {
  @override
  Widget build(context) {
    switch (PlatformWidget._currentPlatform) {
      case TargetPlatform.android:
        return widget.androidBuilder(context);
      case TargetPlatform.iOS:
        return widget.iosBuilder(context);
      default:
        assert(false, 'Unexpected platform ${PlatformWidget._currentPlatform}');
        return Container();
    }
  }
}
创建主文件
lib/main.dart
import 'package:flutter/cupertino.dart';
import 'package:flutter/material.dart';
import 'package:provider/provider.dart';
import 'package:drawer_manager/drawer_manager.dart';

import 'platforms.dart';
import 'hello.dart';

void main() {
  runApp(setupMainWidget());
}

Widget setupMainWidget() {
  WidgetsFlutterBinding.ensureInitialized();
  return const MyApp();
}

class MyApp extends StatelessWidget {
  const MyApp({Key? key}) : super(key: key);

  @override
  Widget build(BuildContext context) {
    return ChangeNotifierProvider<DrawerManagerProvider>(
        create: (_) => DrawerManagerProvider(),
        child: PlatformApp(
            defaultPlatform: PlatformWidget.platform,
            androidApp: const MaterialApp(home: MyHomePage()),
            iosApp: const CupertinoApp(
                theme: CupertinoThemeData(brightness: Brightness.light),
                home: MyHomePage(),
            )
        )
      );
  }
}

class MyHomePage extends StatelessWidget {

  const MyHomePage({Key? key}) : super(key: key);

  String _getTitle(int index) {
      switch (index) {
        case 0: return 'Hello 1';
        case 1: return 'Hello 2';
        default: return '';
      }
  }

  Widget _getTitleWidget() {
    return Consumer<DrawerManagerProvider>(builder: (context, dmObj, _) {
      return Text(
        _getTitle(dmObj.selection),
        key: const Key('app-bar-text')
      );
    });
  }

  Widget _buildAndroidHomePage(BuildContext context) {

    final drawerSelections = [
      const HelloPage(position: 1),
      const HelloPage(position: 2),
    ];

    final manager = Provider.of<DrawerManagerProvider>(context, listen: false);

    return Scaffold(
        appBar: AppBar(title: _getTitleWidget()),
        body: manager.body,
        drawer: DrawerManager(
          context,
          drawerElements: [
            const DrawerHeader(
              decoration: BoxDecoration(color: Colors.blue),
              child: Padding(
                padding: EdgeInsets.only(bottom: 20),
                child: Icon(
                  Icons.account_circle,
                  color: Colors.blueGrey,
                  size: 96,
                ),
              ),
            ),
            DrawerTile(
              key: const Key('drawer-hello-1'),
              context: context,
              leading: const Icon(Icons.hail_rounded),
              title: Text(_getTitle(0)),
              onTap: () async {
                // RUN A BACKEND Hello, Flutter OPERATION
              },
            ),
            DrawerTile(
              key: const Key('drawer-hello-2'),
              context: context,
              leading: const Icon(Icons.hail_rounded),
              title: Text(_getTitle(1)),
              onTap: () async {
                // RUN A BACKEND Hello, Flutter OPERATION
              },
            )
          ],
          tileSelections: drawerSelections,
        ));
    }

  Widget _buildIosHomePage(BuildContext context) {

    return CupertinoTabScaffold(
        tabBar: CupertinoTabBar(
            items: [
                BottomNavigationBarItem(
                    label: _getTitle(0),
                    icon: const Icon(Icons.hail_rounded),
                ),
                BottomNavigationBarItem(
                    label: _getTitle(1),
                    icon: const Icon(Icons.hail_rounded),
                ),
            ],
        ),
        // ignore: avoid_types_on_closure_parameters
        tabBuilder: (BuildContext context, int index) {
            switch (index) {
            case 0: return CupertinoTabView(
                    builder: (context) => const HelloPage(position: 1),
                );
            case 1: return CupertinoTabView(
                    builder: (context) => const HelloPage(position: 2),
                );
            default:
                assert(false, 'Unexpected tab');
                return Container();
            }
        },
    );
  }

  @override
  Widget build(context) {
    return PlatformWidget(
      androidBuilder: _buildAndroidHomePage,
      iosBuilder: _buildIosHomePage,
    );
  }

}
运行测试
通过以下命令运行测试驱动程序:
flutter drive -t integration_test/app_features.dart
更多关于Flutter集成测试预览插件integration_test_preview的使用的实战教程也可以访问 https://www.itying.com/category-92-b0.html

更多关于Flutter集成测试预览插件integration_test_preview的使用的实战系列教程也可以访问 https://www.itying.com/category-92-b0.html
integration_test_preview 是一个用于 Flutter 集成测试的插件,它允许你在 Flutter 应用中编写和运行集成测试。集成测试是用于测试整个应用或应用中的多个部分,以确保它们能够正确地协同工作。integration_test_preview 插件提供了一些工具和功能,使得编写和运行集成测试变得更加容易。
安装 integration_test_preview 插件
首先,你需要在 pubspec.yaml 文件中添加 integration_test_preview 插件的依赖:
dev_dependencies:
  integration_test_preview: ^1.0.0
然后运行 flutter pub get 来安装依赖。
编写集成测试
接下来,你可以编写集成测试。通常,集成测试文件会放在 test_driver 或 integration_test 目录下。以下是一个简单的集成测试示例:
import 'package:flutter_test/flutter_test.dart';
import 'package:integration_test_preview/integration_test_preview.dart';

void main() {
  IntegrationTestWidgetsFlutterBinding.ensureInitialized();

  testWidgets('Counter increments smoke test', (WidgetTester tester) async {
    // 启动应用
    await tester.pumpWidget(MyApp());

    // 验证初始文本
    expect(find.text('0'), findsOneWidget);
    expect(find.text('1'), findsNothing);

    // 点击按钮
    await tester.tap(find.byIcon(Icons.add));
    await tester.pump();

    // 验证文本是否更新
    expect(find.text('0'), findsNothing);
    expect(find.text('1'), findsOneWidget);
  });
}
运行集成测试
要运行集成测试,你可以使用以下命令:
flutter test integration_test/my_test.dart
或者,如果你想在设备上运行测试,可以使用以下命令:
flutter drive --driver=test_driver/integration_test.dart --target=integration_test/my_test.dart
使用 integration_test_preview 插件的高级功能
integration_test_preview 插件提供了一些高级功能,例如:
-
Screenshot Testing: 你可以使用
takeScreenshot方法来捕获屏幕截图,并将其与基准图像进行比较,以确保 UI 没有发生变化。await IntegrationTestWidgetsFlutterBinding.instance.takeScreenshot('screenshot_name'); -
Performance Testing: 你可以使用
traceAction方法来测量特定操作的性能。await IntegrationTestWidgetsFlutterBinding.instance.traceAction(() async { // 执行需要测量的操作 });