


从零开始搭建HarmonyOS鸿蒙Next Docker编译环境
从零开始搭建HarmonyOS鸿蒙Next Docker编译环境 一开始使用的是VM跑Ubuntu编译环境,设备比较老资源不够,所以经常卡机,于是寻找更好用的编译环境。在51cto上看到了@HonestQiao的Docker无忧编译方案(源地址连接:Wi-Fi IoT智能家居套件搭建编译环境-鸿蒙HarmonyOS技术社区-鸿蒙官方合作伙伴-51CTO.COM),觉得很实用,于是便动手开始借用前辈的”轮子“。
但是在实际搭建过程中出现了一个比较棘手的问题:(若哪位大大可以提供解决方案就不用看下面的文章啦)

字面上估计是这个分支没有了,于是搜索下这个作者,有如下结论:
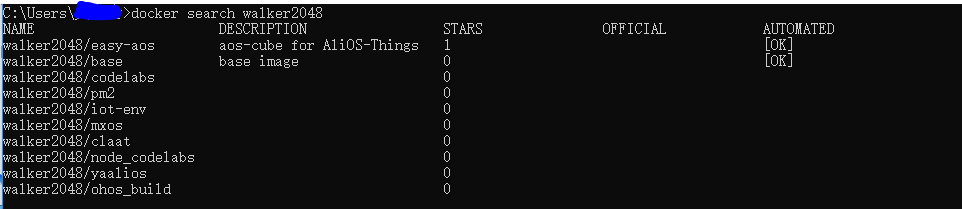
这里有两个值得注意的分支iot-env和ohos_build(当时我就只看到了最下面的,最上面的还没测试,请测试过的同学在评论区留言:)
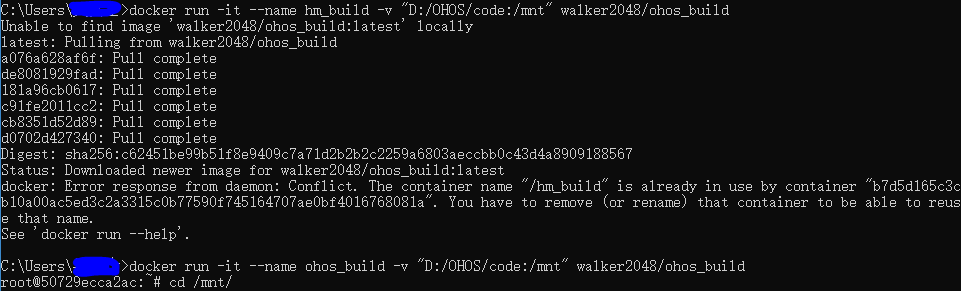
成功拉取进入,准备运行脚本,但是报错。(看样子是脚本问题和这个镜像不兼容的问题,但是我自己用ubuntu的跑这个脚本也是同样错误)
到这里,我差不多快放弃这个无忧编译环境了。。。但是俗话说得好,来都来了,那就自己做个轮子玩玩吧,也算是弥补之前没有玩过docker的缺憾了。以下就是本人配置的全过程,为保证能用,我特地还验证过一次,希望大家有更好的方案一起交流指点。
-
安装Docker,这个去官网下载就行
-
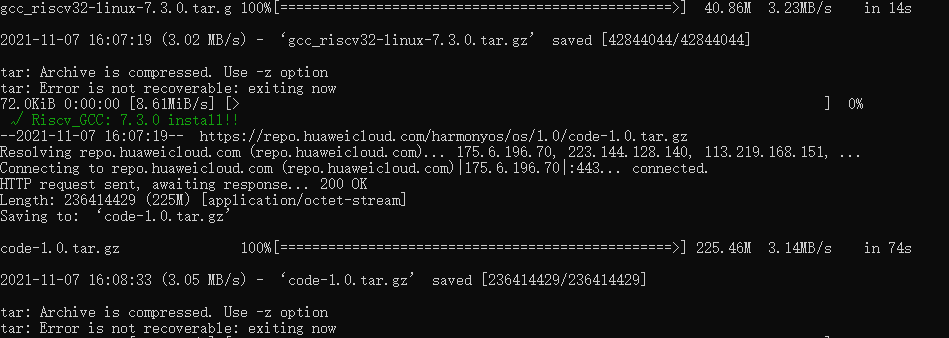
在D盘建立OHOS文件夹,将下载好的gn,gcc_riscv32-linux,ninja等工具和源码的压缩包放在code/buildtools文件夹里。
https://repo.huaweicloud.com/harmonyos/compiler/ninja/1.9.0/linux/ninja.1.9.0.tar
https://repo.huaweicloud.com/harmonyos/compiler/gn/1523/linux/gn.1523.tar
https://repo.huaweicloud.com/harmonyos/compiler/gcc_riscv32/7.3.0/linux/gcc_riscv32-linux-7.3.0.tar.gz
https://repo.huaweicloud.com/harmonyos/os/1.0/code-1.0.tar.gz
- 使用CMD打开命令终端,进行命令输入
#拉取镜像,注意不要登录个人账号,登录了要docker logout
docker pull ubuntu:18.04
#查看拉取的镜像
docker image ls
#运行镜像,名字和文件夹随意,这里我设置参考了上面提到的作者的
docker run -it --name hm –v “D:/OHOS/code:/mnt” ubuntu:18.04
接下来进入了docker里的ubuntu镜像
#备份源表
mv /etc/apt/sources.list /etc/apt/sources.list.bak
#写新源表,这里没有nano没有vim,只能这么写
cat>/etc/apt/sources.list<<EOF
deb http://mirrors.aliyun.com/ubuntu/ bionic main restricted universe multiverse
deb-src http://mirrors.aliyun.com/ubuntu/ bionic main restricted universe multiverse
deb http://mirrors.aliyun.com/ubuntu/ bionic-security main restricted universe multiverse
deb-src http://mirrors.aliyun.com/ubuntu/ bionic-security main restricted universe multiverse
deb http://mirrors.aliyun.com/ubuntu/ bionic-updates main restricted universe multiverse
deb-src http://mirrors.aliyun.com/ubuntu/ bionic-updates main restricted universe multiverse
deb http://mirrors.aliyun.com/ubuntu/ bionic-proposed main restricted universe multiverse
deb-src http://mirrors.aliyun.com/ubuntu/ bionic-proposed main restricted universe multiverse
deb http://mirrors.aliyun.com/ubuntu/ bionic-backports main restricted universe multiverse
deb-src http://mirrors.aliyun.com/ubuntu/ bionic-backports main restricted universe multiverse
EOF
#更新源
apt update
#更新软件
apt upgrade -y
#安装工具,其实vim和build-essential不要也可以
apt install python3.8 vim build-essential wget rsync patch wget nano make pv zip -y
#进入文件夹
cd /mnt/buildtools
#解压工具链和源码包
tar xpf ninja.1.9.0.tar
tar xpf gn.1523.tar
tar xpf gcc_riscv32-linux-7.3.0.tar.gz
tar xpf code-1.0.tar.gz
#添加环境变量到文件
vim ~/.bashrc
GN=/mnt/buildtools/gn
NINJA=/mnt/buildtools/ninja
GCC=/mnt/buildtools/gcc_riscv32
export PATH=$GN:$NINJA:$GCC/bin:$PATH
#调用环境变量
source ~/.bashrc
安装python需要的组件
#安装pip
apt install python3-pip -y
#配置默认Python环境
update-alternatives --install /usr/bin/python python /usr/bin/python3.6 1
update-alternatives --install /usr/bin/python python /usr/bin/python3.8 2
update-alternatives --install /usr/bin/python3 python3 /usr/bin/python3.6 1
update-alternatives --install /usr/bin/python3 python3 /usr/bin/python3.8 2
#更新pip
python3 -m pip install --upgrade pip
#先配置华为的源会更快,参数如下
#[global]
#index-url=https://repo.huaweicloud.com/repository/pypi/simple
#trusted-host=repo.huaweicloud.com
#timeout=120
pip install pycryptodome ecdsa
python3 -m pip install scons
尝试编译,进入buildtools文件夹
python build.py wifiiot
测试环境成功编译,准备封装docker
保持当前窗口不要关闭,再创建一个cmd窗口,输入命令
docker commit –m “description” –a “author” 容器ID repository:tag
- “description”:描述信息。
- “author”:作者名。
- 容器ID:在CMD终端上面状态栏那里,如root@2ce6712ef339。可以看到容器ID是2ce6712ef339。
- reposiory:镜像仓库名,任取即可,例如一开始使用的Ubuntu。
- tag:镜像标签名,任取即可,例如一开始使用的18.04
然后以后就可以直接使用命令,直接打开编译环境进行编译了
docker run -it --name name_str –v “D:/OHOS/code:/mnt” repository_str:tag_str
更多关于从零开始搭建HarmonyOS鸿蒙Next Docker编译环境的实战教程也可以访问 https://www.itying.com/category-93-b0.html

或者说,鸿蒙系统现在能不能安装docker,在docker中实现其它软件部署运行
更多关于从零开始搭建HarmonyOS鸿蒙Next Docker编译环境的实战系列教程也可以访问 https://www.itying.com/category-93-b0.html


