


Flutter登录功能插件loginj的使用
什么是它?
如何使用
在 pub.dev 上可以找到该插件。
添加依赖
在 pubspec.yaml 文件中添加以下依赖:
dependencies:
  loginj: ^0.0.3
然后运行 flutter pub get 来安装依赖。
使用示例
以下是使用 loginj 插件的基本示例代码:
FlipOverj(
    firstFront: (context, aniValue) => firstFrontCard(context, aniValue),
    firstBack: (context, aniValue) => firstBackCard(context, aniValue),
    secondFront: (context, aniValue) => secondFrontCard(context, aniValue),
    secondBack: (context, aniValue) => secondBackCard(context, aniValue),
)
自定义参数
FlipOverj 提供了一些可选参数用于自定义效果,例如偏移量、缩放比例和动画持续时间等。以下是完整的构造函数:
const FlipOverj({
    Key? key,
    required this.firstFront,
    required this.firstBack,
    required this.secondFront,
    required this.secondBack,
    this.offset = 50,
    this.secondScale = 0.85,
    this.firstScale = 0.8,
    this.duration = const Duration(milliseconds: 600),
})
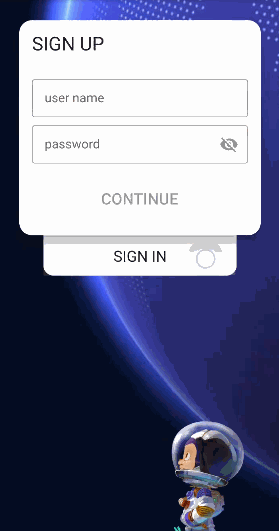
完整示例代码
以下是一个完整的示例代码,展示如何使用 loginj 插件实现登录页面:
import 'package:flutter/material.dart';
import 'package:flutter/scheduler.dart';

import 'login.dart';
import 'main.dart';

void main() {
  runApp(const MyApp());
}

class MyApp extends StatefulWidget {
  const MyApp({Key? key}) : super(key: key);

  [@override](/user/override)
  State<MyApp> createState() => _MyAppState();
}

class _MyAppState extends State<MyApp> {
  [@override](/user/override)
  void initState() {
    super.initState();
  }

  [@override](/user/override)
  Widget build(BuildContext context) {
    return MaterialApp(
      home: Scaffold(
        resizeToAvoidBottomInset: false,
        appBar: AppBar(
          title: const Text('Loginj example'),
        ),
        body: Stack(
          children: [
            // 背景图片
            Positioned(
              bottom: 0,
              child: Image.network(
                "https://github.githubassets.com/images/modules/site/home/globe.jpg",
                fit: BoxFit.cover,
              ),
            ),
            // 右下角装饰图片
            SizedBox.expand(
              child: Align(
                alignment: Alignment.bottomRight,
                child: Image.network(
                  "https://github.githubassets.com/images/modules/site/home/astro-mona.webp",
                  scale: 4.5,
                ),
              ),
            ),
            // 登录页面
            const LoginPage(),
          ],
        ),
      ),
    );
  }
}

class LoginPage extends StatefulWidget {
  const LoginPage({Key? key}) : super(key: key);

  [@override](/user/override)
  State<LoginPage> createState() => _LoginPageState();
}

class _LoginPageState extends State<LoginPage> {
  [@override](/user/override)
  Widget build(BuildContext context) {
    return AnimatedSwitcher(
      transitionBuilder: (Widget child, Animation<double> animation) {
        // 执行缩放动画
        return ScaleTransition(child: child, scale: animation);
      },
      duration: const Duration(milliseconds: 333),
      child: findShowChild(),
    );
  }

  findShowChild() {
    return const Padding(
      padding: EdgeInsets.all(24),
      child: LoginCard(),
    );
  }
}
更多关于Flutter登录功能插件loginj的使用的实战教程也可以访问 https://www.itying.com/category-92-b0.html

更多关于Flutter登录功能插件loginj的使用的实战系列教程也可以访问 https://www.itying.com/category-92-b0.html
loginj 是一个用于简化 Flutter 应用登录功能的插件。它可以帮助你快速实现用户认证、登录、注册等功能。以下是如何使用 loginj 插件的详细步骤:
1. 添加依赖
首先,你需要在 pubspec.yaml 文件中添加 loginj 插件的依赖:
dependencies:
  flutter:
    sdk: flutter
  loginj: ^1.0.0  # 请使用最新版本
然后运行 flutter pub get 来安装依赖。
2. 导入插件
在你的 Dart 文件中导入 loginj 插件:
import 'package:loginj/loginj.dart';
3. 初始化插件
在使用 loginj 之前,你需要对其进行初始化。通常,你可以在 main() 函数中进行初始化:
void main() {
  WidgetsFlutterBinding.ensureInitialized();
  Loginj.initialize(
    apiKey: 'YOUR_API_KEY',  // 替换为你的 API 密钥
    baseUrl: 'https://your-api-url.com',  // 替换为你的 API 基础 URL
  );
  runApp(MyApp());
}
4. 实现登录功能
使用 Loginj 提供的 login 方法来实现登录功能。通常,你可以在一个按钮的 onPressed 回调中调用此方法:
class LoginPage extends StatelessWidget {
  final TextEditingController emailController = TextEditingController();
  final TextEditingController passwordController = TextEditingController();

  Future<void> _login() async {
    try {
      final response = await Loginj.login(
        email: emailController.text,
        password: passwordController.text,
      );
      if (response.success) {
        // 登录成功,跳转到主页
        Navigator.of(context).pushReplacementNamed('/home');
      } else {
        // 登录失败,显示错误信息
        ScaffoldMessenger.of(context).showSnackBar(
          SnackBar(content: Text(response.message)),
        );
      }
    } catch (e) {
      // 处理异常
      ScaffoldMessenger.of(context).showSnackBar(
        SnackBar(content: Text('登录失败: $e')),
      );
    }
  }

  @override
  Widget build(BuildContext context) {
    return Scaffold(
      appBar: AppBar(title: Text('登录')),
      body: Padding(
        padding: const EdgeInsets.all(16.0),
        child: Column(
          children: [
            TextField(
              controller: emailController,
              decoration: InputDecoration(labelText: '邮箱'),
            ),
            TextField(
              controller: passwordController,
              decoration: InputDecoration(labelText: '密码'),
              obscureText: true,
            ),
            SizedBox(height: 20),
            ElevatedButton(
              onPressed: _login,
              child: Text('登录'),
            ),
          ],
        ),
      ),
    );
  }
}
5. 实现注册功能
类似地,你可以使用 Loginj 提供的 register 方法来实现注册功能:
Future<void> _register() async {
  try {
    final response = await Loginj.register(
      email: emailController.text,
      password: passwordController.text,
    );
    if (response.success) {
      // 注册成功,跳转到登录页或直接登录
      Navigator.of(context).pushReplacementNamed('/login');
    } else {
      // 注册失败,显示错误信息
      ScaffoldMessenger.of(context).showSnackBar(
        SnackBar(content: Text(response.message)),
      );
    }
  } catch (e) {
    // 处理异常
    ScaffoldMessenger.of(context).showSnackBar(
      SnackBar(content: Text('注册失败: $e')),
    );
  }
}
6. 处理用户会话
Loginj 还提供了管理用户会话的功能。你可以使用 Loginj.isLoggedIn 来检查用户是否已经登录,并在应用启动时自动恢复用户会话。
void main() async {
  WidgetsFlutterBinding.ensureInitialized();
  await Loginj.initialize(
    apiKey: 'YOUR_API_KEY',
    baseUrl: 'https://your-api-url.com',
  );

  bool isLoggedIn = await Loginj.isLoggedIn();
  runApp(MyApp(isLoggedIn: isLoggedIn));
}

class MyApp extends StatelessWidget {
  final bool isLoggedIn;

  MyApp({required this.isLoggedIn});

  @override
  Widget build(BuildContext context) {
    return MaterialApp(
      initialRoute: isLoggedIn ? '/home' : '/login',
      routes: {
        '/login': (context) => LoginPage(),
        '/home': (context) => HomePage(),
      },
    );
  }
}
7. 登出功能
你可以使用 Loginj.logout 方法来实现登出功能:
Future<void> _logout() async {
  await Loginj.logout();
  Navigator.of(context).pushReplacementNamed('/login');
}