Flutter通用组件插件universal_widget的使用
我很高兴向大家介绍我的超级英雄小部件:UniversalWidget。
您可以在这个地址找到该插件:https://pub.dartlang.org/packages/universal_widget
为什么?
通过UniversalWidget,您可以在 widget 树中完全控制它。

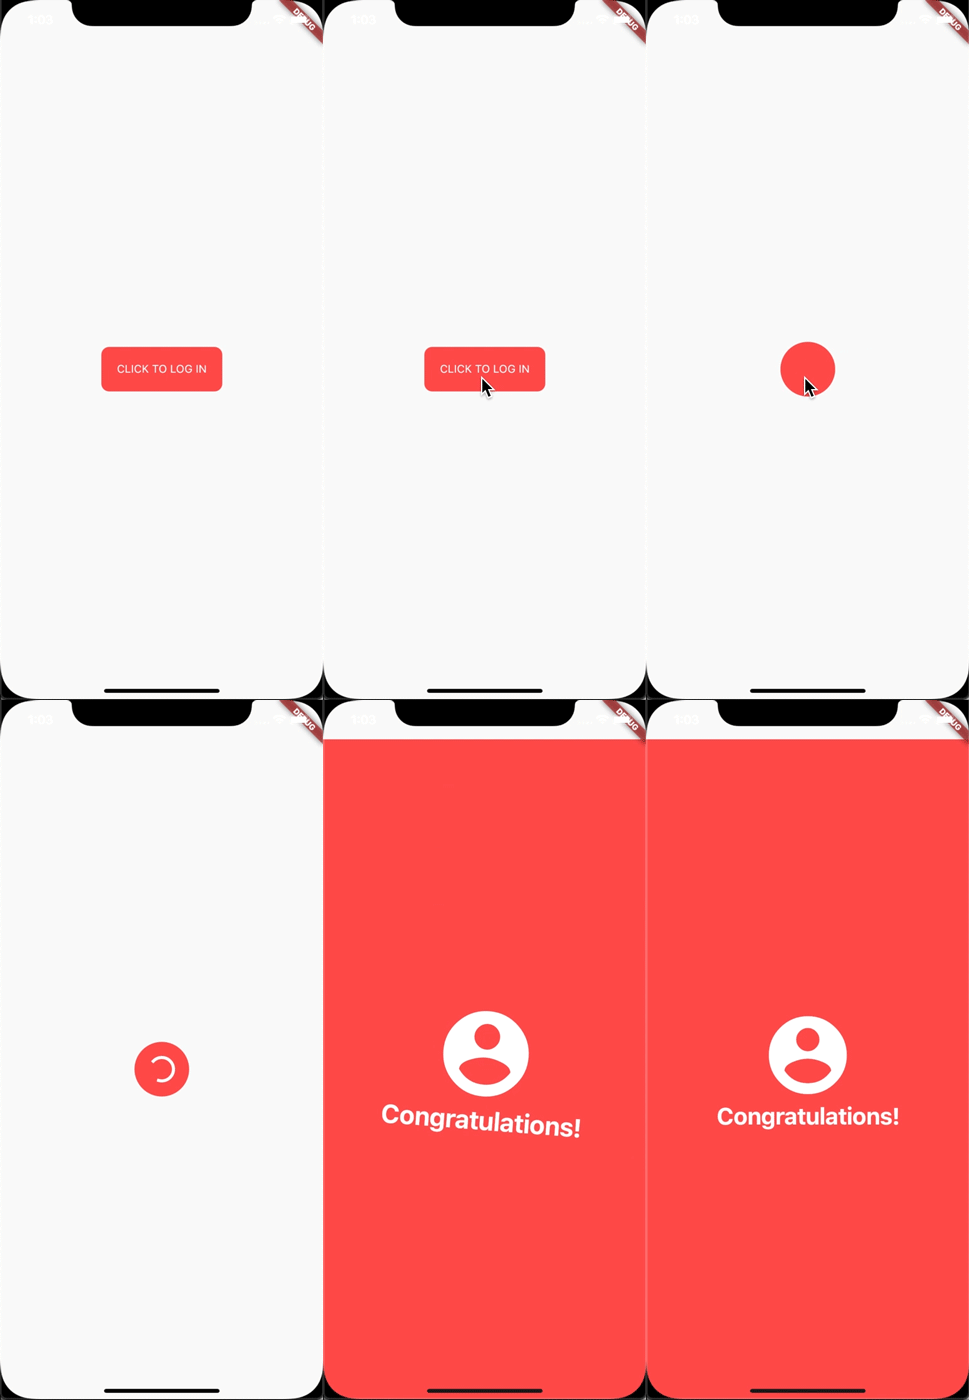
我用UniversalWidget仅用了8行代码就完成了这个登录动画。如果您想了解如何用Flutter实现这个动画,请查看这篇酷炫教程:https://blog.geekyants.com/flutter-login-animation-ab3e6ed4bd19
写得少,做得多。
例如,与其写:
Positioned(
  top: 10,
  left: 20,
  child: Container(
    height: 50,
    padding: EdgeInsets.all(20),
    decoration: BoxDecoration(
      color: Colors.blueAccent,
      borderRadius: BorderRadius.circular(10)
    ),
    transform: Matrix4()..identity()
      ..translate(20, 40)
      ..rotation(45 * math.pi),
    child: Text("Hello World")
  )
)
你可以写:
UniversalWidget(
  x: 20,
  y: 40,
  rotation: 45, // 度数
  top: 10,
  left: 20,
  height: 50,
  padding: EdgeInsets.all(20),
  color: Colors.blueAccent,
  borderRadius: BorderRadius.circular(10),
  child: Text("Hello World")
)
是不是更简洁了?不仅如此,它还比你想象的更有用。继续阅读下一节。
灵活性
假设我有一个红色的小部件:
UniversalWidget myWidget = UniversalWidget(
  color: Colors.red
);
如果我想在按下按钮时将其颜色改为蓝色,这有多简单:
RaisedButton(
  child: Text("Change Me!"),
  onPressed: (){
    myWidget.update(
      color: Colors.blue
    );
  }
);
想想看,用StatefulWidget实现这个功能至少需要20行代码。现在再来看看…
还有很多功能可以解锁UniversalWidget的强大功能。比如管理它的可见性:
myWidget.update(visible: false);
// 通过myWidget.update(visible: true)来显示它
甚至可以更改UniversalWidget的子小部件:
myWidget.update(
  child: Text("Holy Shiettttt!")
);
通过设置mask标志来遮罩(裁剪)UniversalWidget的子小部件:
myWidget.update(
  mask: true,
  child: Text("Holy Shiettttt!")
);
动画
承认一下,AnimatedContainer已经做得很好了。但是UniversalWidget可以做得更好:
UniversalWidget myWidget = UniversalWidget(
  color: Colors.red,
  height: 50
);
// 让它动起来:
myWidget.update(
  duration: 0.5, // 秒
  color: Colors.blue
);
就是这样!
高级动画
应用缓动类型到动画中,监听小部件以查看动画何时完成,查看动画的进度,或者让动画重复。看看这些:
myWidget.update(
  duration: 0.5, // 秒
  delay: 2, // 秒 - 等待2秒后再播放动画
  height: 100,
  ease: Curve.elasticEaseOut, // 或者你可以使用Ease.elasticEaseOut,它们是一样的
  onComplete: (widget){
    print("我改变了高度!");
  },
  onUpdate: (progress){
    print("动画进度是 $progress");
  }
);
如果你想让动画重复5次:
myWidget.update(
  ...
  repeat: 5,
  ...
);
如果你想在动画完成后反向播放(就像现实中玩YOYO一样):
myWidget.update(
  ...
  yoyo: true,
  ...
);
如果你想让动画永远重复:
myWidget.update(
  ...
  repeat: -1,
  ...
);
结合repeat和yoyo,你会得到一个永远向前和向后循环的动画:
myWidget.update(
  ...
  repeat: -1,
  yoyo: true,
  ...
);
要停止小部件的动画:
myWidget.killAllTweens();
其他动画缓动类型
是的,UniversalWidget有比Flutter框架更多的缓动类型,支持以下类型:
- Ease.backIn
- Ease.backOut
- Ease.backInOut
- Ease.slowMo
- Ease.sineIn
- Ease.sineOut
- Ease.sineInOut
自己动手试试吧!😉
可访问性
让我们完全控制你的UniversalWidget,你可以随时随地访问它。(只要它还在屏幕上)
通过给它一个名字:
UniversalWidget(
  name: "TheMightyWidgetEver",
  width: 100.0,
  height: 50.0
);
如果你想当按下按钮时让它高度变为零呢?
RaisedButton(
  child: Text("Collapse Me!"),
  onPressed: (){
    UniversalWidget.find("TheMightyWidgetEver").update(
      duration: 0.8,
      height: 0.0
    );
  }
);
或者只是想检查它的属性:
UniversalWidget widget = UniversalWidget.find("TheMightyWidgetEver");
print(widget.get().width); // 100.0
注意,给出的名字应该是唯一的,如果你有许多带有相同名称的UniversalWidget,只有最新添加到 widget 树中的那个可以通过名称访问,其他的都无法访问。所以请明智地命名。
等等,还有更多。如果你想检查小部件的大小,可以这样做:
UniversalWidget(
  child: Text("Hello World!"),
  // 因为小部件的大小只能在构建后计算,你需要监听这个事件:
  onWidgetBuilt: (context){
    print("我的大小是 ${context.size}");
  }
);
检查小部件是否位于屏幕上:
UniversalWidget widget = UniversalWidget.find("TheMightyWidgetEver");
//...
print(widget.globalPosition);
总结
呼…这就是目前的内容了。现在你们可能理解为什么我称它为**“The Mighty Widget”**了吧,不是太自夸吧?希望它能为你节省大量时间,就像它正在为我节省时间一样。
如果你有任何反馈或在使用此小部件时遇到任何问题,请随时通过这个GitHub仓库联系我。
祝大家用Flutter愉快地编码! 我会回来的。
完整示例代码
以下是完整的示例代码,展示了如何使用UniversalWidget:
import 'package:flutter/material.dart';
import 'package:universal_widget/universal_widget.dart';

void main() => runApp(MyApp());

class MyApp extends StatelessWidget {
  // 这是应用程序的根小部件。
  [@override](/user/override)
  Widget build(BuildContext context) {
    return HomeScreen();
  }
}

class HomeScreen extends StatelessWidget {
  [@override](/user/override)
  Widget build(BuildContext context) {
    Widget example = Container(
      padding: EdgeInsets.only(top: 50),
      child: Column(
        children: <Widget>[
          Padding(
            padding: EdgeInsets.only(bottom: 8),
            child: Wrap(
              spacing: 8,
              runSpacing: 8,
              children: <Widget>[
                RaisedButton(
                  child: Text("Start"),
                  onPressed: () {
                    UniversalWidget.find("testWidget").update(
                      duration: 0.5,
                      height: 600,
                      onComplete: () {
                        print("Start -> Done");
                      },
                    );
                  },
                ),
                RaisedButton(
                  child: Text("Reverse"),
                  onPressed: () {
                    UniversalWidget.find("testWidget").update(
                      duration: 0.5,
                      height: 300,
                      onComplete: () {
                        print("Reverse -> Done");
                      },
                    );
                  },
                ),
                RaisedButton(
                  child: Text("Reset"),
                  onPressed: () {
                    UniversalWidget.find("testWidget").update(
                      height: 300,
                      color: Colors.redAccent,
                    );
                  },
                ),
                RaisedButton(
                  child: Text("Yoyo"),
                  onPressed: () {
                    UniversalWidget.find("testWidget").update(
                      height: 300,
                    );
                    UniversalWidget.find("testWidget").update(
                      duration: 0.5,
                      height: 600,
                      yoyo: true,
                    );
                  },
                ),
                RaisedButton(
                  child: Text("Loop"),
                  onPressed: () {
                    UniversalWidget.find("testWidget").update(
                      height: 300,
                    );
                    UniversalWidget.find("testWidget").update(
                      duration: 0.5,
                      height: 600,
                      yoyo: true,
                      repeat: -1,
                    );
                  },
                ),
                RaisedButton(
                  child: Text("Stop"),
                  onPressed: () {
                    UniversalWidget.find("testWidget").killAllTweens();
                  },
                ),
                RaisedButton(
                  child: Text("Change Color"),
                  onPressed: () {
                    UniversalWidget.find("testWidget").update(
                      duration: 0.5,
                      color: Colors.blueAccent,
                    );
                  },
                ),
                RaisedButton(
                  child: Text("Scale"),
                  onPressed: () {
                    UniversalWidget.find("testWidget").update(
                      duration: 0.8,
                      transformOrigin: Offset(0.5, 0.5),
                      scale: Offset(0.5, 0.5),
                      color: Colors.blueAccent,
                    );
                  },
                ),
              ],
            ),
          ),

          UniversalWidget(
            name: "testWidget",
            height: 300,
            color: Colors.redAccent,
            onWidgetBuilt: (context) {
              print(context.size);
            },
            onWidgetDisposed: (widget) {
              print("=> Good bye ${widget.name}!");
            },
            child: Center(child: Text("Hello World")),
          ),
        ],
      ),
    );

    return Scaffold(
      body: example,
    );
  }
}
更多关于Flutter通用组件插件universal_widget的使用的实战教程也可以访问 https://www.itying.com/category-92-b0.html
更多关于Flutter通用组件插件universal_widget的使用的实战系列教程也可以访问 https://www.itying.com/category-92-b0.html
universal_widget 是一个 Flutter 插件,旨在提供一些通用的、可重用的组件,以简化开发过程。虽然这个插件可能不是官方维护的,但它通常包含一些常见的 UI 组件或功能,如按钮、卡片、对话框等,可以帮助开发者快速构建应用。
安装 universal_widget
首先,你需要在 pubspec.yaml 文件中添加 universal_widget 依赖:
dependencies:
  flutter:
    sdk: flutter
  universal_widget: ^版本号
然后运行 flutter pub get 来安装依赖。
使用 universal_widget
以下是一些常见的使用示例:
1. 通用按钮
import 'package:flutter/material.dart';
import 'package:universal_widget/universal_widget.dart';

class MyHomePage extends StatelessWidget {
  @override
  Widget build(BuildContext context) {
    return Scaffold(
      appBar: AppBar(
        title: Text('Universal Widget Example'),
      ),
      body: Center(
        child: UniversalButton(
          text: 'Click Me',
          onPressed: () {
            print('Button Pressed');
          },
        ),
      ),
    );
  }
}
2. 通用卡片
import 'package:flutter/material.dart';
import 'package:universal_widget/universal_widget.dart';

class MyHomePage extends StatelessWidget {
  @override
  Widget build(BuildContext context) {
    return Scaffold(
      appBar: AppBar(
        title: Text('Universal Widget Example'),
      ),
      body: Center(
        child: UniversalCard(
          child: Text('This is a universal card'),
        ),
      ),
    );
  }
}
3. 通用对话框
import 'package:flutter/material.dart';
import 'package:universal_widget/universal_widget.dart';

class MyHomePage extends StatelessWidget {
  @override
  Widget build(BuildContext context) {
    return Scaffold(
      appBar: AppBar(
        title: Text('Universal Widget Example'),
      ),
      body: Center(
        child: UniversalButton(
          text: 'Show Dialog',
          onPressed: () {
            UniversalDialog.show(
              context,
              title: 'Dialog Title',
              content: Text('This is a universal dialog'),
              actions: [
                UniversalButton(
                  text: 'Close',
                  onPressed: () {
                    Navigator.of(context).pop();
                  },
                ),
              ],
            );
          },
        ),
      ),
    );
  }
}
自定义样式
universal_widget 通常允许你通过参数来自定义样式。例如,你可以通过 color、textStyle、padding 等参数来调整按钮或卡片的样式。
UniversalButton(
  text: 'Custom Button',
  color: Colors.blue,
  textStyle: TextStyle(color: Colors.white, fontSize: 16),
  padding: EdgeInsets.symmetric(horizontal: 20, vertical: 10),
  onPressed: () {
    print('Custom Button Pressed');
  },
);


