HarmonyOS鸿蒙Next中应用内截图的实现方案
HarmonyOS鸿蒙Next中应用内截图的实现方案
场景描述:
众多应用期望在系统截屏后实现应用内截图功能。在实现应用内截图时,由于系统截屏后不能直接返回截图信息,且应用无法直接读取相册的截图数据,从而使开发者在实现应用内截图时遇到一系列问题,主要包括以下几个场景:
1、触发系统截图时,应用内同步截图并进行二次处理(提示反馈、分析等): a. 用户截屏后,app 内展示截屏内容浮窗,作为问题反馈的入口,点击后可跳转对应页面,并且把这个图片显示在反馈页面上。 b. 将应用内某页面的截图内容分享给微信。 c. 社交类应用,识别到系统截屏后,在聊天页面弹出“可能想发送的图片”,展示相册最新截图。
2、地图类应用,点击应用内截图按钮,截取组件内所有内容(包括隐藏在可见区外的)。
3、购物类应用,商品详情页截图后,生成商品详情+商品二维码的页面展示,可以保存至系统相册,以便分享至其他应用。
方案:
触发系统截图时,应用内同步截图并进行二次处理(提示反馈、分析等)。
在系统截图后,应用无法通过监听系统截图回调获取截图信息,应用可以重新获取当前窗口的屏幕截图,将其传递完成分享。
核心代码
1、通过 on(‘screenshot’) 监听系统截屏并展示应用内截图页面:
aboutToAppear(): void {
  try { //监听系统截图时间,打开截屏页面
    this.windowStage_.getMainWindowSync().on('screenshot', () => {
      this.globalCustomDialog()
    });
  } catch (exception) {
    console.error(`Failed to register callback. Cause code: ${exception.code}, message: ${exception.message}`);
  }
}
截图页面使用全局自定义弹窗实现,通过配置 offset 控制浮窗位置,isModal 或者 autoCancel 可以解决点击浮窗以外的区域消失的情况,具体使用可参考 openCustomDialog。
2、获取当前屏幕截图,进行数据处理:
在截图页面加载时获取当前屏幕截图信息,这里需要对 pixelMap 进行压缩处理为 uri 或者 base64。这里的示例是将 pixelMap 处理为 base64 传递:
aboutToAppear(): void {
  // 监听窗口截图事件,获取截图信息
  this.windowStage_.getMainWindowSync()
    .snapshot((err: BusinessError, pixelMap: image.PixelMap) => {
      // 转换成base64
      const imagePackerApi: image.ImagePacker = image.createImagePacker();
      let packOpts: image.PackingOption = { format: 'image/jpeg', quality: 100 };
      imagePackerApi.packing(pixelMap, packOpts).then((data: ArrayBuffer) => {
        let buf: buffer.Buffer = buffer.from(data);
        this.uri = 'data:image/jpeg;base64,' + buf.toString('base64', 0, buf.length);
      })
      const errCode: number = err.code;
      if (errCode) {
        console.error(`Failed to snapshot window. Cause code: ${err.code}, message: ${err.message}`);
        return;
      }
      console.info('Succeeded in snapshotting window. Pixel bytes number: ' + pixelMap.getPixelBytesNumber());
      // PixelMap使用完后及时释放内存
      pixelMap.release();
    });
}
3、点击分享按钮,进行数据传递:
对于应用内分享可以直接通过 Router 或者 Navigation 传递数据,对于应用之间的分享可参考 应用间跳转 通过 want 信息进行传递。
4、接收方的处理:
接收方通过 router.getParam 或者 this.pageStack.getParamByName(“页面名称”) 接收图片信息,并进行页面展示,对于应用间的分享,可以在 onnewant 回调中通过接收 want 参数获取,以下示例通过 router.getParam 接收参数。
效果展示:

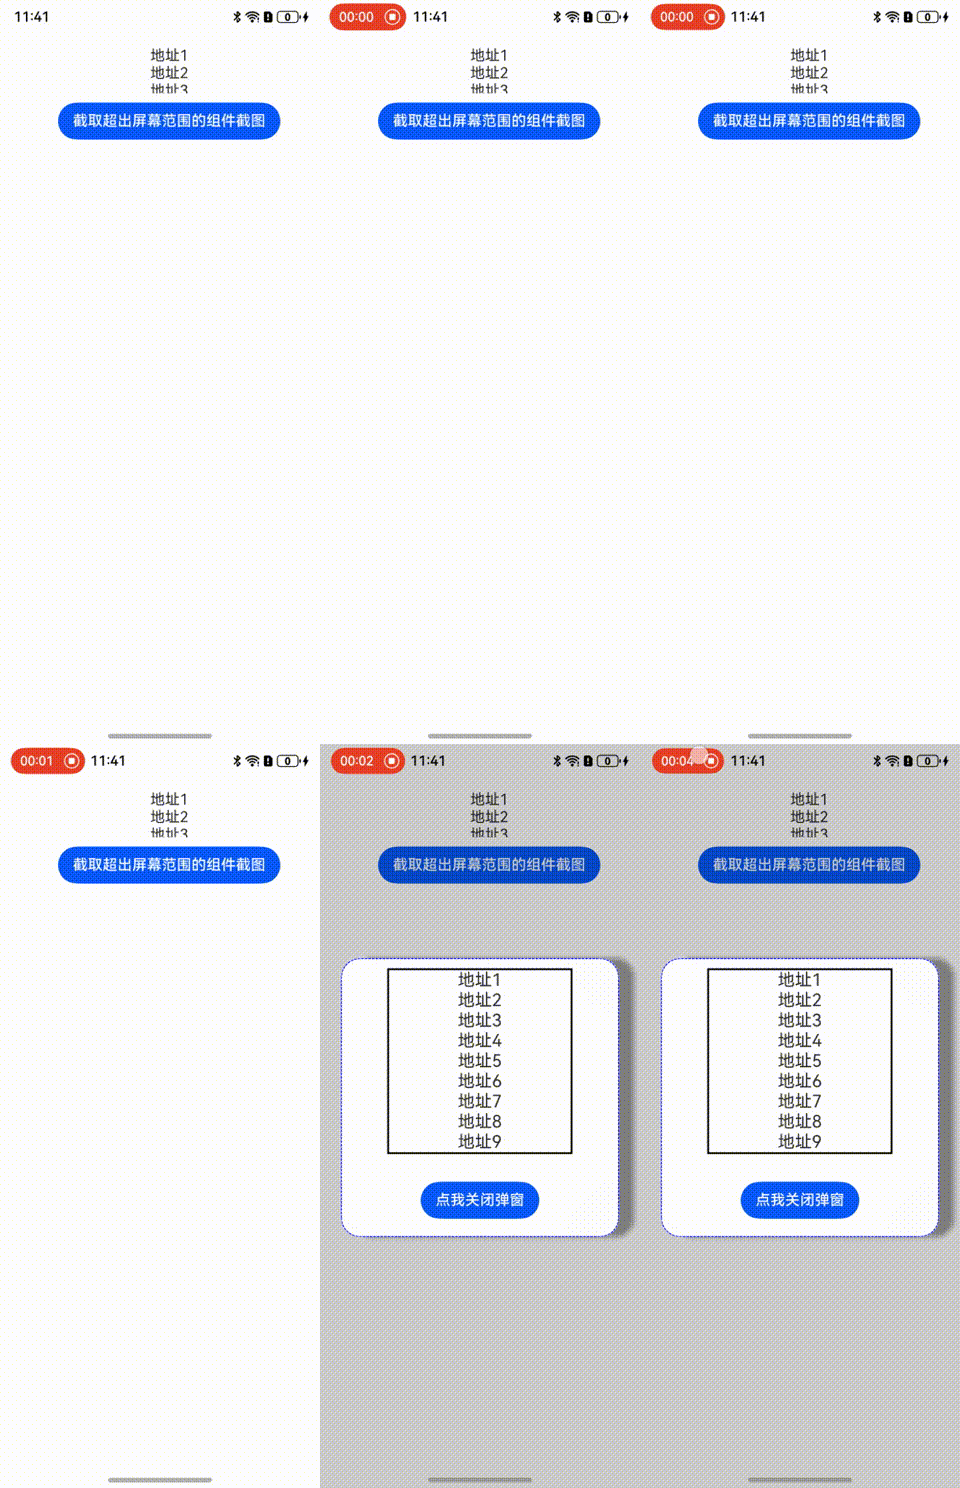
点击应用内截图按钮,截取组件内所有内容(包括隐藏在可见区外的)
通过组件截图 componentSnapshot.createFromBuilder 获取离屏组件绘制区域信息,将其存入缓存,使用全局自定义弹窗展示缓存数据。基于 webview 实现长截图参考:Web 组件网页长截图。
核心代码
使用 componentSnapshot.createFromBuilder 获取组件绘制区,存入缓存并弹出模态框,注意可以通过配置 ImageFit.Contain 使得图片完全显示在显示边界内:
build() {
  Column() {
    Column() {
      this.RandomBuilder()
    }
    .height(50)
    .margin(10)
    Button("截取超出屏幕范围的组件截图").onClick(() => {
      if (this.dialogController != null) {
        // 建议使用this.getUIContext().getComponentSnapshot().createFromBuilder()
        componentSnapshot.createFromBuilder(() => {
          this.RandomBuilder()
        }, (error: Error, pixmap: image.PixelMap) => {
          if (error) {
            console.log("error: " + JSON.stringify(error))
            return;
          }
          AppStorage.setOrCreate("pixmap", pixmap)
          this.dialogController?.open()
          let info = this.getUIContext().getComponentUtils().getRectangleById("builder")
          console.log(info.size.width + ' ' + info.size.height + ' ' + info.localOffset.x + ' ' + info.localOffset.y +
            ' ' + info.windowOffset.x + ' ' + info.windowOffset.y)
        }, 320, true, { scale: 3, waitUntilRenderFinished: true })
      }
    })
  }
  .width('100%')
  .margin({ left: 10, top: 5, bottom: 5 })
  .height(300)
}
构建组件截图 Builder,并进行组件标识:
@Builder
RandomBuilder() {
  Scroll(this.scroller) {
    Column() {
      ForEach(this.arr, (item: string) => {
        Column() {
          Text(item)
        }
      })
    }
  }.id("builder")
}
截图弹窗展示缓存数据:
@CustomDialog
struct CustomDialogExample {
  @State pixmap: image.PixelMap | undefined = AppStorage.get("pixmap")
  controller?: CustomDialogController
  cancel: () => void = () => {
  }
  confirm: () => void = () => {
  }

  build() {
    Column() {
      Image(this.pixmap)
        .margin(10)
        .height(200)
        .width(200)
        .border({ color: Color.Black, width: 2 })
        .objectFit(ImageFit.Contain)
      Button('点我关闭弹窗').onClick(() => {
        if (this.controller != undefined) {
          this.controller.close()
        }
      }).margin(20)
    }
  }
}
效果展示:

拼接截图,并将其保存至相册
1、截图页面与二维码 QRCode 拼接为一个新的组件,设置组件标志。 2、通过 componentSnapshot.get() 获取已加载的组件的截图,传入组件的 组件标识,通过回调将图片压缩打包,将 PixelMap 转为 arraybuffer(如以下示例),也可以将图片写入沙箱,转换为 uri。 3、设置安全控件属性 saveButton,这里需要遵循安全控件的规范,设置不当(建议宽高不要设置 100%,容易出现组件失效) SaveButtonOnClickResult 将会返回 FAILED。 4、使用 addResource 和 PhotoAccessHelper.applyChanges 添加资源内容,提交媒体变更请求。
在系统截图后,应用无法通过监听系统截图回调获取截图信息,应用可以重新获取当前窗口的屏幕截图,将其传递完成分享。
核心代码:
Column() {
  Image(this.uri).width(120).height(150).objectFit(ImageFit.Auto)
  Row() {
    Text("二维码区域")
    QRCode(this.value).width(30).height(30)
  }.width(120).height(50)
}.margin(5).backgroundColor(Color.White).id("root1")
// 安全控件按钮属性
saveButtonOptions: SaveButtonOptions = { icon: SaveIconStyle.FULL_FILLED, text: SaveDescription.SAVE_IMAGE, buttonType: ButtonType.Capsule }
SaveButton(this.saveButtonOptions).onClick(async (event, result: SaveButtonOnClickResult) => {
  if (result == SaveButtonOnClickResult.SUCCESS) {
    try {
      //获取组件截图信息
      componentSnapshot.get("root1", (error: Error, pixmap: image.PixelMap) => {
        if (error) {
          console.log("error: " + JSON.stringify(error))
          return;
        }
        // 创建ImagePacker 实例
        const imagePackerApi: image.ImagePacker = image.createImagePacker();
        let packOpts: image.PackingOption = { format: "image/jpeg", quality: 98 }
        // 重新压缩图片
        imagePackerApi.packing(this.pixmap, packOpts).then(async (buffer: ArrayBuffer) => {
          try {
            const context = getContext(this) // 获取相册管理实例
            let helper = photoAccessHelper.getPhotoAccessHelper(context)
            try {
              // 配置待创建的文件类型和扩展名
              // 类型
              let photoType: photoAccessHelper.PhotoType = photoAccessHelper.PhotoType.IMAGE;
              //扩展名
              let extension: string = 'jpg';
              // 创建资产变更请求
              let assetChangeRequest: photoAccessHelper.MediaAssetChangeRequest =
                photoAccessHelper.MediaAssetChangeRequest.createAssetRequest(context, photoType, extension);
              assetChangeRequest.addResource(photoAccessHelper.ResourceType.IMAGE_RESOURCE,
                buffer);
              // 提交媒体变更请求
              await helper.applyChanges(assetChangeRequest);
              console.info('addResourceByArrayBuffer successfully');
            } catch (err) {
              console.error(`addResourceByArrayBufferDemo failed with error: ${err.code}, ${err.message}`);
            }
            promptAction.showToast({ message: `截图保存成功` })
          } catch (error) {
            console.error("error is " + JSON.stringify(error))
          }
        })
      }, { scale: 2, waitUntilRenderFinished: true })
    } catch (err) {
      console.error(`create asset failed with error: ${err.code}, ${err.message}`);
    }
  } else {
    console.error('SaveButtonOnClickResult create asset failed');
  }
})
更多关于HarmonyOS鸿蒙Next中应用内截图的实现方案的实战教程也可以访问 https://www.itying.com/category-93-b0.html
更多关于HarmonyOS鸿蒙Next中应用内截图的实现方案的实战系列教程也可以访问 https://www.itying.com/category-93-b0.html
在HarmonyOS鸿蒙Next中实现应用内截图,可以通过以下步骤进行:
- 获取窗口对象:使用
WindowManager获取当前应用的窗口对象。 - 创建画布:通过
PixelMap或Canvas创建一个画布对象。 - 绘制内容:将窗口内容绘制到画布上。
- 保存图像:将画布内容保存为图片文件,通常使用
Image或PixelMap的save方法。
示例代码:
Window window = getWindow();
PixelMap pixelMap = PixelMap.create(window.getWidth(), window.getHeight());
Canvas canvas = new Canvas(pixelMap);
window.draw(canvas);
pixelMap.save("screenshot.png");
此方案适用于应用内截图,确保用户隐私和数据安全。


