HarmonyOS鸿蒙Next中多种富文本编辑功能示例代码
HarmonyOS鸿蒙Next中多种富文本编辑功能示例代码
介绍
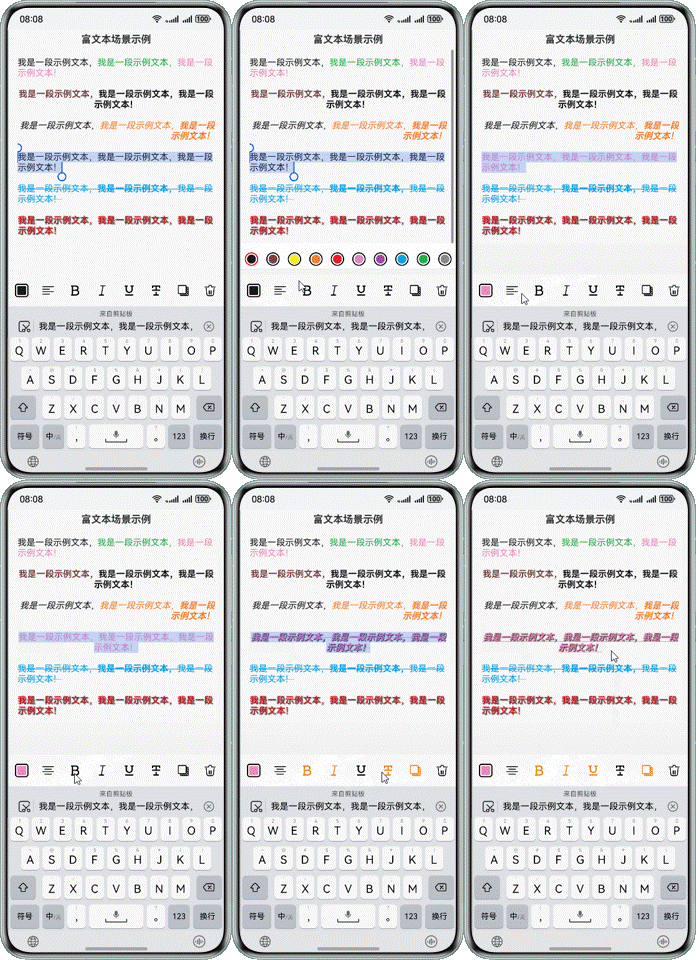
本示例基于 RichEditor 组件实现多种富文本编辑功能,主要包括文本颜色、加粗、斜体、下划线、删除线、阴影,段落对齐等编辑功能。
效果预览

实现思路
- 通过 onSelectionChange 事件回调来获取当前选中的选区位置,并更新工具栏状态显示。
RichEditor({ controller: this.controller })
.onSelectionChange((range) => {
    // 光标移动时,更新编辑栏状态显示
    // 获取选区内文本样式
    let textStyleResult = RichEditorUtil.getFirstTextSpanStyle(this.controller, range);

    // ...获取文本样式信息并记录

    // 更新当前样式信息
    this.currentStyle = {
    fontColor: COLOR_LIST[this.currentColor],
    fontWeight: this.currentBold ? FontWeight.Bold : FontWeight.Normal,
    decoration: { type: this.currentDecoration },
    fontStyle: this.currentItalics ? FontStyle.Italic : FontStyle.Normal,
    textShadow: this.currentShadow ? {
        radius: 2,
        offsetY: vp2px(1),
        offsetX: vp2px(1),
        type: ShadowType.BLUR
    } : { radius: 0 }
    };
    // 光标变动后,应设置为跟随周围样式
    this.controller.setTypingStyle(this.currentStyle);
});
- 通过 getSpans 方法获取选区内样式,当仅有光标无选区时,需要特殊判断。
static getFirstTextSpanStyle(controller: RichEditorController, range: RichEditorRange): RichEditorTextSpanResult | undefined {
    let start = range.start ?? 0;
    let end = range.end ?? -1;
    if (start === end) { // 单独光标,无选区,走搜索匹配
        let spans = controller.getSpans({ start: start - 1, end: range.end });
        for (let i = 0; i < spans.length; i++) {
        let span = spans[i] as RichEditorTextSpanResult;
        if (span.textStyle !== undefined) {
            return span;
        }
        }
    } else {
        // 有选区时,默认选区范围
        let spans = controller.getSpans(range);
        if (spans) {
        for (let i = 0; i < spans.length; i++) {
            let span = spans[i] as RichEditorTextSpanResult;
            if (span.textStyle !== undefined) {
            return span;
            }
        }
        }
    }
    // 无匹配
    return undefined;
}
- 通过 RichEditorController 的 setTypingStyle 方法来设置输入时的文本样式;通过 updateSpanStyle 方法来设置选中区域的文本样式。
static updateSpanStyle(controller: RichEditorController, range: RichEditorSelection, style: RichEditorUpdateTextSpanStyleOptions) {
    let start = range.selection[0];
    let end = range.selection[1];
    if (start === end) {
        // 无选区,仅光标,更新输入样式
        controller.setTypingStyle(style.textStyle);
    } else {
        controller.updateSpanStyle(style);
    }
}
更多关于HarmonyOS鸿蒙Next中多种富文本编辑功能示例代码的实战教程也可以访问 https://www.itying.com/category-93-b0.html
2 回复
在HarmonyOS Next中实现富文本编辑可使用RichEditor组件。以下是关键功能示例代码:
- 基础使用:
import { RichEditor } from '@ohos/richtexteditor'
let editor = new RichEditor()
editor.setFontSize(16)
editor.setTextColor('#FF0000')
- 插入图片:
editor.insertImage($rawfile("example.png"))
- 文字样式:
editor.setBold(true)
editor.setItalic(true)
editor.setUnderline(true)
- 段落格式:
editor.setParagraphAlign(RichEditor.Align.CENTER)
- 撤销/重做:
editor.undo()
editor.redo()
这些API均属于HarmonyOS ArkUI的富文本编辑能力。
更多关于HarmonyOS鸿蒙Next中多种富文本编辑功能示例代码的实战系列教程也可以访问 https://www.itying.com/category-93-b0.html
这是一个很好的HarmonyOS Next富文本编辑实现示例。核心思路是通过RichEditor组件和控制器实现样式管理:
-
使用onSelectionChange事件监听选区变化,通过RichEditorUtil.getFirstTextSpanStyle获取当前文本样式,并更新工具栏状态。
-
处理光标和选区两种情况:
- 无选区时(仅光标):通过getSpans搜索匹配前一个字符的样式
- 有选区时:直接获取选区范围内的样式
- 样式更新分两种方式:
- setTypingStyle:设置输入时的默认样式
- updateSpanStyle:更新已有选区文本的样式
示例代码结构清晰,展示了文本颜色、字体样式、阴影等常见富文本功能的实现方式,是学习HarmonyOS富文本开发的很好参考。


