


HarmonyOS 鸿蒙Next中实现华为账号登录(Account Kit)集成功能的详细步骤。
HarmonyOS 鸿蒙Next中实现华为账号登录(Account Kit)集成功能的详细步骤。
一、开发准备全流程
1. 证书配置四步法
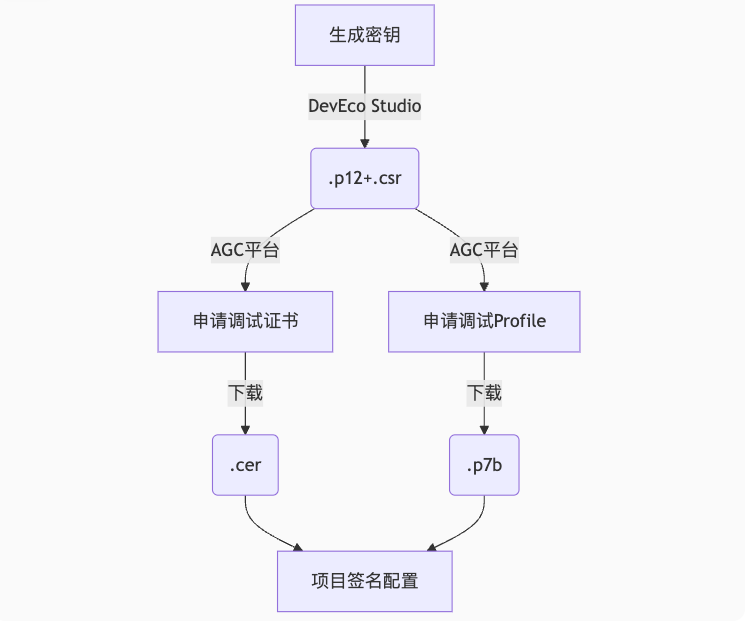
2. 关键配置项
| 文件类型 | 作用 | 获取方式 |
|---|---|---|
| .p12 | 私钥文件 | DevEco Studio生成 |
| .csr | 证书请求文件 | DevEco Studio生成 |
| .cer | 调试证书 | AGC平台申请 |
| .p7b | Profile文件 | AGC平台申请 |
签名配置示例:
// build-profile.json5
"signingConfigs": [
  {
    "name": "release",
    "material": {
      "storeFile": "meikou.p12",
      "storePassword": "******",
      "keyAlias": "meikou",
      "keyPassword": "******",
      "signAlg": "SHA256withECDSA",
      "profile": "meikou_debug.p7b",
      "certpath": "meikou.cer"
    }
  }
]
二、权限配置核心要点
1. 权限层级结构
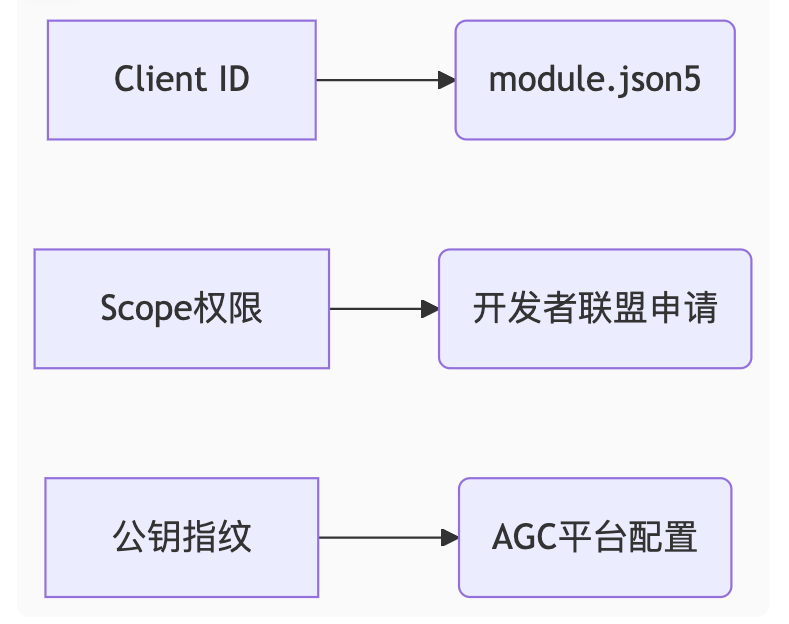
2. 敏感权限申请流程
- 登录开发者联盟
- 进入
管理中心 > API服务 > 授权管理 - 选择目标应用
- 服务选择“华为帐号服务”
- 申请
PHONE权限(获取手机号)
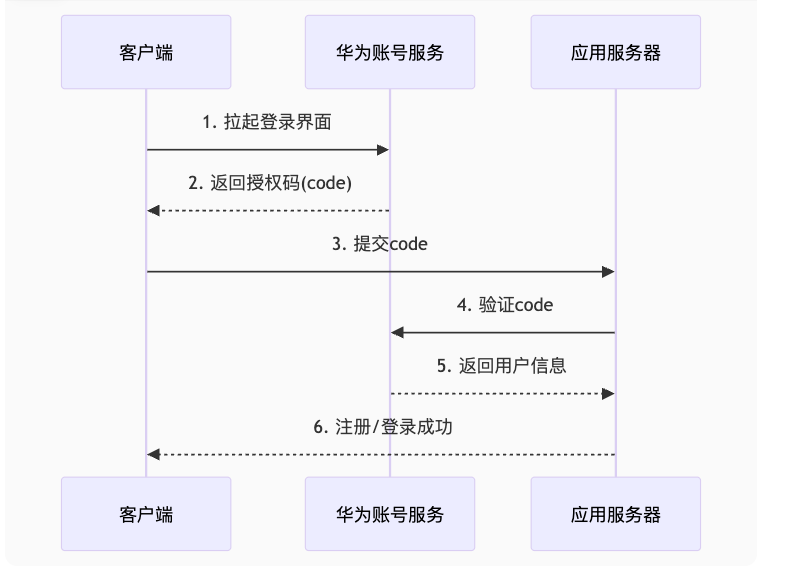
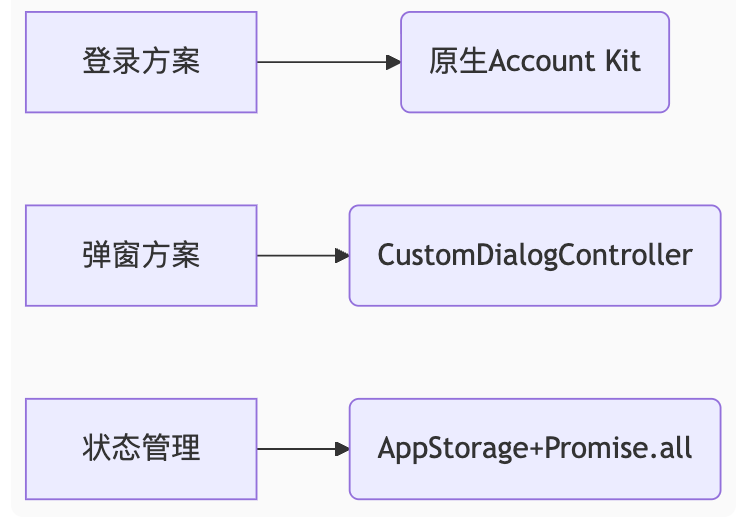
三、华为登录实现精要
1. 授权登录流程图
2. 核心代码实现
封装登录模块
// features/account/src/main/ets/service/HuaweiAuthService.ets
import { AccountAuthService, AccountAuthParams, AccountAuthScope } from '@ohos/account';

export class HuaweiAuth {
  static async login(context: common.UIAbilityContext): Promise<string> {
    const service: AccountAuthService = AccountAuthService.getService(context);
    const authParams: AccountAuthParams = {
      scopeList: [AccountAuthScope.SCOPE_MOBILE_NUMBER]
    };
    try {
      const result = await service.signIn(authParams);
      return result.authCode; // 获取授权码
    } catch (error) {
      throw new Error(`华为登录失败: ${error.code}`);
    }
  }

  static async logout(): Promise<void> {
    const service = AccountAuthService.getService();
    await service.cancelAuth();
  }
}
登录页面整合
// features/auth/src/main/ets/view/LoginView.ets
import { HuaweiAuth } from '../service/HuaweiAuthService';

@Entry
@Component
struct LoginPage {
  @State isLoading: boolean = false;

  async huaweiLogin() {
    this.isLoading = true;
    try {
      const code = await HuaweiAuth.login(getContext(this));
      // 提交code到应用服务器
      const userInfo = await AuthAPI.loginWithHuawei(code);
      AppStorage.setOrCreate('user', userInfo);
    } catch (error) {
      promptAction.showToast({ message: error.message });
    } finally {
      this.isLoading = false;
    }
  }

  build() {
    Column() {
      Button('华为账号登录')
        .onClick(() => this.huaweiLogin())
        .enabled(!this.isLoading)

      if (this.isLoading) {
        LoadingProgress()
          .color(Color.Blue)
      }
    }
  }
}
四、全局弹窗最佳实践
1. 官方推荐方案(API 10+)
// common/src/main/ets/component/LoadingDialog.ets
import { UIContext } from '@ohos.arkui.UIContext';

@CustomDialog
struct GlobalLoading {
  @State message: string = '处理中...'
  controller: CustomDialogController

  build() {
    Column() {
      LoadingProgress()
        .width(50).height(50)
      Text(this.message)
        .margin({ top: 10 })
    }
    .padding(20)
  }
}

// 全局弹窗管理器
export class DialogUtils {
  static showLoading(message: string = '') {
    const controller: CustomDialogController = new CustomDialogController({
      builder: GlobalLoading({ message }),
      alignment: DialogAlignment.Center,
      customStyle: true
    });
    controller.open();
    return controller;
  }
}
2. 使用示例
// 登录流程优化
async huaweiLogin() {
  const controller = DialogUtils.showLoading('华为登录中');

  try {
    const code = await HuaweiAuth.login(getContext(this));
    // ...后续处理
  } catch (error) {
    // 错误处理
  } finally {
    controller.close();
  }
}
五、登出逻辑强化
// features/user/src/main/ets/view/SettingView.ets
async logout() {
  try {
    // 同步执行本地登出和华为登出
    await Promise.all([
      AuthService.localLogout(),
      HuaweiAuth.logout()
    ]);
    router.clear();
    router.pushUrl({ url: 'pages/Login' });
  } catch (error) {
    promptAction.showToast({ message: '登出失败' });
  }
}
六、常见问题解决方案
| 问题现象 | 原因 | 解决方案 |
|---|---|---|
错误码 6003 |
未配置Client ID | 检查module.json5的metaData配置 |
| 权限申请失败 | 企业资质问题 | 1. 完善申请材料 2. 使用测试账号 |
| 真机调试失败 | Profile未包含设备 | 1. 重新申请Profile 2. 添加测试设备UDID |
| 弹窗不显示 | 上下文错误 | 使用getContext获取正确上下文 |
七、安全增强措施
- Code有效期:授权码10分钟内有效,需快速提交服务器
- 防重放攻击:服务器端验证code使用状态
- 敏感信息保护:
// 加密存储token
import { cryptoFramework } from '@ohos.security.cryptoFramework';

async function secureStore(token: string) {
  const cipher = await cryptoFramework.createCipher('AES256|ECB');
  // ...加密操作
}
八、面试要点总结
-
封装组件经验:
- 华为登录模块:封装认证逻辑与UI解耦
- 全局弹窗:基于CustomDialogController实现
- 安全存储:结合cryptoFramework加密敏感数据
-
关键技术选择:
- 性能优化:
- 并行操作:登出时同步执行本地和云端登出
- 资源复用:DialogController单例管理
- 错误边界:try/catch包裹异步操作
更多关于HarmonyOS 鸿蒙Next中实现华为账号登录(Account Kit)集成功能的详细步骤。的实战教程也可以访问 https://www.itying.com/category-93-b0.html
3 回复

学习打卡
更多关于HarmonyOS 鸿蒙Next中实现华为账号登录(Account Kit)集成功能的详细步骤。的实战系列教程也可以访问 https://www.itying.com/category-93-b0.html

鸿蒙Next集成华为账号登录(Account Kit)步骤如下:
- 在AppGallery Connect中创建项目并启用Account Kit
- 配置应用签名指纹
- 在工程级build.gradle添加华为maven仓库
- 在模块级build.gradle添加account-kit依赖
- 在config.json中声明所需权限
- 初始化AccountAuthService
- 调用signIn接口获取AuthAccount对象
- 处理授权回调结果
关键代码片段:
const accountAuthService = account.createAccountAuthService();
accountAuthService.signIn()
  .then(authAccount => { /* 处理成功 */ })
  .catch(err => { /* 处理失败 */ });
在HarmonyOS Next中集成华为账号登录(Account Kit)的主要步骤如下:
- 开发准备:
- 在AGC平台创建项目和应用
- 配置签名证书(.p12, .cer, .p7b等)
- 在build-profile.json5中配置签名信息
- 权限配置:
- 在module.json5中添加必要权限:
"requestPermissions": [
  {
    "name": "ohos.permission.ACCOUNT_MANAGER"
  }
]
- 代码实现:
- 初始化AccountAuthService:
const service = AccountAuthService.getService(context);
- 配置登录参数:
const authParams: AccountAuthParams = {
  scopeList: [AccountAuthScope.SCOPE_PROFILE]
};
- 调用登录方法:
try {
  const result = await service.signIn(authParams);
  const authCode = result.authCode; // 获取授权码
  // 将authCode发送到应用服务器换取accessToken
} catch (error) {
  console.error(`登录失败: ${error.code}`);
}
- 登出实现:
await service.cancelAuth();
- 注意事项:
- 确保应用已正确配置Client ID
- 授权码(authCode)有效期为10分钟,需及时处理
- 真机调试需确保设备UDID已添加到Profile中
常见问题处理:
- 错误码6003:检查Client ID配置
- 权限申请失败:检查企业资质或使用测试账号
- 弹窗不显示:确保使用正确的UIAbilityContext
以上是HarmonyOS Next中集成华为账号登录的核心流程和关键代码实现。