


HarmonyOS鸿蒙Next中使用Web组件加载本地网页怎么使得背景透明
HarmonyOS鸿蒙Next中使用Web组件加载本地网页怎么使得背景透明 如题,想要使背景透明如何操作
6 回复

实现Web组件加载本地网页的背景透明,需要同时处理ArkUI容器和Web内容层的透明设置。楼主参照以下示例试试:
// index.ets
import { webview } from '@kit.ArkWeb';

struct TransparentWebPage {
  controller: webview.WebviewController = new webview.WebviewController();

  build() {
    Column() {
      Web({
        src: $rawfile("transparent.html"),
        controller: this.controller
      })
        .width('100%')
        .height('100%')
        .backgroundColor(Color.Transparent)
    }
    .backgroundColor(Color.Transparent)
    .opacity(1)
  }
}
<!-- transparent.html -->
<!DOCTYPE html>
<html style="background-color:transparent">
<head>
  <link rel="stylesheet" href="resource://rawfile/transparent.css">
</head>
<body>
  <p>透明背景内容</p>
</body>
</html>
更多关于HarmonyOS鸿蒙Next中使用Web组件加载本地网页怎么使得背景透明的实战系列教程也可以访问 https://www.itying.com/category-93-b0.html

我写了一个demo楼主可以参考一下:
- 实现思路:
- 将鸿蒙端组件背景色透明度改为0,再改变网页的透明度来实现将网页背景色变为0使整个web层透明
- 如果要改变其他网页的背景色通过runJavaScript来实现
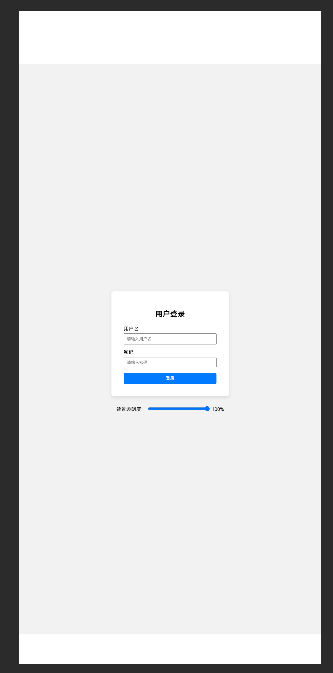
不透明时:
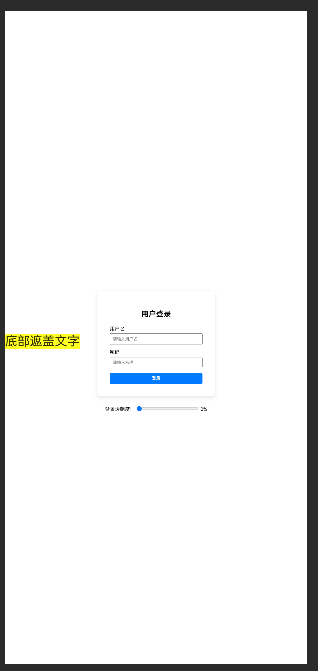
完全透明时,遮盖文字露出:
2. 鸿蒙端代码:

```typescript
import { webview } from '[@kit](/user/kit).ArkWeb';
import { LogUtil } from '../common/util/LogUtil';

const TAG: string = 'MusicWeb'

[@Component](/user/Component)
struct WebPage {
  controller: webview.WebviewController = new webview.WebviewController();
  customUserAgent: string =
    'Mozilla/5.0 (Windows NT 10.0; Win64; x64) AppleWebKit/537.36 (KHTML, like Gecko) Chrome/132.0.0.0 Safari/537.36'
  url: string = ''

  build() {
    Stack() {
      Text('底部遮盖文字')
        .backgroundColor('#ff2')
      Column() {
        Web({
          src: $rawfile('Index.html'),
          controller: this.controller
        })
          .backgroundColor('#00f8f8f6')
          .zoomAccess(false)
          .metaViewport(true)
          .onlineImageAccess(true)
          .javaScriptAccess(true)
          .domStorageAccess(true)
          .databaseAccess(true)
          .horizontalScrollBarAccess(false)
          .verticalScrollBarAccess(false)
          .geolocationAccess(true)
          .multiWindowAccess(false)
          .allowWindowOpenMethod(false)
          .mixedMode(MixedMode.All)
          .darkMode(WebDarkMode.Off)//开启网页深色模式
          .onGeolocationShow((event: OnGeolocationShowEvent) => {
            event.geolocation.invoke(event.origin, true, true)
            // this.viewModel.locationStateManage()
          })
          .onPageBegin((event) => {
            // this.viewModel.setLoadingProgress(0,true)
            LogUtil.i(TAG, "onPageBegin", event)
          })
          .onProgressChange((event) => {
            // this.viewModel.setLoadingProgress(event.newProgress)
            LogUtil.i(TAG, "onProgressChange", event.newProgress)
          })
          .onPageEnd(() => {
            // if (this.viewModel.webState != WebState.networkError) {
            //   this.viewModel.webState = WebState.loadComplete
            // }
            LogUtil.i(TAG, "onPageEnd")
            // 注册对象的名称:jsBridge
            // 交互方法名(同步方法):bridgeMethod
            // 交互方法名(异步方法):asyncBridgeMethod
            // 交互的数据类型统一为json对象或者json字符串
            // {
            //   "bridgeCode": 1,//js调用app方法时返回的状态码,1代表成功,0代表失败,比如登录交互,1:登录成功,0:登录失败
            //   "bridgeData": {"userName": "xxx","pwd": "xxx"},//js调用app方法传递的参数
            //   "appMethodName": "login",//js调用app的方法名
            //   "jsMethodName": "test",//app回调js的方法名
            //   "bridgeFlagData": {}//js调用app方法时传递的参数,app回调js方法时原封不动传递给js
            // }
            // if(this.pageEndScript){
            //   this.config.controller?.runJavaScript(this.pageEndScript)
            // }
          })
          .onGeolocationHide(() => {
            // Toast.show('用户未同意获取地理位置信息!')
            // LogUtil.w(this.Tag, 'onGeolocationHide', '获取地理位置弹窗被取消')
          })
          .onControllerAttached(() => {
            // this.isControllerAttached = true
            try {
              webview.WebCookieManager.putAcceptCookieEnabled(true)
              webview.WebCookieManager.putAcceptThirdPartyCookieEnabled(true)
            } catch (err) {
            }
            // TODO: 这2个api可能造成闪退, 先关闭
            // this.controller?.enableAdsBlock(true) //暂时先开启
            // this.controller?.enableSafeBrowsing(true)
            this.controller?.setCustomUserAgent(this.customUserAgent)
            if (this.controller) {
              /*        this.schemeHandler = new HttpsSchemeHandler(this.config.controller)
                      this.schemeHandler.addHandler(new ServiceWorkSchemeHandler('FControllerAttached'))*/
              // this.controller.setWebSchemeHandler('https', this.schemeHandler);
            }
          })
          .onErrorReceive((event) => {
            if (event) {
              LogUtil.i(TAG, 'getErrorInfo:' + event.error.getErrorInfo());
              LogUtil.i(TAG, 'getErrorCode:' + event.error.getErrorCode());
              LogUtil.i(TAG, 'url:' + event.request.getRequestUrl());
              LogUtil.i(TAG, 'isMainFrame:' + event.request.isMainFrame());
              LogUtil.i(TAG, 'isRedirect:' + event.request.isRedirect());
            }
          })
          .width('100%')
          .height('100%')
      }
      .padding({ top: 30, bottom: 10 })
      .width('100%')
      .height('100%')
      .backgroundColor('#00f8f8f6')
    }
    .alignContent(Alignment.Start)
    .width('100%')
    .height('100%')
  }
}
- Index.html, demo代码:
<!DOCTYPE html>
<html lang="en">
<head>
    <meta charset="UTF-8">
    <title>登录页面</title>
    <style>
        body {
          font-family: Arial, sans-serif;
          background: rgba(242, 242, 242, 1); /* 使用 rgba 支持透明度 */
          display: flex;
          justify-content: center;
          align-items: center;
          height: 100vh;
          flex-direction: column;
          transition: background 0.3s ease;
        }

        .login-container {
          background: #fff;
          padding: 40px;
          border-radius: 8px;
          box-shadow: 0 4px 12px rgba(0, 0, 0, 0.1);
          width: 300px;
        }

        .login-container h2 {
          text-align: center;
          margin-bottom: 24px;
        }

        .form-group {
          margin-bottom: 16px;
        }

        .form-group label {
          display: block;
          margin-bottom: 6px;
        }

        .form-group input {
          width: 100%;
          padding: 8px;
          box-sizing: border-box;
        }

        .login-button {
          width: 100%;
          padding: 10px;
          background: #007bff;
          border: none;
          color: white;
          font-weight: bold;
          border-radius: 4px;
          cursor: pointer;
        }

        .login-button:hover {
          background: #0056b3;
        }

        .error {
          color: red;
          font-size: 14px;
          text-align: center;
          display: none;
        }

        .opacity-slider-container {
          margin-top: 30px;
          text-align: center;
        }

        .opacity-slider-container input {
          width: 200px;
        }
    </style>
</head>
<body>

<div class="login-container">
    <h2>用户登录</h2>
    <div class="form-group">
        <label for="username">用户名</label>
        <input id="username" placeholder="请输入用户名" type="text">
    </div>
    <div class="form-group">
        <label for="password">密码</label>
        <input id="password" placeholder="请输入密码" type="password">
    </div>
    <div class="error" id="errorMsg">请输入用户名和密码</div>
    <button class="login-button" onclick="handleLogin()">登录</button>
</div>

<!-- ✅ 新增:透明度控制滑块 -->
<div class="opacity-slider-container">
    <label for="opacitySlider">背景透明度:</label>
    <input id="opacitySlider" max="100" min="0" type="range" value="100">
    <span id="opacityValue">100%</span>
</div>

<script>
    function handleLogin() {
      const username = document.getElementById('username').value.trim();
      const password = document.getElementById('password').value.trim();
      const errorMsg = document.getElementById('errorMsg');

      if (!username || !password) {
        errorMsg.style.display = 'block';
        return;
      }

      errorMsg.style.display = 'none';

      // 模拟提交请求
      alert(`用户名:${username}\n密码:${password}`);
    }

    // ✅ 新增:监听滑块调整背景透明度
    const slider = document.getElementById('opacitySlider');
    const valueLabel = document.getElementById('opacityValue');
    slider.addEventListener('input', (e) => {
      const percent = e.target.value;
      const alpha = percent / 100;
      document.body.style.background = `rgba(242, 242, 242, ${alpha})`;
      valueLabel.textContent = `${percent}%`;
    });
</script>

</body>
</html>


在 HarmonyOS 的 ArkTS 中,使用 Web 组件加载本地网页并实现背景透明,需要同时配置 Web 组件本身 和 本地网页的 CSS 样式,确保两层背景都设置为透明。

在HarmonyOS Next中,要使Web组件加载的本地网页背景透明,需要在ArkUI和网页端同时设置:
- ArkUI端:
Web({ src: $rawfile('local.html') })
  .backgroundColor(Color.Transparent)
  .webController(controller)
- HTML端需添加:
<style>
  body {
    background-color: transparent !important;
  }
</style>
同时确保网页内容没有不透明元素覆盖。此方法仅适用于本地网页加载场景。
