


Flutter里面HarmonyOS鸿蒙Next沉浸式如何计算安全区
Flutter里面HarmonyOS鸿蒙Next沉浸式如何计算安全区
我在flutter里面设置了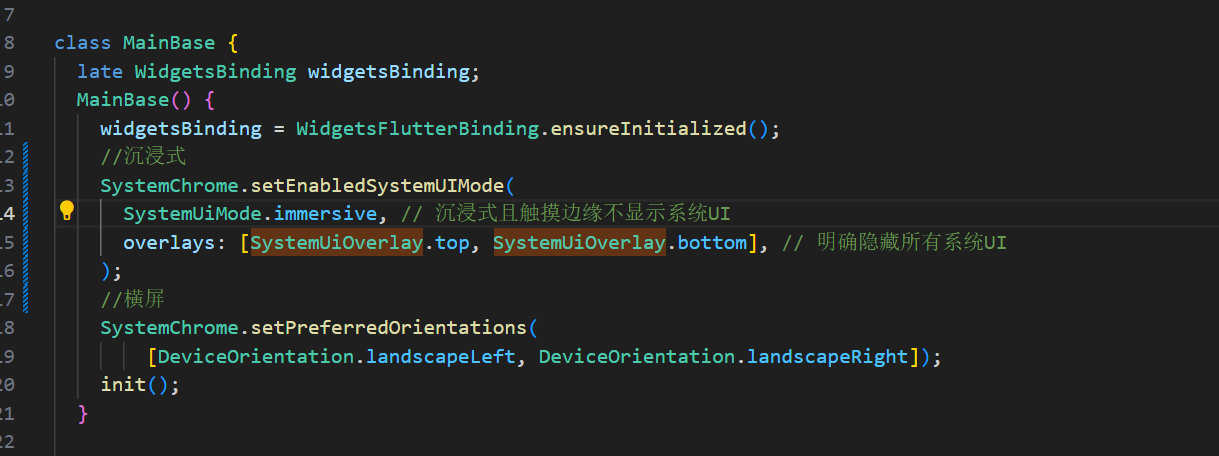 然后得到的
然后得到的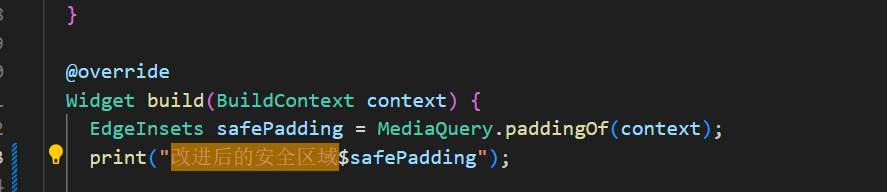
都为
因为我的app有点游戏的成分所有沉浸式是必须的,但是里面的有些组件还不能被摄像头遮挡这就得计算出间距,我既想要沉浸式又想要安全区,咋办
更多关于Flutter里面HarmonyOS鸿蒙Next沉浸式如何计算安全区的实战教程也可以访问 https://www.itying.com/category-92-b0.html

开发者您好,参考以下方案:
【背景知识】
- 系统UI模式:在SystemUiMode.immersive模式下,应用程序以全屏显示,适用于游戏、视频播放等需要完全沉浸的场景。
- MethodChannel:提供Flutter与HarmonyOS通信的能力。
- getWindowAvoidArea:获取当前应用窗口避让区,包括系统栏区域、刘海屏区域、手势区域、软键盘区域等与窗口内容重叠时,需要窗口内容避让的区域。
【解决方案】 如果主动启用全沉浸式,Flutter默认为不需要自动处理安全区域避让,因此padding被清零。若需在全沉浸式下获取真实的安全区域尺寸,可在进入沉浸式前保存padding值,手动记录原始安全区域,或在HarmonyOS侧调用接口getWindowAvoidArea获取窗口避让区,再通过MethodChannel通道将避让数据回传给Dart侧,并在Dart中设置组件上边距。代码参考:
- 方案一:进入沉浸式前保存padding值并设置组件上边距:
import 'package:flutter/material.dart';
import 'package:flutter/services.dart';

void main() {
  runApp(const MyApp());
}

class MyApp extends StatelessWidget {
  const MyApp({super.key});

  @override
  Widget build(BuildContext context) {
    return MaterialApp(
      home: const MyHomePage(title: 'Flutter Demo Home Page')
    );
  }
}

class MyHomePage extends StatefulWidget {
  const MyHomePage({super.key, required this.title});
  final String title;

  @override
  State<MyHomePage> createState() => _MyHomePageState();
}

class _MyHomePageState extends State<MyHomePage> {
  EdgeInsets originalPadding = EdgeInsets.zero;
  bool _isImmersiveEnabled = false;
  @override
  initState() {
    super.initState();
  }

  // 在didChangeDependencies中捕获初始安全区域
  @override
  void didChangeDependencies() {
    super.didChangeDependencies();
    if (originalPadding.top == 0) {
      originalPadding = MediaQuery.of(context).padding; // 安全访问
    }
    if (!_isImmersiveEnabled) {
      enableFullImmersiveMode();
    }
  }

  // 进入完全沉浸式模式(触摸边缘不显示系统UI)
  void enableFullImmersiveMode() {
    SystemChrome.setEnabledSystemUIMode(
      SystemUiMode.immersive, // 关键参数:触摸边缘不会显示系统UI
      overlays: [], // 隐藏所有系统覆盖层(状态栏/导航栏)
    );
    _isImmersiveEnabled = true;
  }

  @override
  Widget build(BuildContext context) {

    return Scaffold(
      body: Container(
        alignment: Alignment.center,
        color: Colors.blue, // 背景设为蓝色
        child: Column(
          crossAxisAlignment: CrossAxisAlignment.center,
          children: [
            Padding(
              padding: EdgeInsets.only(top: originalPadding.top), // 设置上边距
              child: ElevatedButton(
                onPressed: () {
                  print("按钮被点击了!");
                },
                child: Text("点击我"),
              ),
            ),
            Text(
              "这是一段文本",
              style: TextStyle(
                fontSize: 16,
                color: Colors.white,
              ),
            ),
          ],
        ),
      )
    );
  }
}
- 方案二:在HarmonyOS端获取安全区域,再通过MethodChannel通道将数据回传给Dart侧设置组件上边距:
// HarmonyOS侧
onAttachedToEngine(binding: FlutterPluginBinding): void {
  this.channel = new MethodChannel(binding.getBinaryMessenger(), "samples.flutter.dev/myDemo");
  let that = this;
  this.channel.setMethodCallHandler({
    onMethodCall(call: MethodCall, result: MethodResult) {
      switch (call.method) {
        case "getSafeArea":
          that.getSafeArea(result)
          break;
        default:
          result.notImplemented();
          break;
      }
    }
  })
}

getSafeArea(result: MethodResult) {
  window.getLastWindow(getContext(), (err: BusinessError, windowClass) => {
    if (err.code) {
      result.error("UNAVAILABLE", "SafeArea not available.", null)
    } else {
      const avoidArea = windowClass.getWindowAvoidArea(window.AvoidAreaType.TYPE_CUTOUT)
      result.success(windowClass.getUIContext().px2vp(avoidArea.topRect.height))
    }
  })
}
// Dart侧
import 'package:flutter/material.dart';
import 'package:flutter/services.dart';

void main() {
  runApp(const MyApp());
}

class MyApp extends StatelessWidget {
  const MyApp({super.key});

  @override
  Widget build(BuildContext context) {
    return MaterialApp(
      home: const MyHomePage(title: 'Flutter Demo Home Page')
    );
  }
}

class MyHomePage extends StatefulWidget {
  const MyHomePage({super.key, required this.title});
  final String title;

  @override
  State<MyHomePage> createState() => _MyHomePageState();
}

class _MyHomePageState extends State<MyHomePage> {
  final _platform = const MethodChannel('samples.flutter.dev/myDemo');
  double _safeTop = 100;
  @override
  initState() {
    super.initState();
  }

  Future<double> getSafeArea() async {
    try {
      var value =  await _platform.invokeMethod('getSafeArea');
      return value.toDouble();
    } on PlatformException catch (e) {
      print('getSafeArea value error $e');
      return 100.0;
    }
  }

  @override
  Widget build(BuildContext context) {
    return Scaffold(
      body: FutureBuilder<double>(
        future: getSafeArea(),
        builder: (context, snapshot) {
          // 等待数据加载时显示加载指示器
          if (snapshot.connectionState == ConnectionState.waiting) {
            return Center(child: CircularProgressIndicator());
          }

          // 处理错误情况
          if (snapshot.hasError) {
            return Center(child: Text('Error: ${snapshot.error}'));
          }

          // 数据加载完成,使用获取到的 _safeTop 值
          _safeTop = snapshot.data ?? 0.0;

          return Container(
            alignment: Alignment.center,
            color: Colors.blue, // 背景设为蓝色
            child: Column(
              crossAxisAlignment: CrossAxisAlignment.center,
              children: [
                Padding(
                  padding: EdgeInsets.only(top: _safeTop + 10), // 设置上边距
                  child: ElevatedButton(
                    onPressed: () {
                      print("按钮被点击了!");
                    },
                    child: Text("点击我"),
                  ),
                ),
                Text(
                  "这是一段文本",
                  style: TextStyle(
                    fontSize: 16,
                    color: Colors.white,
                  ),
                ),
              ],
            ),
          );
        }
      )
    );
  }
}
【总结】 全沉浸式下padding.top=0是预期行为,因为系统UI被完全隐藏。若需精确避让,需通过HarmonyOS平台获取真实尺寸。
更多关于Flutter里面HarmonyOS鸿蒙Next沉浸式如何计算安全区的实战系列教程也可以访问 https://www.itying.com/category-92-b0.html

建议在需要精确控制规避区域时,优先通过原生接口获取物理像素值后换算为逻辑像素。沉浸式背景层使用透明填充,关键交互组件通过动态边距避开异形区域。
安全区获取方案:
const area = window.getWindowAvoidArea(AvoidAreaType.TYPE_SYSTEM)
const statusBarHeight = px2vp(area.topRect.height)
const navBarHeight = px2vp(area.bottomRect.height)
动态计算布局边距
// 在Flutter层接收原生参数
double _safeTop = 0;
double _safeBottom = 0;

void initState() {
  super.initState();
  MethodChannel('safety_channel').invokeMethod('getSafeArea').then((value) {
    setState(() {
      _safeTop = value['top'];
      _safeBottom = value['bottom'];
    });
  });
}
组件布局调整
Padding(
  padding: EdgeInsets.only(top: _safeTop, bottom: _safeBottom),
  child: Container(color: Colors.transparent) // 沉浸式背景
)
在Flutter中处理HarmonyOS鸿蒙Next的沉浸式安全区,需使用SafeArea组件包裹内容,并配合MediaQuery获取屏幕信息。鸿蒙的安全区计算主要依赖系统返回的窗口边距数据,通过MediaQuery.of(context).padding获取顶部和底部安全区域值,避免刘海屏和底部导航栏遮挡。Flutter框架会自动处理鸿蒙平台的适配,无需额外计算。
在Flutter中实现HarmonyOS Next沉浸式并计算安全区,可通过以下方式处理:
使用SafeArea组件包裹需要避开系统UI(如摄像头区域)的内容部分。例如:
SafeArea(
  minimum: EdgeInsets.only(top: MediaQuery.of(context).padding.top),
  child: YourGameWidget(),
)
同时,通过MediaQuery.of(context).padding获取各边的安全间距(top包含状态栏/摄像头区域,bottom包含导航栏)。若需全屏沉浸,在主页面设置:
SystemChrome.setEnabledSystemUIMode(SystemUiMode.immersiveSticky);
这样既可保持全屏体验,又能通过SafeArea避免关键组件被遮挡。需注意动态适配不同设备的刘海/摄像头差异。