HarmonyOS鸿蒙Next中App Linking解锁酷炫链接新玩法活动及appLink调试盒子
HarmonyOS鸿蒙Next中App Linking解锁酷炫链接新玩法活动及appLink调试盒子 前段时间为了给灵动小组件开发基于applink的壁纸分享功能,做了个简易的applink调试工具,方便其他开发者测试applink的拉起效果,以及快速迭代出合适的uri方案。
【使用体验如下所示:只要提供了接收方的appLink,就能实现快速稳定的跨应用传图功能。该方案未上架,仅定向邀测使用】
当时就感觉这个能力很适合帮助开发者快速调试applink的uri参数,就尝试改造了一下,开发成了一个更专业的applink调试工具。
应用界面:
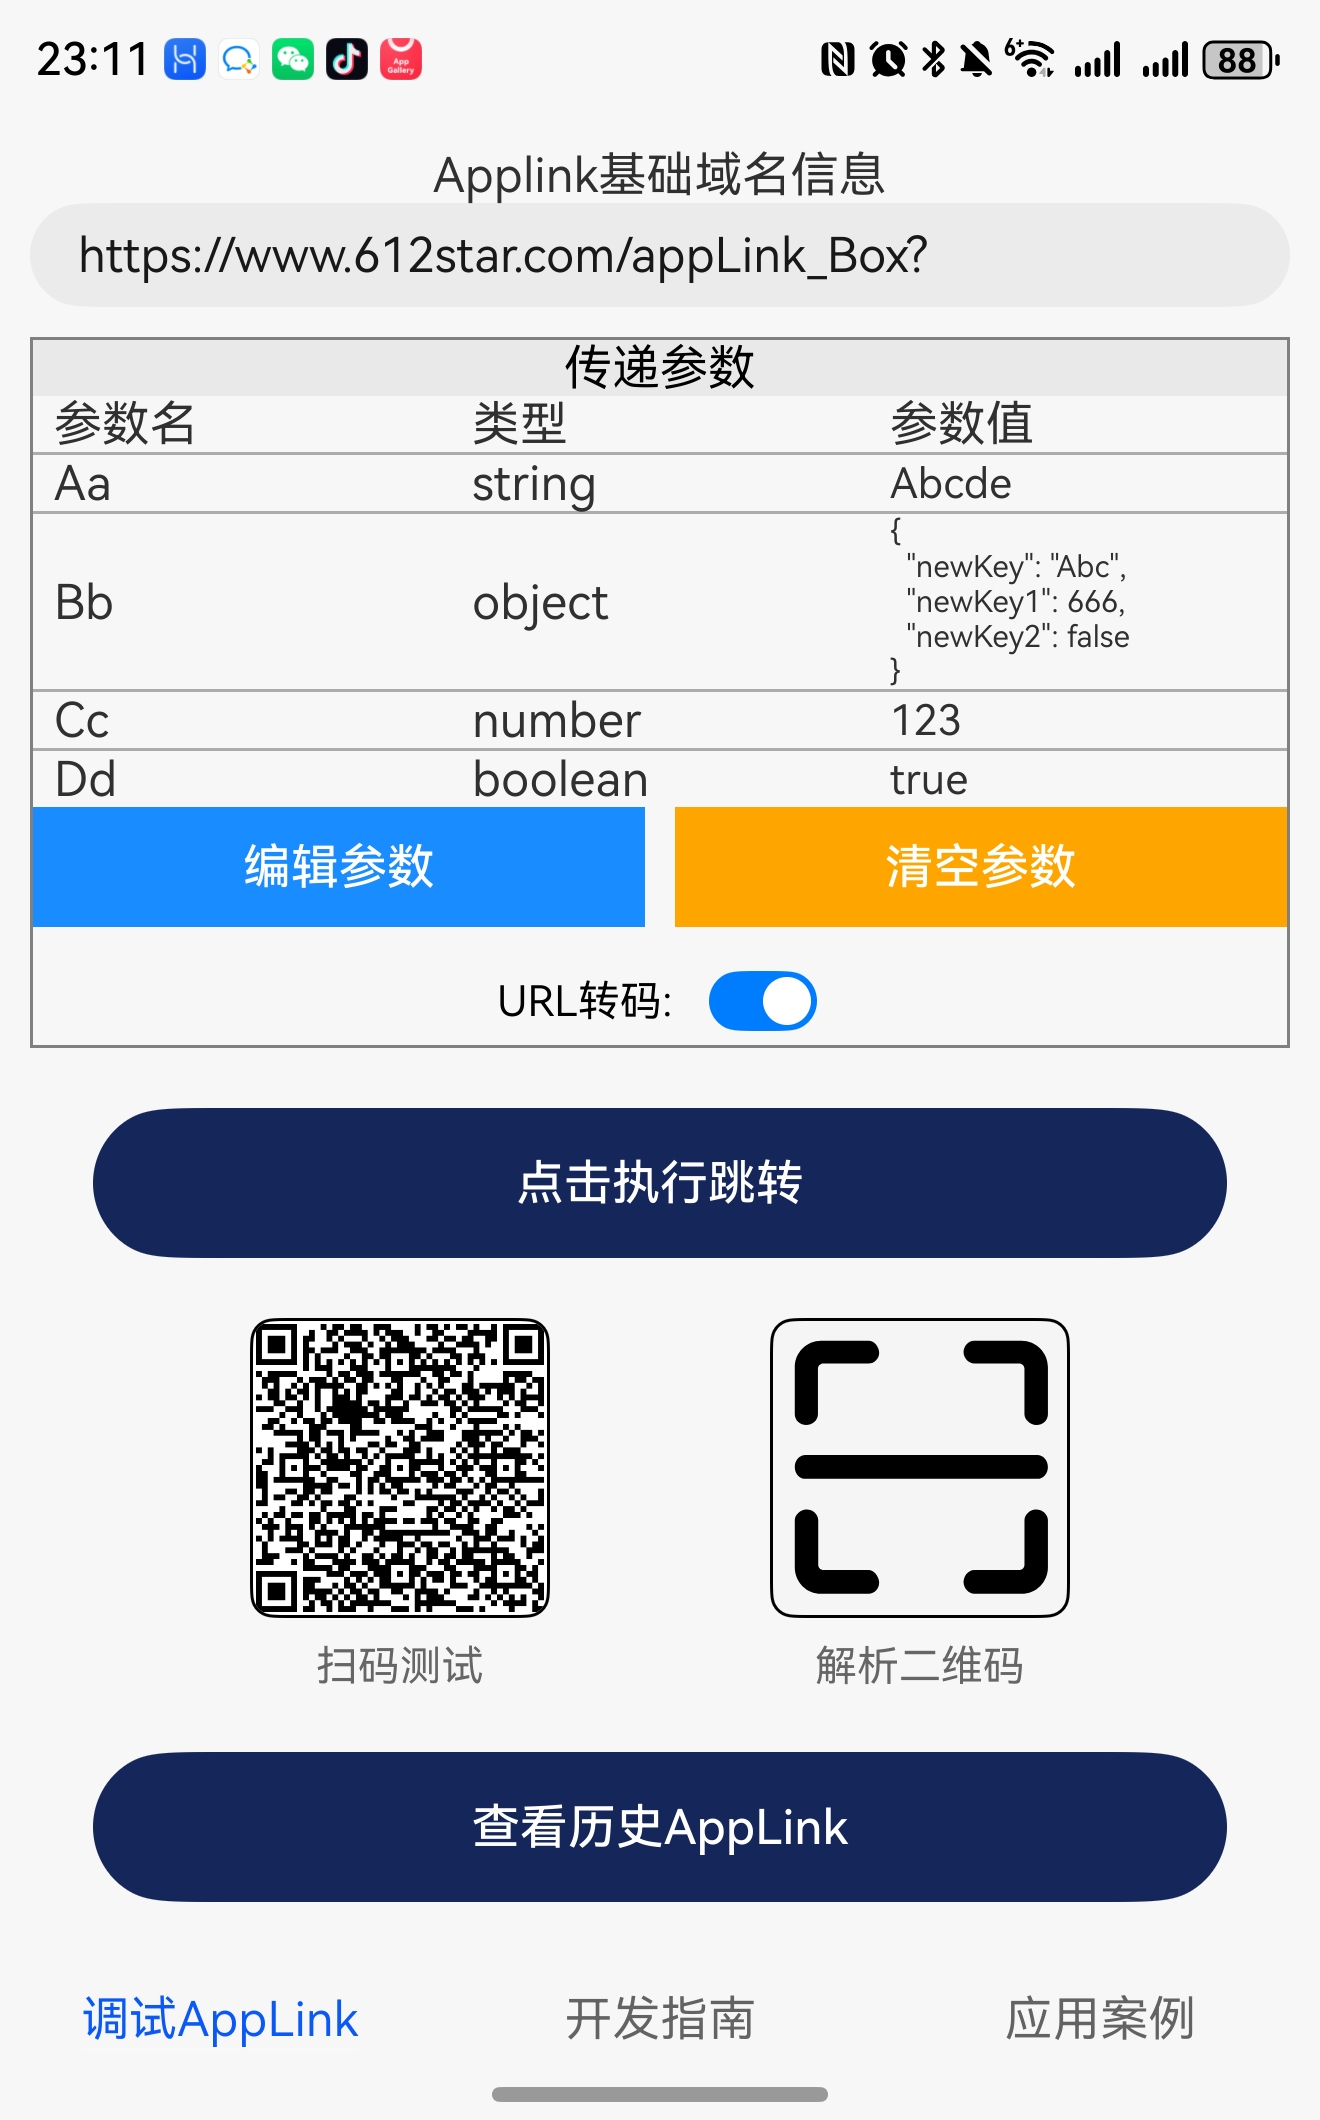
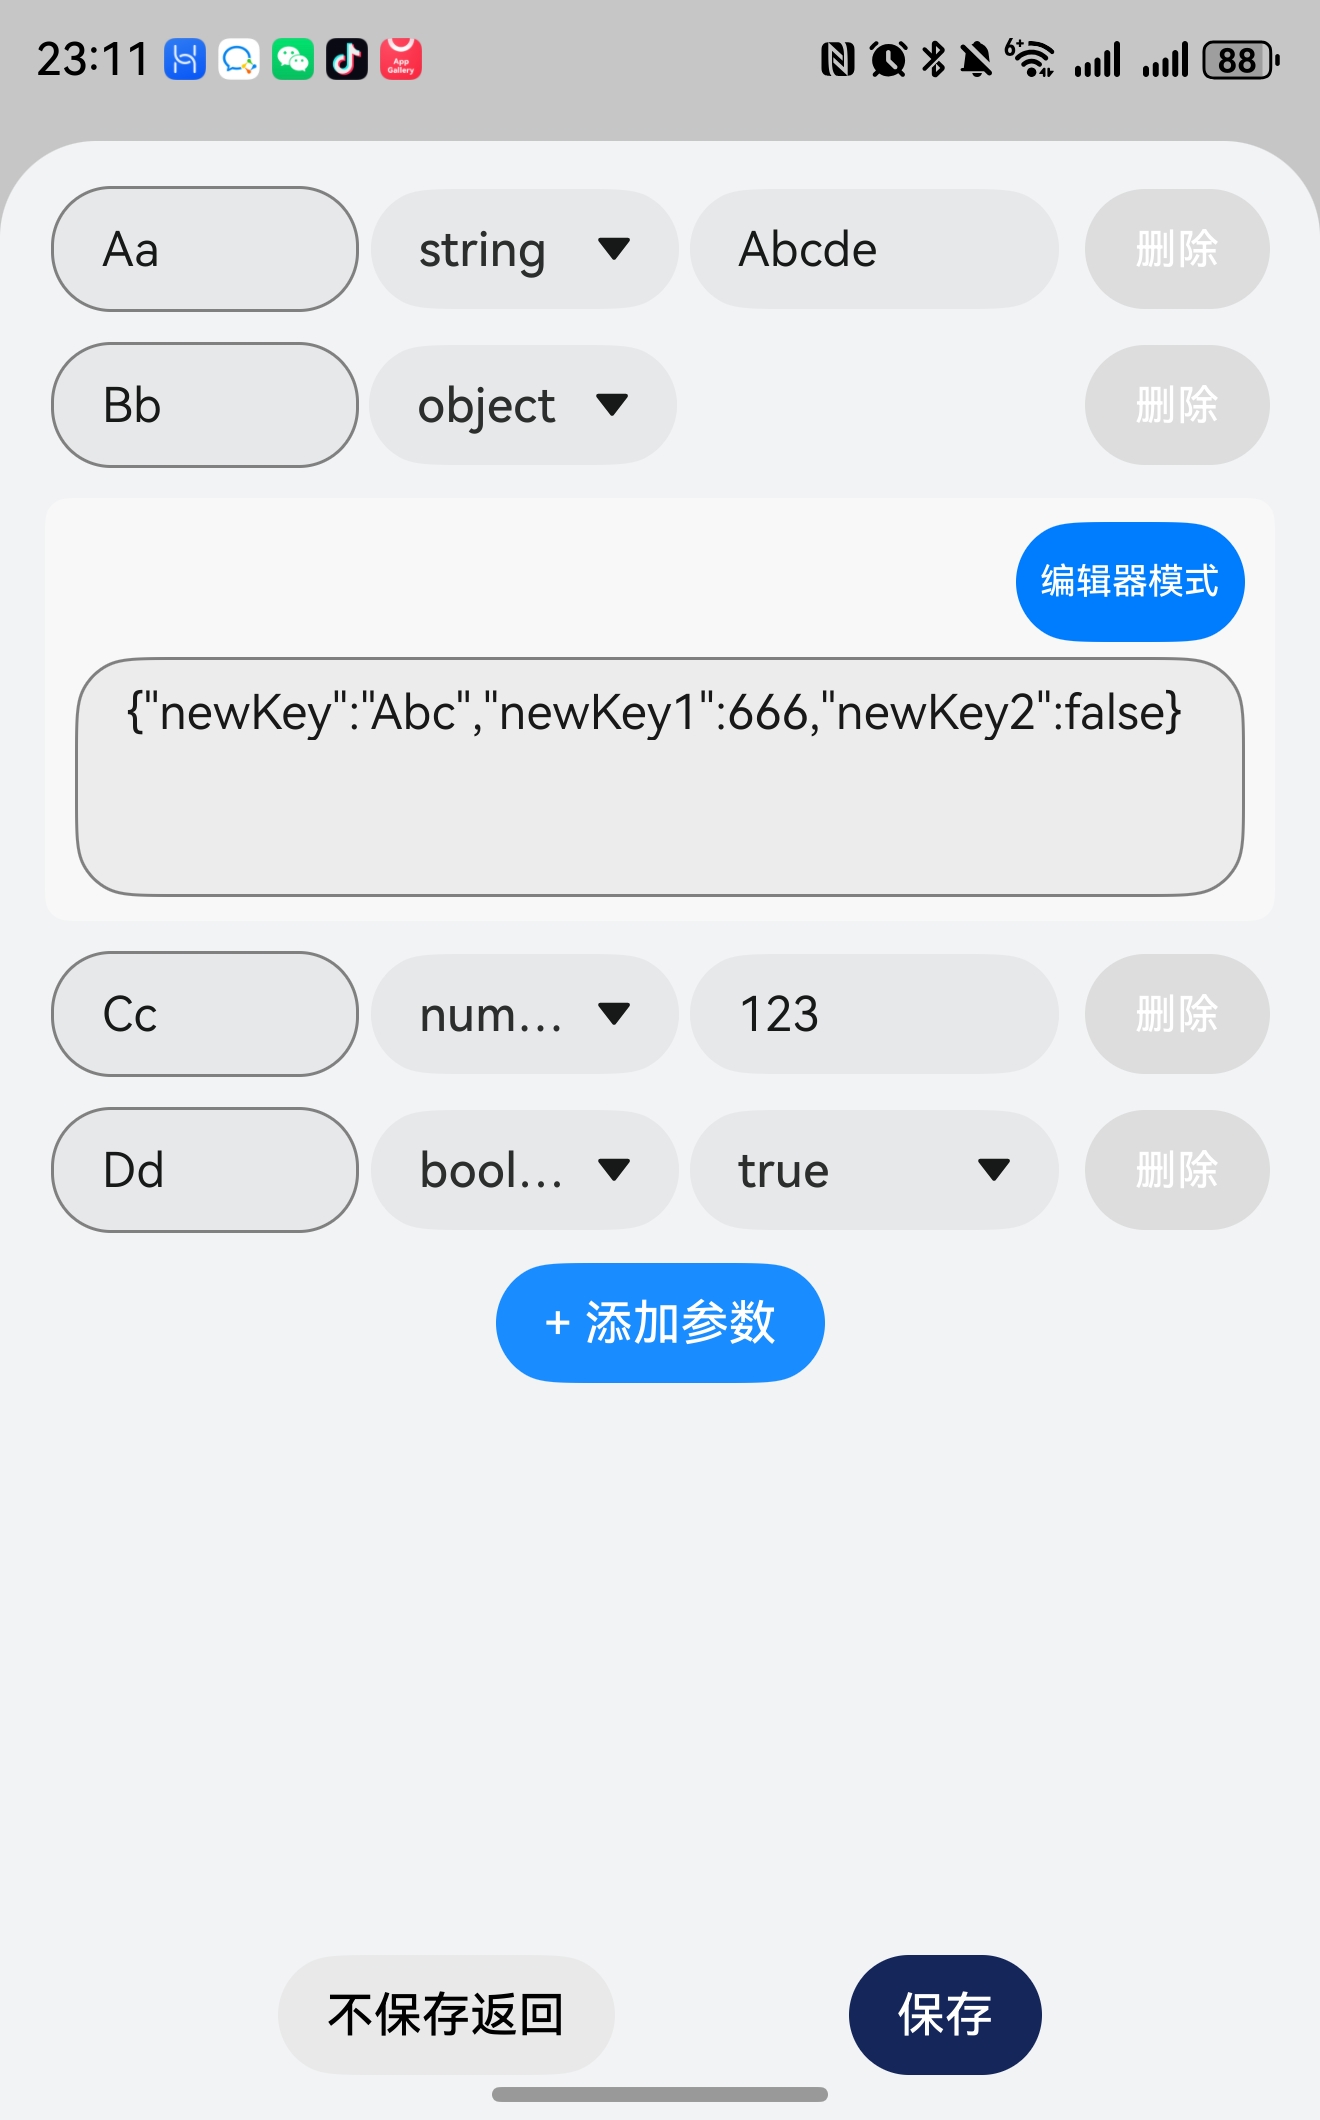
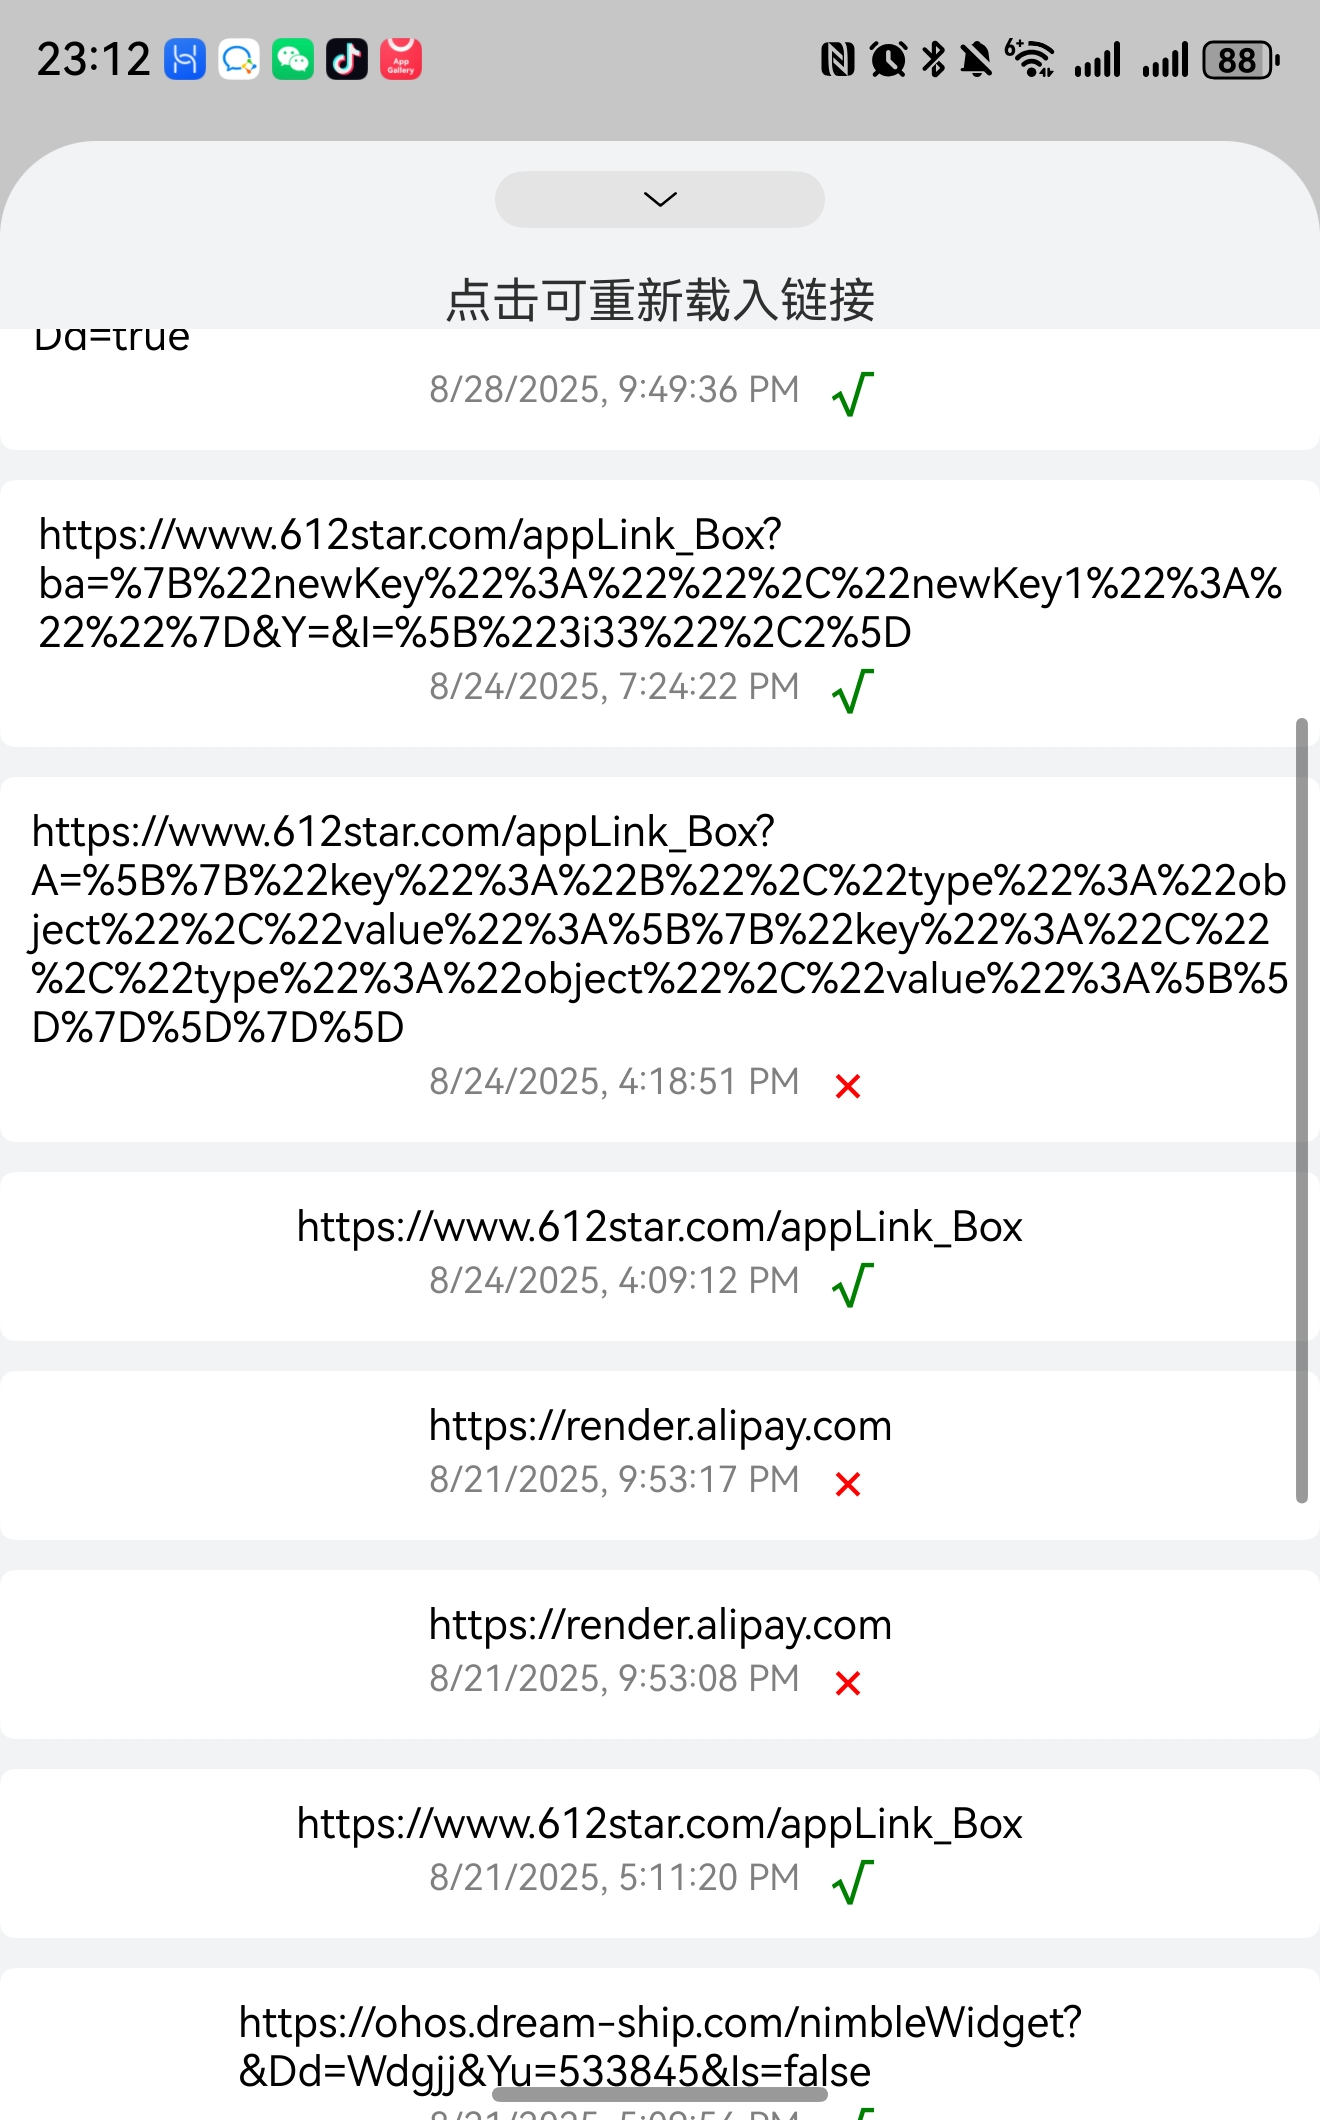
applink调试盒子允许开发者自行填写applink参数,并通过直接点击、碰一碰、生成二维码扫码识别的方式执行applink,测试uri是否能正确拉起应用。
如果是直接点击跳转的话,还支持显示运行日志,省去反复安装应用进行调试的困扰。
具体功能演示效果如下:【视频为开发中途拍摄,UI及部分功能有改动,具体效果以上方图片为准】
分享一下我对Applink的理解:
运行流程图:
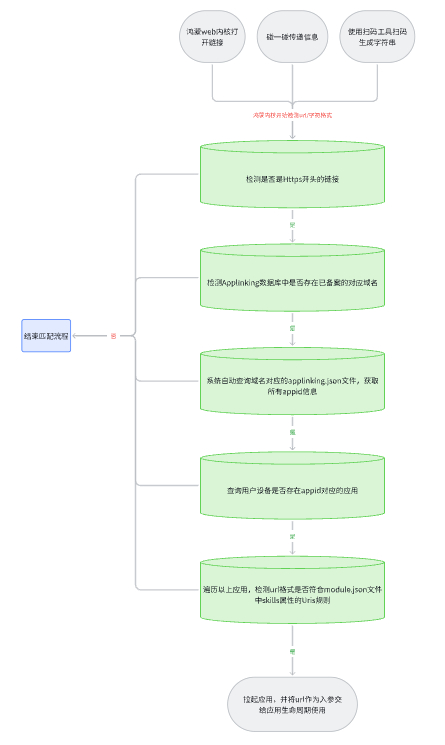
在鸿蒙系统中内置一个applink的自动化执行机制,激活的前提是在AGC平台备案我们的域名。当域名备案以后,如果openLink接口的uri参数、浏览器访问的uri网址、统一扫码接口识别出的二维码信息中匹配到了这个域名,就会启动applink的检测流程。
流程依次为:从域名服务器中查找applinking.json文件->读取文件中的appid->检测当前设备是否安装了对应应用->检测对应应用的module.json5中是否配置了与当前uri相符的网址域名。
如果以上匹配全部成功,就会直接拉起应用,并将uri传给entryAbility的onCreate/onNewWant生命周期进行解析。
配置参数:
配置applink前,你需要准备一个支持https访问的域名及相应的服务器。
uri格式:schema+host(自有域名)+path(自定义)+【非必须】额外信息
以本项目为例:
// scheme须配置为https
"scheme": "https",
// host须配置为关联的域名
"host": "www.612star.com",
// path可选,为了避免匹配到多个应用,建议配置该字段
"path": "appLink_Box"
最终的uri基座就是:https://www.612star.com/appLink_Box
根据业务需要也可以在uri基座的基础上再增加额外的信息,配置出更复杂的uri,如:https://www.612star.com/appLink_Box?uid=1234567&info=gogogo
依次完成以下配置:
1.在域名对应的服务器中增加applinking.json文件,文件路径为:域名对应默认路径/.well-known/applinking.json,文件中需包含本应用的appid。
//applinking.json
{
 "applinking": {
   "apps": [
     {
       "appIdentifier": "1234567"
     }
   ]
 }
}
2.在agc控制台找的对应项目的配置页面,使用“https://”+域名 创建应用链接。(提交后配置系统会自动访问域名并查找服务器中是否存在上一步对应的文件,如果能找到则认定域名可用)

3.在应用的module.json5文件中配置uri信息
{
  "module": {
    "name": "entry",
    "type": "entry",
    "description": "$string:module_desc",
    "mainElement": "EntryAbility",
    "deviceTypes": [
      "phone",
    ],
    "deliveryWithInstall": true,
    "installationFree": false,
    "pages": "$profile:main_pages",
    "abilities": [
      {
        "name": "EntryAbility",
        "srcEntry": "./ets/entryability/EntryAbility.ets",
        "description": "$string:EntryAbility_desc",
        "icon": "$media:layered_image",
        "label": "$string:EntryAbility_label",
        "startWindowIcon":"$media:startIcon",
        "startWindowBackground": "$color:start_window_background",
        "exported": true,// 使用applink时需将exported配置为true;
        "skills": [
          {
            "entities": [
              "entity.system.home",
              "entity.system.browsable"//使用applinking必须包含此项
            ],
            "actions": [
              "action.system.home",
              "ohos.want.action.viewData" //使用applinking必须包含此项
            ],
            "uris": [
              {
                // scheme须配置为https
                "scheme": "https",
                // host须配置为关联的域名
                "host": "www.612star.com",
                // path可选,为了避免匹配到多个应用,建议配置该字段
                "path": "appLink_Box"
              }
            ],
            // domainVerify须设置为true
            "domainVerify": true
          }
        ]
      }
    ],
    "extensionAbilities": [
      {
        "name": "EntryBackupAbility",
        "srcEntry": "./ets/entrybackupability/EntryBackupAbility.ets",
        "type": "backup",
        "exported": false,
        "metadata": [
          {
            "name": "ohos.extension.backup",
            "resource": "$profile:backup_config"
          }
        ],
      }
    ]
  }
}
完成以上3步以后,applink就能正常运行了。
只要安装了对应应用的设备通过applink接口、浏览器、统一扫码接口等方式识别到了这个uri,就会执行applink检测流程,如果检测成功就会拉起应用。
附上代码以供大家参考:
应用内直接点击触发applink:
1.在entryAbility生命周期中保存上下文
  onCreate(want: Want, launchParam: AbilityConstant.LaunchParam): void {
    GlobalContext.initContext(this.context)
  }
/**
 * 保存全局上下文
 */
export class GlobalContext {
  private static context: common.UIAbilityContext;

  public static initContext(context: common.UIAbilityContext): void {
    GlobalContext.context = context;
  }

  public static getContext(): common.UIAbilityContext {
    return GlobalContext.context;
  }
}
2.在需要使用applink功能的位置执行openLink方法进行跳转
    /**
   * 基于applink方案手动拉起三方应用
   * @param context
   * @param appLink
   * @param linkInfoDate
   */
  async appLinkJump(appLink: string): Promise<null> {
    return new Promise((resolve, reject) => {
      console.log('显示转换结果' + appLink)  // 仅以App Linking的方式打开应用
      try {
        let context = GlobalContext.getContext();
        context.openLink(appLink, { appLinkingOnly: true })
          .then(() => {
            console.log('testTag', `Succeeded in opening link.`); //目标应用拉起成功
            resolve(null)
          })
          .catch((error: BusinessError) => {

            console.log('testTag', `Failed to open link, code: ${error.code}, message: ${error.message}`); //目标应用拉起失败
            reject(error)
          });
      } catch (error) {
        console.log('异常' + JSON.stringify(error))
        reject(error)
      }
    })
  }
基于碰一碰方式触发applink:
  aboutToAppear() {
    if (this.tabIndexId == 0) {
      harmonyShare.on('knockShare', async (sharableTarget: harmonyShare.SharableTarget) => {
        await this.saveImg()//存储分享图片
        let filePath = this.HostContext.filesDir + '/ApplinkBoxKnock.jpg'; // 分享图片的文件路径。此处仅为示例 请替换正确的文件路径
        let shareData: systemShare.SharedData = new systemShare.SharedData({
          utd: utd.UniformDataType.HYPERLINK,
          content: 'https://www.612star.com/appLink_Box',
          thumbnailUri: fileUri.getUriFromPath(filePath),
        });
        sharableTarget.share(shareData);
      });
    }
  }
基于扫码方式触发applink:(核心是基于uri生成二维码,然后给其他设备扫码识别)
import { generateBarcode, scanCore } from '@kit.ScanKit';
import { hilog } from '@kit.PerformanceAnalysisKit';
import { image } from '@kit.ImageKit';
import { BusinessError } from '@kit.BasicServicesKit';

// 生成二维码
export function QRCodeCreate(applinkUri:string): Promise<PixelMap> {
  return new Promise((resolve, reject) => {
    // 以QR码为例,码图生成参数
    let options: generateBarcode.CreateOptions = {
      scanType: scanCore.ScanType.QR_CODE,
      height: 400,
      width: 400
    }
    try {
      // 码图生成接口,成功返回PixelMap格式图片
      generateBarcode.createBarcode(applinkUri, options).then((pixelMap: image.PixelMap) => {
        resolve(pixelMap)
      }).catch((error: BusinessError) => {
        hilog.error(0x0001, '[generateBarcode]',
          `Failed to get PixelMap by promise with options. Code: ${error.code}, message: ${error.message}`);
        reject(error)
      })
    } catch (error) {
      hilog.error(0x0001, '[generateBarcode]',
        `Failed to createBarcode by promise with options. Code: ${error.code}, message: ${error.message}`);
      reject(error)
    }
  })
}
应用被拉起后EntryAbility接收Applink参数并执行对应业务逻辑:
在生命周期中解析uri:
export default class EntryAbility extends UIAbility {
  private currentWindowStage: window.WindowStage | null = null;

  onCreate(want: Want, launchParam: AbilityConstant.LaunchParam): void {
    this.context.getApplicationContext().setColorMode(ConfigurationConstant.ColorMode.COLOR_MODE_NOT_SET);
    hilog.info(DOMAIN, 'testTag', '%{public}s', 'Ability onCreate');


    // 从want中获取传入的链接信息。
    // 如传入的url为:https://www.example.com/programs?action=showall
    let uri = want?.uri;
    if (uri!=null && uri!='') {
      // 从链接中解析query参数,拿到参数后,开发者可根据自己的业务需求进行后续的处理。
      try {
        console.log('生命周期获取uri'+uri)
        AppStorage.setOrCreate('pullLink',uri)

      } catch (error) {
        hilog.error(0x0000, 'testTag', `Failed to parse url.`);
      }
    }
    GlobalContext.initContext(this.context)
  }

  onNewWant(want: Want, launchParam: AbilityConstant.LaunchParam): void {
    let uri = want?.uri

    // 从want中获取传入的链接信息。
    // 如传入的url为:https://www.example.com/programs?action=showall
    if (uri!=null && uri!='') {
      // 从链接中解析query参数,拿到参数后,开发者可根据自己的业务需求进行后续的处理。
      try {
        console.log('生命周期获取uri'+uri)
        AppStorage.setOrCreate('pullLink',uri)

      } catch (error) {
        hilog.error(0x0000, 'testTag', `Failed to parse url.`);
      }
    }
  }
在页面中定向展示UI
[@Entry](/user/Entry)
[@Component](/user/Component)
struct Index {
  private HostContext: Context = this.getUIContext().getHostContext() as Context;

  [@StorageProp](/user/StorageProp)('bottomRectHeight')  bottomRectHeight: number = 0;
  [@StorageProp](/user/StorageProp)('topRectHeight')  topRectHeight: number = 0;
  [@StorageLink](/user/StorageLink)('pullLink') pullLink:string=''
更多关于HarmonyOS鸿蒙Next中App Linking解锁酷炫链接新玩法活动及appLink调试盒子的实战教程也可以访问 https://www.itying.com/category-93-b0.html
HarmonyOS Next的App Linking功能通过深度链接技术实现应用间无缝跳转与数据传递。活动聚焦展示如何利用App Linking创建动态链接,支持参数自定义和场景化跳转。调试盒子提供实时链接验证工具,可检测链接配置正确性及跳转逻辑,支持查看错误日志与性能数据。开发者需在AGC平台配置关联域名和路径,并在工程中集成App Linking SDK完成适配。
更多关于HarmonyOS鸿蒙Next中App Linking解锁酷炫链接新玩法活动及appLink调试盒子的实战系列教程也可以访问 https://www.itying.com/category-93-b0.html
在HarmonyOS Next中,App Linking的调试工具确实能显著提升开发效率。你开发的AppLink调试盒子通过支持手动输入参数、直接点击、碰一碰和二维码扫描等多种触发方式,覆盖了常见的调试场景,尤其是运行日志的显示功能,避免了反复安装应用的麻烦。
从技术实现来看,你在配置文件中正确设置了domainVerify: true,并遵循了AGC平台域名备案、服务器放置applinking.json以及module.json5中skills的规范配置,这确保了App Linking流程的完整性和合规性。通过openLink接口调用并设置appLinkingOnly: true,能够精准测试链接触发逻辑。
对于参数解析,你在EntryAbility的onCreate和onNewWant生命周期中处理want对象,提取uri并存储到AppStorage,页面再根据存储值动态展示UI,这是一个清晰且高效的数据传递方案。
整体上,这个工具不仅解决了调试痛点,还展示了App Linking在跨应用跳转、内容分享等场景的实用性。如果有更多具体问题或优化需求,可以进一步讨论。


