


HarmonyOS鸿蒙Next中Canvas自定义视图的点击事件功能
HarmonyOS鸿蒙Next中Canvas自定义视图的点击事件功能
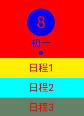
使用Canvas 绘制这个视图的时候,我想分别给每个组件添加点击事件 如何处理? 比如点击红色区域,点击日期的蓝色背景,点击阴历文本,分别点击三个日程的区域分别打印不同的日志,如何实现???
现在的代码如下
import { drawing } from "@kit.ArkGraphics2D"

/**
 * 每个日程的视图
 */
@Component
export struct ScheduleView {
  private settings: RenderingContextSettings = new RenderingContextSettings(true)
  private context: CanvasRenderingContext2D = new CanvasRenderingContext2D(this.settings)
  // private draw: DrawingRenderingContext = new DrawingRenderingContext()

  build() {
    Stack() {

      Canvas(this.context)
        .width('100%')
        .height('100%')
        .backgroundColor('#B0ECF5FF')
        .onReady(() => {

          const height = this.context.height
          const width = this.context.width

          this.getRect('#ff0000', 0, 0, width, 60)

          // 班休信息
          this.context.font = '10vp sans-serif'
          this.context.textBaseline = 'top'
          this.context.fillStyle = '#0000ff'
          this.context.fillText('休', width - 10, 0, 10)

          // 日期背景
          this.context.beginPath()
          this.context.fillStyle = '#0000ff'
          this.context.arc(width / 2, 24, 14, 0, 2 * Math.PI)
          this.context.fill()
          this.context.closePath()

          // 日期数据文本
          this.context.font = '16vp sans-serif'
          this.context.fillStyle = '#ff0000'
          this.context.textBaseline = 'middle'
          this.context.textAlign = 'center'
          this.context.fillText('8', width / 2, 24, 38)

          // 农历日期文本
          this.context.font = '10vp sans-serif'
          this.context.fillStyle = '#0000ff'
          this.context.textBaseline = 'middle'
          this.context.textAlign = 'center'
          this.context.fillText('初一', width / 2, 45, 38)

          // 有日程的指示点
          this.context.beginPath()
          this.context.fillStyle = '#0000ff'
          this.context.arc(width / 2, 55, 2, 0, 2 * Math.PI)
          this.context.fill()
          this.context.closePath()

          // 中间参考线
          // this.setLine()

          // 日程整体背景
          this.getRect('#fff000', 0, 60, width, 60)

          // this.context.beginPath()
          // this.context.fillStyle = '#0000ff'
          // this.context.fillRect(0, 60,width, 20)
          // this.context.closePath()

          this.context.font = '10vp sans-serif'
          this.context.fillStyle = '#ff0000'
          this.context.textBaseline = 'middle'
          this.context.textAlign = 'center'
          this.context.fillText('日程1', width / 2, 70)


          this.context.beginPath()
          this.context.fillStyle = '#00ffff'
          this.context.fillRect(0, 80,width, 20)
          this.context.closePath()

          this.context.font = '10vp sans-serif'
          this.context.fillStyle = '#ff0000'
          this.context.textBaseline = 'middle'
          this.context.textAlign = 'center'
          this.context.fillText('日程2', width / 2, 90)

          this.context.beginPath()
          this.context.fillStyle = '#658269'
          this.context.fillRect(0, 100,width, 20)
          this.context.closePath()

          this.context.font = '10vp sans-serif'
          this.context.fillStyle = '#ff0000'
          this.context.textBaseline = 'middle'
          this.context.textAlign = 'center'
          this.context.fillText('日程3', width / 2, 110)

        })

    }.width('100%')
    .layoutWeight(1)
  }

  getRect(color: string, x: number, y: number, w: number, h: number) {
    this.context.beginPath()
    this.context.fillStyle = color
    this.context.fillRect(x, y, w, h)
    this.context.closePath()
  }

  setLine() {

    const width = this.context.width
    this.context.beginPath()
    this.context.moveTo(width / 2, 0)
    this.context.lineTo(width / 2, 200)
    this.context.stroke()
    this.context.closePath()
  }
}
更多关于HarmonyOS鸿蒙Next中Canvas自定义视图的点击事件功能的实战教程也可以访问 https://www.itying.com/category-93-b0.html

解决方案
在Canvas组件中,您可以通过绑定onClick事件,在回调函数中获取点击坐标(event.x, event.y),并根据坐标范围判断点击区域,从而执行不同的日志打印操作。以下是具体实现步骤和代码示例:
步骤说明
- 绑定onClick事件:在Canvas组件上使用
.onClick方法绑定点击事件回调。 - 获取点击坐标:在回调函数中,通过
ClickEvent对象的x和y属性获取点击位置相对于Canvas左上角的坐标。 - 定义区域边界:根据绘制内容(如矩形、圆形、文本)的坐标和尺寸,定义点击区域的边界条件。
- 判断区域并打印日志:使用条件语句判断点击坐标是否落在特定区域内,并打印相应日志。
代码实现
以下是根据您的代码修改后的示例,实现了对红色区域、日期蓝色背景、阴历文本和三个日程区域的点击判断:
import { drawing } from "@kit.ArkGraphics2D";
import { ClickEvent } from '@kit.ArkUI'; // 导入ClickEvent类型(确保API版本兼容)

@Component
export struct ScheduleView {
  private settings: RenderingContextSettings = new RenderingContextSettings(true);
  private context: CanvasRenderingContext2D = new CanvasRenderingContext2D(this.settings);

  build() {
    Stack() {
      Canvas(this.context)
        .width('100%')
        .height('100%')
        .backgroundColor('#B0ECF5FF')
        .onReady(() => {
          // 绘制代码(与您原有代码一致)
          const height = this.context.height;
          const width = this.context.width;

          // 绘制红色区域
          this.getRect('#ff0000', 0, 0, width, 60);

          // 班休信息
          this.context.font = '10vp sans-serif';
          this.context.textBaseline = 'top';
          this.context.fillStyle = '#0000ff';
          this.context.fillText('休', width - 10, 0, 10);

          // 日期蓝色背景(圆形)
          this.context.beginPath();
          this.context.fillStyle = '#0000ff';
          this.context.arc(width / 2, 24, 14, 0, 2 * Math.PI);
          this.context.fill();
          this.context.closePath();

          // 日期文本
          this.context.font = '16vp sans-serif';
          this.context.fillStyle = '#ff0000';
          this.context.textBaseline = 'middle';
          this.context.textAlign = 'center';
          this.context.fillText('8', width / 2, 24, 38);

          // 阴历文本
          this.context.font = '10vp sans-serif';
          this.context.fillStyle = '#0000ff';
          this.context.textBaseline = 'middle';
          this.context.textAlign = 'center';
          this.context.fillText('初一', width / 2, 45, 38);

          // 指示点
          this.context.beginPath();
          this.context.fillStyle = '#0000ff';
          this.context.arc(width / 2, 55, 2, 0, 2 * Math.PI);
          this.context.fill();
          this.context.closePath();

          // 日程背景和文本
          this.getRect('#fff000', 0, 60, width, 60);
          this.context.font = '10vp sans-serif';
          this.context.fillStyle = '#ff0000';
          this.context.textBaseline = 'middle';
          this.context.textAlign = 'center';
          this.context.fillText('日程1', width / 2, 70);

          this.context.beginPath();
          this.context.fillStyle = '#00ffff';
          this.context.fillRect(0, 80, width, 20);
          this.context.closePath();
          this.context.fillText('日程2', width / 2, 90);

          this.context.beginPath();
          this.context.fillStyle = '#658269';
          this.context.fillRect(0, 100, width, 20);
          this.context.closePath();
          this.context.fillText('日程3', width / 2, 110);
        })
        .onClick((event: ClickEvent) => {
          const x = event.x; // 点击的x坐标
          const y = event.y; // 点击的y坐标
          const width = this.context.width; // Canvas宽度
          const height = this.context.height; // Canvas高度

          // 1. 判断红色区域(矩形: (0,0) 到 (width,60))
          if (y >= 0 && y <= 60) {
            console.log('点击了红色区域');
            return;
          }

          // 2. 判断日期蓝色背景(圆形: 中心点(width/2,24), 半径14)
          const centerX = width / 2;
          const centerY = 24;
          const radius = 14;
          const distance = Math.sqrt(Math.pow(x - centerX, 2) + Math.pow(y - centerY, 2));
          if (distance <= radius) {
            console.log('点击了日期蓝色背景');
            return;
          }

          // 3. 判断阴历文本区域(近似矩形: 中心(width/2,45), 宽38, 高10)
          const textX = width / 2;
          const textY = 45;
          const textWidth = 38; // 基于fillText的maxWidth
          const textHeight = 10; // 估计值(字体大小)
          if (x >= textX - textWidth / 2 && x <= textX + textWidth / 2 &&
              y >= textY - textHeight / 2 && y <= textY + textHeight / 2) {
            console.log('点击了阴历文本');
            return;
          }

          // 4. 判断三个日程区域(矩形)
          if (y >= 60 && y <= 80) {
            console.log('点击了日程1');
          } else if (y >= 80 && y <= 100) {
            console.log('点击了日程2');
          } else if (y >= 100 && y <= 120) {
            console.log('点击了日程3');
          }
        });
    }
    .width('100%')
    .layoutWeight(1);
  }

  // 辅助方法:绘制矩形
  getRect(color: string, x: number, y: number, w: number, h: number) {
    this.context.beginPath();
    this.context.fillStyle = color;
    this.context.fillRect(x, y, w, h);
    this.context.closePath();
  }
}
关键说明
- 坐标系统:
event.x和event.y是相对于Canvas组件左上角的坐标,与绘制时使用的坐标系统一致。 - 区域判断:
- 矩形区域:直接比较坐标范围。
- 圆形区域:计算点击点与圆心的距离。
- 文本区域:使用近似矩形区域(基于文本绘制位置和估计尺寸)。
- 日志打印:每个区域条件分支内打印对应的日志信息。
- API兼容性:
onClick事件从API version 9开始支持(根据文档),确保您的开发环境兼容。
注意事项
- 文本点击区域是近似计算,实际体验可能需要调整边界值。
- 如果Canvas尺寸动态变化,需要在点击事件中重新获取
width和height。 - 确保导入
ClickEvent类型(如import { ClickEvent } from '@kit.ArkUI')。
更多关于HarmonyOS鸿蒙Next中Canvas自定义视图的点击事件功能的实战系列教程也可以访问 https://www.itying.com/category-93-b0.html

实现思路
坐标计算:通过ClickEvent事件对象获取点击位置坐标(x,y)
区域判定:根据绘制时设定的几何形状和位置,判断点击坐标是否落在目标区域内
事件分发:通过条件判断执行不同区域的响应逻辑
实现步骤
@Component
export struct ScheduleView {

  // 定义区域边界变量
  private redAreaHeight: number = 60; // 红色区域高度
  private scheduleItemHeight: number = 20; // 每个日程项高度
  private dateCircle = { x: 0, y: 24, r: 14 }; // 日期圆形参数
  private lunarPos = { x: 0, y: 45 }; // 阴历文本位置

  build() {
    Stack() {
      Canvas(this.context)
        .onClick((event: ClickEvent) => {
          // 获取点击坐标(转换为Canvas相对坐标)
          const clickX = event.x;
          const clickY = event.y;

          // 区域判断逻辑
          this.checkRedArea(clickY);
          this.checkDateCircle(clickX, clickY);
          this.checkLunarText(clickY);
          this.checkSchedules(clickY);
        })
        .onReady(() => {
          // 初始化时记录布局参数
          const width = this.context.width;
          this.dateCircle.x = width / 2;
          this.lunarPos.x = width / 2;
          // ...其他绘制逻辑保持不变
        })
    }
  }

  // 判断红色顶部区域(0 < y < 60)
  private checkRedArea(y: number) {
    if (y < this.redAreaHeight) {
      console.log('点击红色区域');
    }
  }

  // 判断日期圆形区域(勾股定理计算距离)
  private checkDateCircle(x: number, y: number) {
    const dx = x - this.dateCircle.x;
    const dy = y - this.dateCircle.y;
    if (dx*dx + dy*dy <= this.dateCircle.r*this.dateCircle.r) {
      console.log('点击日期背景');
    }
  }

  // 判断阴历文本区域(y在40-50范围)
  private checkLunarText(y: number) {
    if (y >= 40 && y <= 50) {
      console.log('点击阴历文本');
    }
  }

  // 判断日程区域(根据Y轴分段)
  private checkSchedules(y: number) {
    const baseY = this.redAreaHeight;
    if (y >= baseY + 10 && y < baseY + 30) {
      console.log('点击日程1');
    } else if (y >= baseY + 30 && y < baseY + 50) {
      console.log('点击日程2');
    } else if (y >= baseY + 50) {
      console.log('点击日程3');
    }
  }
}

在HarmonyOS Next中,Canvas自定义视图的点击事件可通过onTouchEvent监听触控操作实现。通过重写onTouchEvent方法,获取触摸坐标并判断是否在Canvas绘制区域内。使用Path或Rect定义可点击区域,结合invalidate方法触发重绘反馈。支持单点、多点及手势识别,需处理ACTION_DOWN、ACTION_MOVE、ACTION_UP事件流。
