


HarmonyOS鸿蒙Next组件/模板集成创新活动-巡星漫游指南
HarmonyOS鸿蒙Next组件/模板集成创新活动-巡星漫游指南
引言
在HarmonyOS应用开发中,清晰的新用户引导和高效的开发工具集成至关重要。本文分享了在HarmonyOS Next 5.0+环境中,集成第三方高亮引导组件和常用工具组件的实践经验,并介绍了一个自主开发的基于ArkTS的高性能动画轻便框架,以提升ArkUI当前在Canvas动画方面的能力。这些实践不仅提升了应用的用户体验,也为HarmonyOS开发者社区提供了有益参考。 https://appgallery.huawei.com/app/detail?id=com.SHKJ.TYDF.Guide&channelId=SHARE,APP中的动画效果全部应用了自主开发动画框架的,也请大家多多提意见。
1 第三方组件集成指南
1.1 组件集成方式
在HarmonyOS应用开发中,集成第三方组件主要有两种便捷方式:
命令行集成:使用ohpm(OpenHarmony Package Manager)命令行工具直接安装所需组件。例如,执行以下命令即可完成高亮引导组的集成:
ohpm install [@ohos](/user/ohos)/high_light_guide
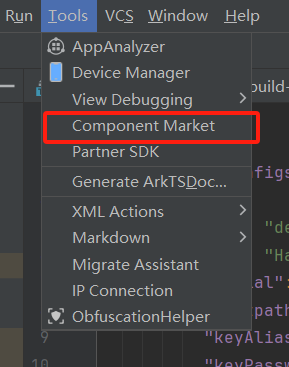
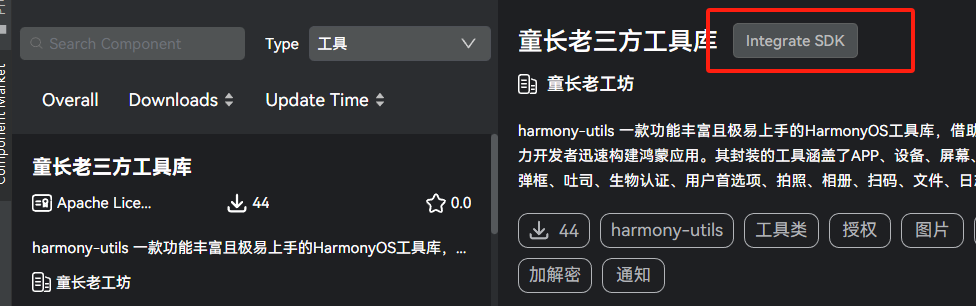
组件市场集成:通过DevEco Studio的组件市场可视化集成:
-
首先安装组件市场插件(需先安装组件市场插件)组件市场安装与使用说明
-
在IDE中选择Tools标签,进入Component Market
-
搜索所需组件名称,点击页面内"Integrate SDK"即可完成集成
集成成功后,组件将出现在项目的oh_modules目录中,配置文件会自动更新同步。在代码中只需通过import语句引入即可使用:
import * as HighLight from '[@ohos](/user/ohos)/high_light_guide';
import * as Utils from '@pura/harmony-utils';
1.2 组件使用与进阶技巧
@ohos/high_light_guide使用方式,指导文档https://developer.huawei.com/consumer/cn/doc/architecture-guides/feature_guide_page-0000002271957437
高亮引导组件的增强使用:虽然组件作者声称当前不支持隐藏后再次显示,但通过分析源代码,我们在Controller类中添加了两个方法解决了这一限制:
public hide():void{
  this.isGuideShowing = false;
  if (this.observedMaskVisibleState) {
    this.observedMaskVisibleState.setShowGuideMask(false);
  }
}
  public showPageAgain(page:number){
    LogUtil.info('Controller show');
    // 组件名称必须设置,如果没有设置,则不显示组件引导页
    if (!this.builder || !this.builder.label) {
      hilog.info(0x0000, GlobalContext.HILOG_TAG, '%{public}s', 'label is empty, please set the label for guide');
      return;
    }


    if (!this.builder || !this.builder.guidePages || this.builder.guidePages.length === 0) {
      hilog.info(0x0000, GlobalContext.HILOG_TAG, '%{public}s', 'There is no guide to show !! Please add at least one page.');
      return;
    }

    if (this.observedMaskVisibleState) {
      this.observedMaskVisibleState.setShowGuideMask(true);
    }

    this.isGuideShowing = true;
    this.guidePageIndex = page;
    this.showGuidePage();

    if (this.builder && this.builder.visibleStateChangeListener) {
      this.builder.visibleStateChangeListener.onShowed(this);
    }
  }
调用方式简单明了:
import * as HighLight from '[@ohos](/user/ohos)/high_light_guide';
......
private controller: HighLight.Controller | null = null;
......
this.controller?.hide();
setTimeout(() => {
  this.controller?.showPageAgain(1);
}, 10000)
工具组件的高效应用:常用工具组件的使用非常直观,例如显示一个确认弹窗:在导入文件后直接调取静态方法,比如一个确认弹窗
import * as Utils from '@pura/harmony-utils'
setTimeout(() => {
  Util.DialogUtil.showConfirmDialog({
    title: '测试确认标题',
    message: '测试确认信息',
    onAction:()=>{
        Util.DialogUtil.showConfirmDialog({
          title: '测试确认标题1',
          message: '测试确认信息1',
      })
    }
  })
}
, 1000)
2 高性能动画框架开发
2.1 框架架构设计
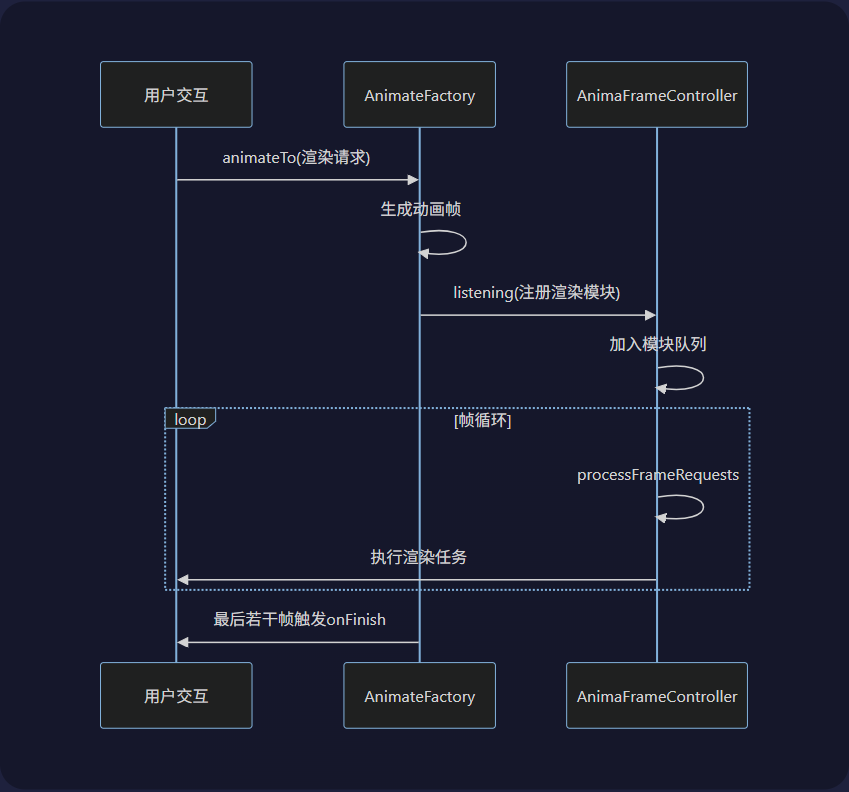
以提升ArkUI当前在Canvas动画方面的能力,开发了一个高性能的动画帧控制与动画实时生成框架。该框架采用分层架构设计,包括:
- 动画管理层:负责动画的创建、暂停、恢复和销毁
- 帧数据处理层:生成和处理中间帧数据,支持多种动画曲线
- 渲染控制层:控制渲染时序,确保动画流畅性
2.2 核心功能特性
框架提供了丰富的动画功能:
- 多动画曲线支持:支持线性、缓入、缓出、缓入缓出、摩擦等多种内置动画曲线,同时也支持自定义曲线函数。
- 精准的帧率控制:通过设置expectedFrameRateRange参数,可以精确控制动画的播放帧率。
- 动画生命周期管理:提供完整的动画控制方法,包括暂停(pause)、恢复(resume)、清除(clear)和重置(reset)等。
- 并发动画支持:通过UUID标识符管理多个并发动画,可以对同一组动画进行统一控制。
2.3 技术实现亮点
帧数据处理:框架能够根据动画参数(持续时间、播放速度、曲线类型等)自动生成所有中间帧数据,并通过定时器逐帧执行动画。
时间容差机制:引入了半周期容差机制(halfIntervalTime),确保动画帧在适当的时间范围内执行,避免了因定时器精度问题导致的动画跳帧现象。
内存优化管理:通过队列数据结构管理动画任务,及时清理已完成动画,避免内存泄漏。
框架图如下:
代码如下:
import { HashMap, Queue } from "[@kit](/user/kit).ArkTS";
import { systemDateTime } from "[@kit](/user/kit).BasicServicesKit";
import { hilog } from "[@kit](/user/kit).PerformanceAnalysisKit";
import { curves } from "[@kit](/user/kit).ArkUI";

export interface FrameStatus {
  startValue: number,
  targetValue: number,
  incrementalValue?: number

}

interface AnimationFrame {
  frameData: FrameStatus[],
  frameSequenceTime: number,
}

interface AnimationFrameTask {
  frame: AnimationFrame,
  task: () => void,
}

interface Animation {
  isPaused: boolean,
  startTime: number,
  endTime: number,
  tasks: Queue<AnimationFrameTask>
}

export class AnimateToParam {
  duration?: number = 1000; // 动画持续时间,单位为毫秒。
  tempo?: number = 1; // 播放速度倍速。
  curve?: Curve = Curve.Linear; // 动画曲线
  curveFunc?: (time: number) => number = undefined; // 自定义动画曲线,根据相对时间变化返回取得曲线值
  delay?: number = undefined; // 延迟 ,毫秒为单位
  iterations?: number = 1; // 播放次数
  onFinish?: () => void = undefined; // 动画播放完成回调。
  expectedFrameRateRange?: number = 30; // 期望帧率
}

export default class AnimateFactory {
  private timerID: number | undefined = undefined;
  //执行周期时间,毫秒单位
  private intervalTime = 10;
  //执行半周期时间,毫秒单位
  private halfIntervalTime = 5;
  // 动画管理列表
  private animations: HashMap<string, Animation> = new HashMap<string, Animation>();
  // 待清除列表
  private removeList: Queue<string> = new Queue();
  // 同步渲染控制
  private isRendering = false;

  /**
   * 生成动画数据方法
   *
   * 该方法根据提供的动画参数生成中间帧数据,并通过定时器逐帧执行动画。
   * 支持自定义动画曲线、播放速度、延迟、多次迭代等特性。
   * [@param](/user/param) UUID - 同UUID序列动画,用于同一个对象或一组对象共同触发的动画,暂停,终止。
   * [@param](/user/param) param - 动画参数对象,包含持续时间、速度、曲线等配置
   * [@param](/user/param) lastFrameList - 动画对象的初始状态和目标值列表
   * [@param](/user/param) updateStatus - 状态更新回调函数,在每帧执行时调用
   * [@param](/user/param) animateRender - 渲染回调函数,在每帧执行时调用
   *
   * [@example](/user/example)
   * // 基本用法
   * animateTo(
   *   new animateToParam({ duration: 2000 }),
   *   [{ startValue: pos.x, targetValue: pos.x + 100 }],
   *   (newStatus)=>{newStatus.forEach((item)=>{
   *      console.log(`状态更新:${item.targetValue.toString()},变化量:${item.incrementalValue}`)}
   *   )},
   *  () => { //动画渲染
   *    this.frameCtrl.listening({
   *      moduleName: 'draw',
   *       module: () => {
   *         this.drawMain()
   *      }
   *    })
   *  }
   * );
   */
  public animateTo(
    UUID: string, // 同UUID序列,暂停,终止。
    param: AnimateToParam, // 动画参数
    lastFrameList: FrameStatus[], // 更新对象与目标值列表
    updateStatus: (newStatus: FrameStatus[]) => void, // 更新复杂状态回调
    animateRender: () => void // 动画渲染回调
  ) {

    // 融合默认参数
    const defaultParam = new AnimateToParam();
    for (const key of Object.keys(param)) {
      if (Reflect.get(param, key)!== undefined && Reflect.get(param, key)!== null ) {
        Reflect.set(defaultParam, key, Reflect.get(param, key));
      }
    }

    this.intervalTime = 1000 / (param.expectedFrameRateRange || 30);

    // ============== 根据param生成和lastFrameList,每一帧的数据 ==============
    // 计算实际动画持续时间(考虑播放速度)
    const actualDuration = (defaultParam.duration!) / defaultParam.tempo!;
    // 计算帧间隔时间(基于期望帧率)
    const frameInterval = 1000 / defaultParam.expectedFrameRateRange!;
    this.intervalTime = frameInterval;
    this.halfIntervalTime = this.intervalTime / 2
    // 计算总帧数(向上取整确保覆盖完整持续时间)
    const totalFrames = Math.ceil(actualDuration / frameInterval);
    // 创建存储所有动画帧数据的数组
    const animationFrames: AnimationFrame[] = new Array<AnimationFrame>(totalFrames);

    // 获取曲线函数
    const curveFunction = defaultParam.curveFunc || getCurveFunction(defaultParam.curve!);

    // 生成每一帧数据
    for (let frameIdx = 0; frameIdx < totalFrames; frameIdx++) {
      // 计算当前进度(0到1之间)
      const progress = frameIdx / (totalFrames - 1);
      // 应用动画曲线变换进度值
      const curvedProgress = curveFunction(progress);


      // 生成每帧数据
      const frameData: FrameStatus[] = lastFrameList.map((item, index) => {
        const startValue = item.startValue;
        const endValue = item.targetValue;
        const newStartValue = animationFrames[frameIdx -1]?.frameData[index].targetValue || startValue;
        // 线性插值计算当前值
        const targetValue = startValue + (endValue - startValue) * curvedProgress;
        // 线性插值计算当前变化值
        const incrementalValue = targetValue - newStartValue
        return {
          startValue: newStartValue,
          targetValue: targetValue,
          incrementalValue: incrementalValue
        } as FrameStatus;
      });

      // 添加到帧列表(包含帧显示时间)
      animationFrames[frameIdx] = {
        frameData: frameData,
        frameSequenceTime: (frameIdx * frameInterval) + (defaultParam.delay || 0)
      };
    }

    // 处理多次迭代
    if (defaultParam.iterations! > 1) {
      const baseFrames = [...animationFrames];
      const lastFrameTime = baseFrames[baseFrames.length - 1].frameSequenceTime;

      for (let iter = 1; iter < defaultParam.iterations!; iter++) {
        const offset = iter * lastFrameTime;
        const iterFrames = baseFrames.map(frame => ({
          frameData: frame.frameData,
          frameSequenceTime: frame.frameSequenceTime + offset
        } as AnimationFrame));

        animationFrames.push(...iterFrames);
      }
    }
    // ============== 帧数据生成完成 ==============

    // 打开一个animations列队逐帧生成执行动画任务
    const tasks: Queue<AnimationFrameTask> = new Queue<AnimationFrameTask>();
    animationFrames.forEach((item, index) => {
      const task: AnimationFrameTask = {
        frame: item,
        task: () => {
          // 执行回调刷新状态数据,
          updateStatus(item.frameData);
          // 触发渲染
          animateRender();
          // 动画结束时执行完成回调,提前10帧进行倒计时
          if (index === animationFrames.length - 10) {
            setTimeout(()=>{
              defaultParam.onFinish?.();
            },(item.frameSequenceTime - (defaultParam?.delay || 0))/index*10)
          }
        },
      };
      // 组成一组动画列任务序列
      tasks.add(task);
    })
    const startTime = systemDateTime.getTime() + tasks.getFirst().frame.frameSequenceTime;
    const endTime = startTime + animationFrames[animationFrames.length-1].frameSequenceTime
    // 加入动画管理列表
    this.animations.set(UUID, {
      isPaused: false,
      startTime,
      endTime,
      tasks
    });
    // 启动动画播放
    this.makeFrameLoop();
  }

  private makeFrameLoop() {
    if (this.timerID !== undefined) {
      return;
    }
    // 定期执行生成的动画
    this.timerID = setInterval(() => {
      if (this.animations.length === 0) {
        clearInterval(this.timerID);
        this.timerID = undefined;
        return;
      }
      if (this.isRendering) {
        return;
      }
      this.isRendering = true;
      this.animations.forEach((animation, UUID) => {
        try {
          const now = systemDateTime.getTime();
          // 跳过空动画或暂停状态
          if (!animation || animation.isPaused) {
            return;
          }
          // 检查动画是否过期,已释放
          if ((animation.endTime < now || animation.tasks.length === 0) && UUID) {
            this.removeList.add(UUID);
            return;
          }
          // 检查当前帧是否到达执行时间(带半周期容差),每次拿一帧出来执行
          const nextTask = animation.tasks.getFirst();
          const shouldExecute =
            (nextTask.frame.frameSequenceTime + animation.startTime) <= (now + this.halfIntervalTime)
          if (shouldExecute) {
            const frame = animation.tasks.pop();
            frame?.task();
          }

        } catch (e) {
          hilog.error(0x0000, 'AnimateFactory.Interval',
            `动画数据生成异常时间${Date.now().toLocaleString()}${JSON.stringify(e)}`)
        }
      });
      while (this.removeList.length > 0) {
        const UUID = this.removeList.pop();
        this.animations.remove(UUID);
      }
      this.isRendering = false;
    }, this.intervalTime)
  }

  // 暂停指定UUID动画
  public pause(UUID: string) {
    const animation = this.animations.get(UUID);
    if (animation) {
      animation.isPaused = true;
    }
  }

  // 恢复指定UUID动画
  public resume(UUID: string) {
    const animation = this.animations.get(UUID);
    if (animation) {
      animation.isPaused = false;
      const startTime = systemDateTime.getTime();
      const endTime = (animation.endTime - animation.startTime) + systemDateTime.getTime();
      animation.startTime = startTime;
      animation.endTime = endTime;
    }
  }

  // 清除指定UUID动画
  public clear(UUID: string) {
    if (this.animations.hasKey(UUID)) {
      this.animations.get(UUID).isPaused = true;
      this.animations.remove(UUID);
    }
  }
  // 清除指定名称动画
  public clearEndsOfName(name: string) {
    const filteredKeys = Array.from(this.animations.keys()).filter(key =>
    key.
更多关于HarmonyOS鸿蒙Next组件/模板集成创新活动-巡星漫游指南的实战教程也可以访问 https://www.itying.com/category-93-b0.html

HarmonyOS鸿蒙Next组件/模板集成创新活动-巡星漫游指南是一项面向开发者的技术活动,旨在推广鸿蒙Next的组件和模板集成能力。活动鼓励开发者探索鸿蒙系统的创新应用,通过集成现有组件和模板提升开发效率。参与者可以体验鸿蒙Next的最新特性,如分布式架构和跨设备协同,并有机会展示自己的创新成果。该活动不涉及Java或C语言,专注于鸿蒙自身的开发框架和工具。
更多关于HarmonyOS鸿蒙Next组件/模板集成创新活动-巡星漫游指南的实战系列教程也可以访问 https://www.itying.com/category-93-b0.html

感谢分享在HarmonyOS Next 5.0+环境下集成第三方组件和开发高性能动画框架的实践经验。内容详实,技术方案清晰,对开发者社区有很好的参考价值。
关于高亮引导组件的集成和扩展,通过分析源码并添加hide()和showPageAgain()方法解决了隐藏后再次显示的限制,这种思路很实用。命令行和组件市场两种集成方式也覆盖了不同开发场景的需求。
自主研发的动画框架架构设计合理,分层明确,支持多曲线类型和精准帧率控制,尤其是时间容差机制和内存管理策略,能有效提升动画流畅性和稳定性。使用UUID管理并发动画、队列结构清理资源,都是性能优化的关键点。
提供的代码示例和最佳实践建议(如冷启动延迟显示、合理设置帧率、及时释放资源)非常贴合实际开发需求,有助于其他开发者避免常见陷阱。
整体来看,这是一次成功的HarmonyOS生态实践,既利用了现有组件能力,又通过自主创新弥补了平台当前的动画能力缺口,值得推广和学习。