


HarmonyOS 鸿蒙Next中MVVM模式
HarmonyOS 鸿蒙Next中MVVM模式 HarmonyOS有无MVVM模式的开发介绍文档,以及示例

1、楼主,使用MVVM模式架构需要先了解ArkUI中的 状态管理 相关知识。状态管理目前分为两个版本V1和V2。
2、然后在进去MVVM相关架构的学习。
更多关于HarmonyOS 鸿蒙Next中MVVM模式的实战系列教程也可以访问 https://www.itying.com/category-93-b0.html

1.为了更好地组织代码和提升可维护性,使用MVVM模式重构代码,进一步将数据层(Model)、逻辑层(ViewModel)和展示层(View)分离。
MVVM参考文档:MVVM模式(状态管理V2)-状态管理(V2)-学习UI范式状态管理-UI开发 (ArkTS声明式开发范式)-ArkUI(方舟UI框架)-应用框架 - 华为HarmonyOS开发者
2.楼主想要学习MVVM架构的话最好是结合V2的状态变量:
V2所属装饰器-状态管理(V2)-学习UI范式状态管理-UI开发 (ArkTS声明式开发范式)-ArkUI(方舟UI框架)-应用框架 - 华为HarmonyOS开发者
官方文档中有一篇介绍了MVVM

提供了一些代码
参考地址

参考官文:https://developer.huawei.com/consumer/cn/doc/harmonyos-guides/arkts-mvvm
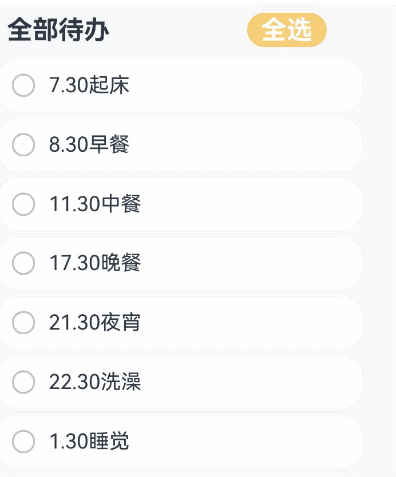
效果图如下:
Index.ets
import { common } from '@kit.AbilityKit';

// import ViewModel

import TodoListViewModel from '../ViewModel/TodoListViewModel';

// import View

import { TodoComponent } from '../View/TodoComponent';

import { AllChooseComponent } from '../View/AllChooseComponent';

import { TodoListComponent } from '../View/TodoListComponent';

@Entry

@Component

struct TodoList {

  @State todoListViewModel: TodoListViewModel = new TodoListViewModel(); // View绑定ViewModel的数据

  private context = this.getUIContext().getHostContext() as common.UIAbilityContext;

  async aboutToAppear() {

    await this.todoListViewModel.loadTasks(this.context);

  }

  build() {

    Column() {

      Row({ space: 40 }) {

        // 全部待办

        TodoComponent()

        // 全选

        AllChooseComponent({ todoListViewModel: this.todoListViewModel })

      }

      Column() {

        TodoListComponent({ thingsViewModelArray: this.todoListViewModel.things })

      }

    }

    .height('100%')

    .width('100%')

    .margin({ top: 5, bottom: 5 })

    .backgroundColor('#90f1f3f5')

  }

}
ThingModel.ets
export default class ThingModel {

  thingsName: string = 'Todo';

  isFinish: boolean = false;

}
TodoListModel.ets
import { common } from '@kit.AbilityKit';

import { util } from '@kit.ArkTs';

import ThingModel from './ThingModel';

export default class TodoListModel {

  things: Array<ThingModel> = [];

  constructor(things: Array<ThingModel>) {

    this.things = things;

  }

  async loadTasks(context: common.UIAbilityContext) {

    let getJson = await context.resourceManager.getRawFileContent('default_tasks.json');

    let textDecoderOptions: util.TextDecoderOptions = { ignoreBOM: true };

    let textDecoder = util.TextDecoder.create('utf-8', textDecoderOptions);

    let result = textDecoder.decodeToString(getJson, { stream: false });

    this.things = JSON.parse(result);

  }

}
AllChooseComponent.ets
import TodoListViewModel from "../ViewModel/TodoListViewModel";

@Component

export struct AllChooseComponent {

  @State titleName: string = '全选';

  @Link todoListViewModel: TodoListViewModel;

  build() {

    Row() {

      Button(`${this.titleName}`, { type: ButtonType.Capsule })

        .onClick(() => {

          this.todoListViewModel.chooseAll(); // View层点击事件发生时,调用ViewModel层方法chooseAll处理逻辑

          this.titleName = this.todoListViewModel.isChoosen ? '全选' : '取消全选';

        })

        .fontSize(30)

        .fontWeight(FontWeight.Bold)

        .backgroundColor('#f7f6cc74')

    }

    .padding({ left: this.todoListViewModel.isChoosen ? 15 : 0 })

    .width('100%')

    .margin({ top: 10, bottom: 10 })

  }

}
ThingsComponent.ets
import ThingsViewModel from "../ViewModel/ThingsViewModel";

@Component

export struct ThingsComponent {

  @Prop things: ThingsViewModel;

  @Builder

  displayIcon(icon: Resource) {

    Image(icon)

      .width(28)

      .height(28)

      .onClick(() => {

        this.things.updateIsFinish(); // View层点击事件发生时,调用ViewModel层方法updateIsFinish处理逻辑

      })

  }

  build() {

    // 待办事项

    Row({ space: 15 }) {

      if(this.things.isFinish) {

        // 此处'app.media.finished'仅作示例,请开发者自行替换,否则imageSource创建失败会导致后续无法正常执行。

        this.displayIcon($r('app.media.finished'));

      } else {

        // 此处'app.media.unfinished'仅作示例,请开发者自行替换,否则imageSource创建失败会导致后续无法正常执行。

        this.displayIcon($r('app.media.unfinished'));

      }

      Text(`${this.things.thingsName}`)

        .fontSize(24)

        .decoration({ type: this.things.isFinish ? TextDecorationType.LineThrough: TextDecorationType.None })

        .onClick(() => {

          this.things.addSuffixes(); // View层点击事件发生时,调用ViewModel层方法addSuffixes处理逻辑

        })

    }

    .height('8%')

    .width('90%')

    .padding({ left: 15 })

    .opacity(this.things.isFinish ? 0.3 : 1)

    .border({ width: 1 })

    .borderColor(Color.White)

    .borderRadius(25)

    .backgroundColor(Color.White)

  }

}
TodoComponent.ets
@Component

export struct TodoComponent {

  build() {

    Row() {

      Text('全部待办')

        .fontSize(30)

        .fontWeight(FontWeight.Bold)

    }

    .padding({ left: 15 })

    .width('50%')

    .margin({ top: 10, bottom: 10 })

  }

}
TodoListComponent.ets
import ThingsViewModel from "../ViewModel/ThingsViewModel";

import { ThingsViewModelArray } from "../ViewModel/TodoListViewModel"

import { ThingsComponent } from "./ThingsComponent";

@Component

export struct TodoListComponent {

  @ObjectLink thingsViewModelArray: ThingsViewModelArray;

  build() {

    Column() {

      List() {

        ForEach(this.thingsViewModelArray, (item: ThingsViewModel) => {

          // 待办事项

          ListItem() {

            ThingsComponent({ things: item })

              .margin(5)

          }

        }, (item: ThingsViewModel) => {

          return item.thingsName;

        })

      }

    }

  }

}
ThingsViewModel.ets
import ThingModel from "../Model/ThingModel";

@Observed

export default class ThingsViewModel {

  @Track thingsName: string = 'Todo';

  @Track isFinish: boolean = false;

  updateTask(things: ThingModel) {

    this.thingsName = things.thingsName;

    this.isFinish = things.isFinish;

  }

  updateIsFinish(): void {

    this.isFinish = !this.isFinish;

  }

  addSuffixes(): void {

    this.thingsName += '啦';

  }

}
TodoListViewModel.ets
import ThingsViewModel from "./ThingsViewModel";

import { common } from "@kit.AbilityKit";

import TodoListModel from "../Model/TodoListModel";

@Observed

export class ThingsViewModelArray extends Array<ThingsViewModel> {

}

@Observed

export default class TodoListViewModel {

  @Track isChoosen: boolean = true;

  @Track things: ThingsViewModelArray = new ThingsViewModelArray();

  async loadTasks(context: common.UIAbilityContext) {

    let todoList = new TodoListModel([]);

    await todoList.loadTasks(context);

    for(let things of todoList.things) {

      let todoListViewModel = new ThingsViewModel();

      todoListViewModel.updateTask(things);

      this.things.push(todoListViewModel);

    }

  }

  chooseAll(): void {

    for(let things of this.things) {

      things.isFinish = this.isChoosen;

    }

    this.isChoosen = !this.isChoosen;

  }

}

default_tasks.json

[

  {"thingsName": "7.30起床", "isFinish": false},

  {"thingsName": "8.30早餐", "isFinish": false},

  {"thingsName": "11.30中餐", "isFinish": false},

  {"thingsName": "17.30晚餐", "isFinish": false},

  {"thingsName": "21.30夜宵", "isFinish": false},

  {"thingsName": "22.30洗澡", "isFinish": false},

  {"thingsName": "1.30睡觉", "isFinish": false}

]


目前HarmonyOS Next官方文档中提供了基于ArkTS的声明式开发范式,支持MVVM模式开发。您可以在华为开发者官网的“文档”部分查看详细的开发指南和示例代码,其中包含了数据绑定、状态管理和组件化开发的相关内容。建议参考“ArkUI开发框架”文档,其中通过实际案例展示了如何实现数据与UI的分离及响应式更新。