HarmonyOS 鸿蒙Next中自定义键盘如何避让安全区?
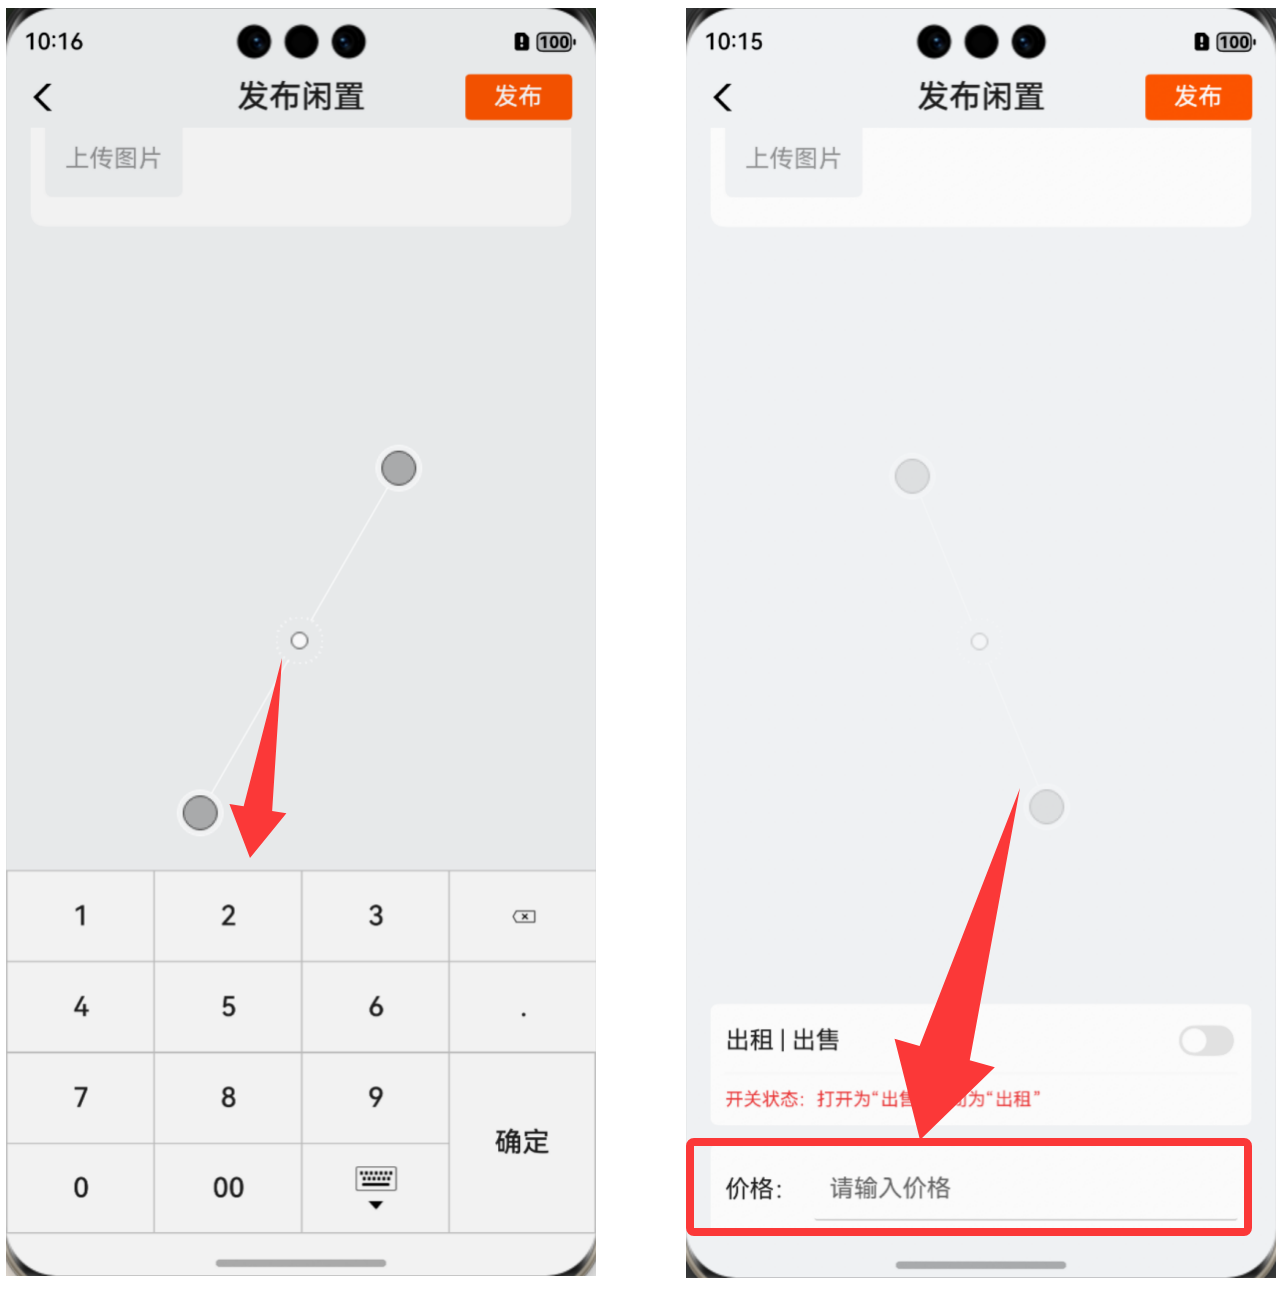
HarmonyOS 鸿蒙Next中自定义键盘如何避让安全区? 如下所示,滑动到页面最底部,有一个输入框,点击这个输入框,弹出来系统键盘时,就可以正常避让安全区;如果设置为自定义键盘,就不会避让安全区,TextInput组件就会被自定义键盘盖住,有什么解决办法吗?

更多关于HarmonyOS 鸿蒙Next中自定义键盘如何避让安全区?的实战教程也可以访问 https://www.itying.com/category-93-b0.html
TextInput组件的customKeyboard属性设置supportAvoidance为true,开启系统提供的自定义键盘避让功能
更多关于HarmonyOS 鸿蒙Next中自定义键盘如何避让安全区?的实战系列教程也可以访问 https://www.itying.com/category-93-b0.html
阔以阔以~感谢~,
又遇到了新问题!这个supportAvoidance属性,确实可以开启避让功能,但是,在自定义键盘弹出来的时候,滑动scroll组件到顶部,页面的顶部并不能展示全,这时,关闭自定义键盘,页面就展示全了,这种情况,有什么好的办法吗?想让自定义键盘弹出的时候,滑动scroll组件到顶部,可以使得页面展示全~
问题是解决了,但是算是用的蠢办法,我在scroll中的column顶部加了一个blank占位,键盘弹出的时候,高度是自定义键盘的高度减去 scroll组件外顶部的title标题区域,如果是沉浸式布局,还要减去顶部状态栏高度,键盘收起时,高度为0,
【背景知识】 自定义弹出框 (CustomDialog):CustomDialog是自定义弹窗,可用于广告、中奖、警告、软件更新等与用户交互响应操作。开发者可以通过CustomDialogController类显示自定义弹窗。具体用法请参考自定义弹窗。 安全区域:安全区域是指页面的显示区域,默认不与系统设置的非安全区域比如状态栏、导航栏区域重叠,默认情况下开发者开发的界面都被布局在安全区域内,通过设置setKeyboardAvoidMode来配置虚拟键盘弹出时页面的避让模式。
【解决方案】
- 方法一、用offset方法设置16vp的间距,示例代码如下:
@Entry
@Component
struct CustomDialogPage {
  @State message: string = 'CustomDialogPage';
  customDialogController: CustomDialogController = new CustomDialogController({
    builder: CustomEditDialogWidget({
      tipString: '姓名',
      inputType: InputType.Normal,
      textInputConString: () => {
      }
    }),
    alignment: DialogAlignment.Bottom,
    maskColor: Color.Red,
    customStyle: true
  });

  build() {
    Row() {
      Column() {
        Button(this.message).onClick(() => {
          this.customDialogController.open();
        })
      }
      .width('100%')
    }
    .height('100%')
  }
}

@CustomDialog
@Component
export struct CustomEditDialogWidget {
  controller?: CustomDialogController;
  @State textInputString: string = ""
  tipString: string = ""
  textInputConString = () => {
  }
  inputType: InputType = InputType.Normal

  build() {
    Column() {
      Text(`请输入${this.tipString}`).margin({ top: 20 })
      TextInput({ placeholder: `请输入${this.tipString}` })
        .width("90%")
        .backgroundColor(Color.White)
        .borderWidth(1)
        .borderColor("#666")
        .borderRadius(10)
        .margin({ top: 20 })
        .defaultFocus(true)
        .onChange((value: string) => {
          this.textInputString = value
        })
        .type(this.inputType)
      Row() {
        Text("取消")
          .fontColor("#333")
          .onClick(() => {
            this.controller?.close()
          })
          .padding({
            left: 35,
            right: 35,
            top: 15,
            bottom: 15
          })
        Text("|").opacity(0.5).height("100%")
        Text("确定")
          .fontColor("#000")
          .onClick(() => {
            if (this.textInputString !== "") {
              this.textInputConString()
            }
            this.controller?.close()
          })
          .padding({
            left: 35,
            right: 35,
            top: 15,
            bottom: 15
          })
      }
      .width("100%")
      .height(50)
      .justifyContent(FlexAlign.SpaceAround)
      .margin({ top: 10 })
    }
    .width("90%")
    .borderRadius(15)
    .backgroundColor(Color.White)
    .borderWidth(5)
    .offset({ x: 0, y: 16 })
  }
}
- 方法二、动态判断软键盘高度,并基于软键盘高度调整自定义弹窗的外边距尺寸。 在自定义弹窗的aboutToAppear生命周期接口中,监听键盘的拉起和隐藏,获取键盘的高度,并将高度动态赋值给弹窗根容器的底部外边距,实现弹窗避让软键盘。 注意:必须设置自定义弹窗不自动避让软键盘(KeyboardAvoidMode.NONE),否则弹窗会出现不符合预期的顶起。 示例代码如下:
import { window } from "@kit.ArkUI";
@CustomDialog
export struct DialogInput {
 controller?: CustomDialogController;
 @State textInputString: string = ""
 tipString: string = ""
 textInputConString = () => {
 }
 inputType: InputType = InputType.Normal
 @State private keyboardHeight: number = 0
 private  context: Context = this.getUIContext().getHostContext() as Context;
 aboutToAppear(): void {
   window.getLastWindow(this.context).then(currentWindow => {
     currentWindow.on('avoidAreaChange', data => {
       if (data.type === window.AvoidAreaType.TYPE_KEYBOARD) {
         // 获取软键盘高度
         this.keyboardHeight = this.getUIContext().px2vp(data.area.bottomRect.height)
       }
     })
   })
 }
 build() {
   Column() {
     Text(`请输入${this.tipString}`).margin({ top: 20 })
     TextInput({ placeholder: `请输入${this.tipString}` })
       .width("90%")
       .backgroundColor(Color.White)
       .borderWidth(1)
       .borderColor("#666")
       .borderRadius(10)
       .margin({ top: 20 })
       .defaultFocus(true)
       .onChange((value: string) => {
         this.textInputString = value
       })
       .type(this.inputType)
     Row() {
       Text("取消")
         .fontColor("#333")
         .onClick(() => {
           this.controller?.close()
         })
         .padding({
           left: 35,
           right: 35,
           top: 15,
           bottom: 15
         })
       Text("|").opacity(0.5).height("100%")
       Text("确定")
         .fontColor("#000")
         .onClick(() => {
           if (this.textInputString !== "") {
             this.textInputConString()
           }
           this.controller?.close()
         })
         .padding({
           left: 35,
           right: 35,
           top: 15,
           bottom: 15
         })
     }
     .width("100%")
     .height(50)
     .justifyContent(FlexAlign.SpaceAround)
     .margin({ top: 10 })
   }
   .margin({ bottom: this.keyboardHeight })
   .width("90%")
   .borderRadius(15)
   .backgroundColor(Color.White)
   .borderWidth(5)
 }
}
@Entry
@Component
struct Index {
 private customDialog: CustomDialogController = new CustomDialogController({
   builder: DialogInput(),
   alignment: DialogAlignment.Bottom,
   // 自定义弹窗偏移量设为0
   offset: { dx: 0, dy: 0 },
   backgroundColor: Color.White,
   autoCancel: true,
   customStyle: true,
   // 必须设置自定义弹窗不自动避让软键盘,否则弹窗会出现不符合预期的顶起
   keyboardAvoidMode: KeyboardAvoidMode.NONE
 })

 build() {
   Column() {
     Button('弹窗')
       .type(ButtonType.Capsule)
       .onClick(() => {
         // 打开自定义弹窗
         this.customDialog.open()
       })
   }
 }
}
- 方法三:从API version 15开始,可通过keyboardAvoidDistance设置弹窗避让键盘后,和键盘之间的距离。 示例代码如下:
import { LengthMetrics } from "@kit.ArkUI";

@Entry
@Component
struct CustomDialogPage {
  @State message: string = 'CustomDialogPage';
  customDialogController: CustomDialogController = new CustomDialogController({
    builder: CustomEditDialogWidget({
      tipString: '姓名',
      inputType: InputType.Normal,
      textInputConString: () => {
      }
    }),
    alignment: DialogAlignment.Bottom,
    maskColor: Color.Red,
    customStyle: true,
    keyboardAvoidDistance: LengthMetrics.px(0)
  });

  build() {
    Row() {
      Column() {
        Button(this.message).onClick(() => {
          this.customDialogController.open();
        })
      }
      .width('100%')
    }
    .height('100%')
  }
}

@CustomDialog
@Component
export struct CustomEditDialogWidget {
  controller?: CustomDialogController;
  @State textInputString: string = ""
  tipString: string = ""
  textInputConString = () => {
  }
  inputType: InputType = InputType.Normal

  build() {
    Column() {
      Text(`请输入${this.tipString}`).margin({ top: 20 })
      TextInput({ placeholder: `请输入${this.tipString}` })
        .width("90%")
        .backgroundColor(Color.White)
        .borderWidth(1)
        .borderColor("#666")
        .borderRadius(10)
        .margin({ top: 20 })
        .defaultFocus(true)
        .onChange((value: string) => {
          this.textInputString = value
        })
        .type(this.inputType)
      Row() {
        Text("取消")
          .fontColor("#333")
          .onClick(() => {
            this.controller?.close()
          })
          .padding({
            left: 35,
            right: 35,
            top: 15,
            bottom: 15
          })
        Text("|").opacity(0.5).height("100%")
        Text("确定")
          .fontColor("#000")
          .onClick(() => {
            if (this.textInputString !== "") {
              this.textInputConString()
            }
            this.controller?.close()
          })
          .padding({
            left: 35,
            right: 35,
            top: 15,
            bottom: 15
          })
      }
      .width("100%")
      .height(50)
      .justifyContent(FlexAlign.SpaceAround)
      .margin({ top: 10 })
    }
    .width("90%")
    .borderRadius(15)
    .backgroundColor(Color.White)
    .borderWidth(5)
  }
}
【总结】
| 方法 | 特性 | 适用场景 |
|---|---|---|
| 方法一:使用offset设置固定间距 | 简单易用,固定间距,适配性差 | 键盘高度固定的场景 |
| 方法二:动态监听键盘高度调整外边距 | 精准适配键盘高度,需监听事件 | 多设备/动态键盘场景 |
| 方法三:API15+的keyboardAvoidDistance | 系统能力实现,最为简单高效 | 新版本设备 |
阔以的,感谢感谢,
监听键盘弹出,然后手动修改UI 底部的间距
试着改一下不同皮肤。
【背景知识】
软键盘布局适配:本文将介绍以下知识帮助开发者了解软键盘的弹出和收起的控制、避让机制以及软键盘常见问题的解决方法。
【参考方案】
可参考实现自定义键盘功能示例,通过绑定系统键盘,实现自定义键盘和系统键盘的切换;通过onAreaChange获取自定义键盘高度,设置布局避让;为开发者讲解键盘切换、自定义键盘光标处理、自定义键盘布局避让等技术场景案例。
- TextInput组件customKeyboard属性绑定builder,实现自定义键盘。
- TextInput组件customKeyboard属性传值null,绑定系统键盘,实现自定义键盘和系统键盘的切换。
- 监听TextInput组件onTextSelectionChange、onChange事件,实现光标位置设置。
- 监听TextInput组件onPaste、onCut事件,实现复制粘贴功能。
- 通过window的keyboardHeightChange事件获取系统键盘高度,通过onAreaChange获取自定义键盘高度,设置布局避让。
键盘出现的同时上移输入框不就行了,
这样的话,其他布局不动,相当于在自定义键盘上面再展示一个输入框,感觉怪怪的,但是也算个方法,,
不太懂
啥意思
鸿蒙Next中自定义键盘避让安全区需使用安全区域组件。在ArkUI中使用SafeArea组件包裹键盘布局,系统会自动处理底部安全区域适配。可通过SafeArea参数设置避让位置,如.edges([SafeAreaEdge.BOTTOM])指定底部避让。键盘组件应设置自适应布局约束,避免固定高度值。系统安全区域插值通过窗口管理器获取,键盘需响应窗口尺寸变化事件实时调整位置。
在HarmonyOS Next中,自定义键盘避让安全区需要通过以下方式实现:
- 使用
window.getWindowAvoidArea()获取安全区域信息
import window from '@ohos.window';

let avoidArea = window.getWindowAvoidArea(window.AvoidAreaType.TYPE_SYSTEM);
let bottomSafeHeight = avoidArea.bottomRect.height;
- 通过键盘弹起事件动态调整布局
// 监听键盘显示/隐藏事件
keyboardController.onKeyboardShow(() => {
  // 将输入框上移安全区域高度
  inputComponent.offset({ y: -bottomSafeHeight });
});

keyboardController.onKeyboardHide(() => {
  // 恢复原位
  inputComponent.offset({ y: 0 });
});
- 或者使用安全区域组件包裹内容
SafeArea({
  edges: ['bottom'],
  child: TextInput({ placeholder: '请输入内容' })
})
关键是要在自定义键盘显示时,手动计算并应用安全区域的偏移量,确保输入框始终可见。系统键盘自动避让的原理也是基于这些安全区域API的实现。


