


HarmonyOS鸿蒙Next中桌面快捷方式怎么跳h5页面
HarmonyOS鸿蒙Next中桌面快捷方式怎么跳h5页面 h5页面是接口返回的地址,怎么通过长按应用拉起快捷方式,点击后直接跳入应用内的h5页面呢

应用静态快捷方式
随着应用的功能越来越复杂,用户在使用应用时,找到某个功能的操作步骤也变得更加繁琐。为提升用户体验,可以对应用中常用的功能创建对应的桌面快捷方式,以达到快速启动应用、一键直达特定功能等目的。例如相机应用的 “快速拍照”、便签应用的 “新建便签” 和地图应用的常用地点导航等功能的快捷方式,用户通过快捷方式可以快速进入特定功能页面,既能大大提高操作效率,同时也增加了用户对应用的依赖性。使用快捷方式,还可以实现个性化定制的需求,创建多个快捷方式,以满足个性化的工作流程和操作偏好。
场景介绍
以导航场景为例,用户使用地图应用导航时,通常先搜索目的地,然后开始导航。为了提升导航效率和操作便捷性,建议在地图应用中添加常去地点的快捷方式,如公司、家等。添加这些快捷方式后,用户长按应用图标,即可打开快捷方式入口,快速启动导航。详情请参考桌面快捷方式。
配置方法
下面介绍在工程中配置静态快捷方式的方法。
- 在entry/src/main/resources/base/element/string.json配置资源文件如下。
{
  "string": [
    // ···
    {
      "name": "share",
      "value": "分享好友"
    },
    {
      "name": "add",
      "value": "添加收藏"
    }
  ]
}
-
配置快捷方式文件。
在模块的/resources/base/profile/目录下配置快捷方式的配置文件,如shortcuts_config.json,拷贝示例代码需要删除注释。
{
  "shortcuts": [
   {
      "shortcutId": "id_test1",
      "label": "$string:add",
      "icon": "$media:add_icon",
      "wants": [
        {
          "bundleName": "com.ohos.hello",
          "moduleName": "entry",
          "abilityName": "EntryAbility1",
          "parameters": {
            "testKey": "testValue"
          }
        }
      ]
    },
    {
      "shortcutId": "id_test2",
      "label": "$string:share",
      "icon": "$media:share_icon",
      "wants": [
        {
          "bundleName": "com.ohos.hello",
          "moduleName": "entry",
          "abilityName": "EntryAbility",
          "parameters": {
            "testKey": "testValue"
          }
        }
      ]
    }
  ]
}
- 在应用的module.json5文件中配置metadata,指向快捷方式的配置文件。
{
  "module": {
  // ...
    "abilities": [
      {
        "name": "EntryAbility",
        "srcEntry": "./ets/entryability/EntryAbility.ets",
        // ...
        "metadata": [
          {
            "name": "ohos.ability.shortcuts",
            "resource": "$profile:shortcuts_config"
          }
        ]
      }
    ]
  }
}
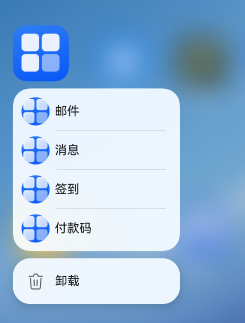
安装应用后,长按桌面上的应用图标,图标上方会显示开发者配置的快捷方式:“添加收藏"和"分享好友”。点击相应标签,可启动对应的组件。应用配置的静态快捷方式在桌面上的展示效果如下图所示。

更多关于HarmonyOS鸿蒙Next中桌面快捷方式怎么跳h5页面的实战系列教程也可以访问 https://www.itying.com/category-93-b0.html

【背景知识】
productViewManager:提供展示应用/元服务详情页、应用内快捷方式加桌的能力。
【参考方案】
可参考地铁线路图添加桌面示例,通过productViewManager提供应用内快捷方式添加至桌面的能力。
- 构造调用checkPinShortcutPermitted接口校验桌面快捷方式的参数。
let uiContext = this.getUIContext().getHostContext() as common.UIAbilityContext;
let shortcutId = 'id_map';             // 对应shortcuts标签中配置的shortcutId
let labelResName = 'go_to_map';        // 对应shortcuts标签中配置的label资源索引名称
let iconResName = 'metro';             // 对应shortcuts标签中配置的icon资源索引名称
let want: Want = {                     // 对应shortcuts标签中配置的want
  bundleName: 'com.example.addshortcuttodesktop',
  moduleName: 'entry',
  abilityName: 'EntryAbility',
  parameters: {
    shortCutKey: 'MainPage'
  }
}
- 调用checkPinShortcutPermitted接口,将步骤1中的参数依次传入接口中,并保存异步返回的结果CheckShortcutResult。调用requestNewPinShortcut接口,将异步结果的tid传入,执行添加到桌面的操作。
let checkShortcutResult: productViewManager.CheckShortcutResult;
productViewManager.checkPinShortcutPermitted(uiContext, shortcutId, want, labelResName, iconResName)
  .then((result: productViewManager.CheckShortcutResult) => {
    checkShortcutResult = result;
    let tid = checkShortcutResult.tid;
    productViewManager.requestNewPinShortcut(uiContext, tid)
  })
- 在/resources/base/profile/目录下创建名为shortcuts_config.json的文件,并在文件中定义应用快捷方式的相关配置。
{
  "shortcuts": [
    {
      "shortcutId": "id_map",
      "label": "$string:go_to_map",
      "icon": "$media:metro",
      "wants": [
        {
          "bundleName": "com.example.addshortcuttodesktop",
          "moduleName": "entry",
          "abilityName": "EntryAbility",
          "parameters": {
            "shortCutKey": "MainPage"
          }
        }
      ]
    }
  ]
}
- 在module.json5配置文件中的abilities标签下的metadata中设置resource属性值为$profile:shortcuts_config,指定应用的快捷方式配置文件,即使用shortcuts_config.json文件中的shortcuts配置。
"metadata": [
  {
    "name": "ohos.ability.shortcuts", // 配置快捷方式,该值固定为ohos.ability.shortcuts
    "resource": "$profile:shortcuts_config" // 指定shortcuts信息的资源位置
  }
]

你是要这种效果吗?
原理: 给 UIAbility 配置快捷方式,快捷方式中包含 Want,用户点击该快捷方式之后,系统通过 Want 中的信息拉起应用,在UIAbility中处理Want中携带的目标页面参数来决定进入到应用中的哪一个内页。以下是大概实现步骤:
- 打开
\entry\src\main\**module.json5**,给对应 UIAbility 新增快捷方式元数据:
{
  "module": {
    "name": "entry",
    "type": "entry",
    "srcEntry": "./ets/abilityStage/NotificationAbilityStage.ets",
    "mainElement": "EntryAbility",

    // ...这里省略一些其他属性

    "abilities": [
      {
        "name": "EntryAbility",
        "srcEntry": "./ets/entryability/EntryAbility.ets",
        "metadata": [
          // 关键:给需要配置快捷方式的UIAbility新增shortcuts属性
          {
            // name 必须为这个
            "name": "ohos.ability.shortcuts",
            // 对应资源文件名称可以自定义
            "resource": "$profile:shortcuts_config"
          }

        ]
      },
  }
}
\entry\src\main\resources\base\**profile**文件夹内新增文件**shortcuts_config.json**:
{
  "shortcuts": [
    {
      "shortcutId": "shortcut_id_email",
      "label": "$string:shortcut_label_email",
      "icon": "$media:startIcon",
      "wants": [
        {
          // 将下面几个属性值替换为你自己的应用信息
          "bundleName": "com.xxx.xxx",
          "moduleName": "entry",
          "abilityName": "NotificationAbility",
          "parameters": {
            // 目标页面 该属性名可以自定义,属性值为你的 webview 组件页面名称
            "targetPage": "NotificationPage1",
            // ...其他额外参数
          }
        }
      ]
    },
}
这里就是放了每个快捷方式对应的Want信息,以及额外参数:目标页面。
- 在UIAbility中写热启动路由跳转等业务代码。
由于跳转应用内页(页面路由)需要考虑当前应用是否已经打开。建议了解一下UIAbility组件启动模式,理解应用在已经打开**(热启动)和未打开时(冷启动)**UIAbility中回调方法执行顺序的区别。
UIAbility默认为singleton(单实例模式)。这里就以默认单实例启动模式,写一个简单示例代码并做简短说明:- 示例代码内为应用首页使用 Navigation (推荐) 路由页面,如果使用** router(已过时)**,请鼠标左键点击该链接参考其中的api自行实现。
- onCreate、**onNewWant **中判断是否进行页面路由的业务代码,可以依照你的业务需求来进行判断。
- 这段代码主要关注使用
**want.parameters?.targetPage**方法来获取 shortcuts_config.json 中 Want 携带的目标页面参数。
import { window } from '@kit.ArkUI'
import { AbilityConstant, UIAbility, Want, WantAgent, wantAgent } from '@kit.AbilityKit'
import { notificationManager } from '@kit.NotificationKit';
import { BusinessError } from '@kit.BasicServicesKit';
import { hilog } from '@kit.PerformanceAnalysisKit';
import { JSON } from '@kit.ArkTS';

export default class NotificationAbility extends UIAbility {
  // want目标页面
  private targetPage: string = '';

  // 冷启动入口(由于此时应用首页还未渲染出来,故冷启动时在应用首页判断)
  onCreate(want: Want, launchParam: AbilityConstant.LaunchParam): void {
    hilog.info(DOMAIN_NUMBER, TAG, `#onCreate: want.parameters is ${JSON.stringify(want.parameters)}`)
    this.targetPage = want.parameters?.targetPage as string || ''
    AppStorage.setOrCreate<string>('targetPage', this.targetPage);
  }

  // 热启动入口(直接判断是否路由页面)
  onNewWant(want: Want, launchParam: AbilityConstant.LaunchParam) {
    hilog.info(DOMAIN_NUMBER, TAG, `#onNewWant: want.parameters is ${JSON.stringify(want.parameters)}`)
    this.targetPage = want.parameters?.targetPage as string || '';

    if (this.targetPage.trim().length !== 0) {
      // 获取当前路由页面
      let currentPage: string = AppStorage.get<string>('currentPage') || '';
      // 获取首页Navigation页面栈
      let pageInfos: NavPathStack | undefined = AppStorage.get<NavPathStack>('pageInfos');

      if (undefined == pageInfos) {
        return;
      }

      // 判断是否需要路由
      if (this.targetPage.trim().length !== 0 && currentPage !== this.targetPage && this.targetPage !== 'NotificationIndex') {
        currentPage = this.targetPage
        // router.clear()
        hilog.info(DOMAIN_NUMBER, TAG, `#routerByNewWant#pushPathByName(${this.targetPage})`)
        pageInfos.pushPathByName(this.targetPage, null)
      }

      // 目标页面消费之后置空
      AppStorage.setOrCreate<string>('targetPage', '');
      // 更新当前路由页面
      AppStorage.setOrCreate<string>('currentPage', this.targetPage);
    }

  }

  onWindowStageCreate(windowStage: window.WindowStage): Promise<void> {
    hilog.info(DOMAIN_NUMBER, TAG, `#onWindowStageCreate()`)
    // 默认加载的页面路径
    let pageUrl = 'NotificationIndex';
    // 记录当前页面url
    AppStorage.setOrCreate<string>('currentPage', pageUrl);

    windowStage.loadContent(`pages/${pageUrl}`)
      .then(() => {
        hilog.info(DOMAIN_NUMBER, TAG, `#onWindowStageCreate#windowStage.loadContent(${pageUrl}): Successfully!`)
      })
      .catch((error: BusinessError) => {
        hilog.error(DOMAIN_NUMBER, TAG,
          `ERROR: #onWindowStageCreate#windowStage.loadContent(${pageUrl}), Cause: ${JSON.stringify(error)}`);
      });

  }
}
- 应用首页处理冷启动时的页面路由:
// NotificationIndex 应用首页
import { hilog } from '@kit.PerformanceAnalysisKit';
import { BusinessError } from '@kit.BasicServicesKit';
import { JSON } from '@kit.ArkTS';

const DOMAIN_NUMBER: number = 0xAAAA;
const TAG: string = 'NotificationIndex'

// Navigation路由表Builder
@Builder
export function NotificationIndexBuilder(name: string, param: Object) {
  NotificationIndex()
}

@Entry
@Component
struct NotificationIndex {

  pageInfos: NavPathStack = new NavPathStack();

  build() {
    Navigation(this.pageInfos){
      Column() {
        Text('应用首页')
      }
    }
    .title('NotificationIndex')
  }

  aboutToAppear(): void {
    hilog.info(DOMAIN_NUMBER, TAG, `#aboutToAppear()`)
    // 存储Navigation页面栈,在应用热启动时候使用
    AppStorage.setOrCreate('pageInfos', this.pageInfos)
  }

  onDidBuild(): void {
    hilog.info(DOMAIN_NUMBER, TAG, `#onDidBuild()`)
    this.routerByWant()
  }

  /**
   * 通过Want中的信息进行页面路由
   */
  private routerByWant() {
    hilog.info(DOMAIN_NUMBER, TAG, `#routerByWant()`)

    // 获取want中的目标页面
    let targetPage: string = AppStorage.get<string>('targetPage') || '';
    // 获取当前路由页面
    let currentPage: string = AppStorage.get<string>('currentPage') || ''

    // 判断是否需要路由
    if (targetPage.trim().length !== 0 && currentPage !== targetPage && targetPage !== 'NotificationIndex') {
      currentPage = targetPage
      hilog.info(DOMAIN_NUMBER, TAG, `#routerByNewWant#pushPathByName(${targetPage})`)
      this.pageInfos.pushPathByName(targetPage, null)
    }

    // 目标页面消费之后置空
    AppStorage.setOrCreate<string>('targetPage', '');
    // 更新当前路由页面
    AppStorage.setOrCreate<string>('currentPage', targetPage);
  }

}
在HarmonyOS Next中,通过UIAbility的Want配置实现桌面快捷方式跳转H5页面。首先在module.json5配置文件中声明UIAbility,设置actions为"ohos.want.action.view"和entities为[“entity.system.h5”]。在配置文件中为UIAbility添加"skills"字段,指定"entities"和"actions"匹配H5页面。使用Web组件加载目标URL,通过startAbility方法触发跳转。整个过程基于ArkTS开发,无需依赖Java或C语言。

在HarmonyOS Next中,可以通过以下步骤实现从桌面快捷方式跳转到应用内的H5页面:
-
配置Ability信息:在module.json5文件中,为目标H5页面配置一个Ability,类型设为"page",并设置正确的url参数指向H5地址。
-
添加快捷方式:在应用的Shortcuts配置中定义快捷方式,关联到上述Ability。在resources/base/profile/shortcuts_config.json中配置:
{
  "shortcuts": [
    {
      "shortcutId": "h5_shortcut",
      "label": "跳转H5",
      "icon": "$media:icon",
      "intents": [
        {
          "targetBundle": "你的应用包名",
          "targetModule": "模块名",
          "targetAbility": "配置的Ability名称"
        }
      ]
    }
  ]
}
-
动态处理URL:如果H5地址是接口动态返回的,可在Ability的onCreate生命周期中通过参数传递URL,或通过全局变量管理。
-
权限声明:确保在module.json5中声明ohos.permission.SET_ABILITY_CONTROLLER权限。
完成配置后,用户长按应用图标即可看到快捷方式,点击后会直接启动应用并跳转到指定的H5页面。注意确保H5地址的有效性和网络可用性。