


HarmonyOS 鸿蒙Next中触摸事件穿透组件的问题
HarmonyOS 鸿蒙Next中触摸事件穿透组件的问题
@Component
struct test04 {
build() {
Column() {
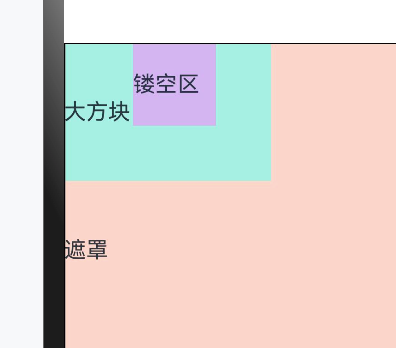
Text('遮罩')
.position({ x: 0 })
.size({ width: 300, height: 300 })
.backgroundColor('#fffed8cb')
// .onClick(() => console.log('遮罩'))
.onTouch((e) => e.type == TouchType.Up && console.log('遮罩'))
Text('大方块').size({ width: 150, height: 100 }).backgroundColor('#ffb6eee3').position({ x: 0 })
// .onClick(() => console.log('大方块'))
// .onTouch((e) => e.type == TouchType.Up && console.log('大方块'))
Text('镂空区')
.size({ width: 60, height: 60 })
.backgroundColor('#ffcfb6ee')
.position({ x: 50 })
// .onClick(() => console.log('镂空区'))
// .onTouch((e) => e.type == TouchType.Up && console.log('镂空区'))
.hitTestBehavior(HitTestMode.Transparent)
}.size({ width: 300, height: 300 }).borderWidth(1)
.onTouch((e) => e.type == TouchType.Up && console.log('底部'))
// .onClick(() => console.log('底部'))
}
}
上面代码,期望是
点击紫色区,输出【底部】日志,
点击蓝色区,输出【大方块】日志,
点击红色区,输出【遮罩】日志
怎么设置才能实现?
更多关于HarmonyOS 鸿蒙Next中触摸事件穿透组件的问题的实战教程也可以访问 https://www.itying.com/category-93-b0.html
4 回复

// xxx.ets
import { Type38CarouselComponent } from './Type38CarouselComponent';

@Entry
@Component
struct Index {
  build() {
    Stack() {
      Text('遮罩')
        .size({ width: 300, height: 300 })
        .backgroundColor('#fffed8cb')
        .onClick(() => {
          console.log('qts 遮罩')
        })
      // .onTouch((e) => e.type == TouchType.Up && console.log('qts 遮罩'))
      Text('大方块').size({ width: 150, height: 100 }).backgroundColor('#ffb6eee3').position({ x: 0 })
        .onClick(() => console.log('qts 大方块'))
      //   .onTouch((e) => e.type == TouchType.Up && console.log('大方块'))
      Text('镂空区')
        .size({ width: 60, height: 60 })
        .backgroundColor('#ffcfb6ee')
        .position({ x: 50 })
        .onClick(() => console.log('qts 镂空区'))// .onTouch((e) => e.type == TouchType.Up && console.log('镂空区'))
        .hitTestBehavior(HitTestMode.Transparent)
    }.size({ width: 300, height: 300 }).borderWidth(1)
    // .onTouch((e) => e.type == TouchType.Up && console.log('qts 底部'))
    // .hitTestBehavior(HitTestMode.Transparent)
    // .onClick(() => console.log('底部'))
  }
}
更多关于HarmonyOS 鸿蒙Next中触摸事件穿透组件的问题的实战系列教程也可以访问 https://www.itying.com/category-93-b0.html

在HarmonyOS Next中,触摸事件穿透通常由组件层级或事件处理机制导致。可通过设置组件的hitTestBehavior属性为Block或Transparent来控制事件响应范围。检查组件的事件冒泡设置,避免子组件拦截事件。使用onTouch事件监听器精确管理触摸行为,确保目标组件正确接收事件。

在HarmonyOS Next中,触摸事件默认遵循冒泡机制,但可以通过hitTestBehavior控制事件穿透。根据你的需求:
-
紫色区域(镂空区):需要穿透到底层Column,应设置:
.hitTestBehavior(HitTestMode.Transparent)这样触摸事件会穿透到下层Column,触发底部日志。
-
蓝色区域(大方块):需要拦截事件,应设置:
.hitTestBehavior(HitTestMode.Block)并添加
.onTouch事件监听,输出"大方块"日志。 -
红色区域(遮罩):保持默认的
HitTestMode.Default即可,它会正常响应触摸事件。
关键是要确保组件层级和位置正确,避免重叠区域的事件冲突。对于需要穿透的组件(紫色),必须明确设置为Transparent;对于需要独立响应的组件(蓝色),设置为Block阻止事件向下传递。