


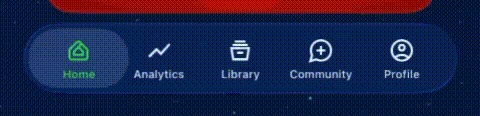
HarmonyOS鸿蒙Next模仿ios26的玻璃滑动tab效果
HarmonyOS鸿蒙Next模仿ios26的玻璃滑动tab效果 本人是大三学生尽最大能力还原的效果 但是视频最后那里手势滑动还是会有一点延迟,应该还是bug或者是本人菜没发现问题(不知有无大佬帮我优化一下开源一下Ovo),勿喷
视频一是示例演示(暂无bug)
- 问题一
- 视频二手势滑动会有延迟(bug)
- UI动画差距还是很大
视频三是目标效果
视频一👇(Tab滑动功能演示) 视频二👇(有手势滑动延迟bug)


视频三👇(最理想版ios26)
以下是完整版代码
import { curves } from '@kit.ArkUI';

interface tarBarList {
  index: number,
  item: TabBarOptions, // 你原来使用的类型,保持不变
}
@Entry
@ComponentV2
struct Index {
  @Local OutsideSelectedIndex: number = 0;
  @Local private dragStartIndex: number = 0; // 手势开始时“选中索引”的快照
  @Local private perTabWidthVp: number = 0; // 单个 tab 的实际宽度(vp)= Stack 实际宽度 / 个数

  @Local private dragAccumX: number = 0; // 本次手势累计位移(vp)
  @Local private lastSwitchTick: number = 0; // 上一次索引切换的时间戳(ms,做去抖)
  // ===== 可调阈值(按需要微调手感)=====
  @Local private panMinDistanceVp: number = 5; // PanGesture 最小触发距离(vp)
  @Local private flickVelocity: number = 1200; // 甩动速度阈值(像素/秒,设备不同可调 800~1600)
  @Local private distanceRatio: number = 0.45; // 位移达到单格宽度的 45% 才换页(可调 0.45~0.6)
  @Local private dragOffsetIndex: number = 0; // 拖拽中的连续偏移(单位:索引,负=左/正=右)
  @Local tarBarList: tarBarList[] = [
    { index: 0, item: { icon: $r('sys.symbol.house_fill'), text: 'Home' } },
    { index: 1, item: { icon: $r('sys.symbol.worldclock_fill_2'), text: 'Analytics' } },
    { index: 2, item: { icon: $r('sys.symbol.book_pages_fill_1'), text: 'Library' } },
    { index: 3, item: { icon: $r('sys.symbol.person_crop_circle_fill_1'), text: 'Profile' } },
  ];
  private isTouched(i: number): boolean {
    // s = 滑块左边界(单位:索引,可能是小数);滑块区间为 [s, s+1)
    const s = this.OutsideSelectedIndex + this.dragOffsetIndex;
    const tabL = i; // 第 i 个 tab 的区间 [i, i+1)
    const tabR = i + 1;

    // 计算两个区间的重叠长度(单位:索引格宽)
    const overlap = Math.max(0, Math.min(s + 1, tabR) - Math.max(s, tabL)); // 范围 0..1

    // 只有当重叠达到“1/4 宽度”才认为被接触(返回 true)
    return overlap >= 0.25;
  }

  @Builder
  NavigationTabs() {
    Stack() {
      // ==== 胶囊滑块(选中高亮条)====
      Row()
      // 宽度 = 单格百分比
        .width(`${100 / this.tarBarList.length}%`)
        .height('100%')
        .borderRadius('50%')
        // 位置 = 选中索引 × 单格百分比
        // 注:这里采用“离散吸附”方案,不做跟手连续位移;小幅移动不会闪跳
        .position({ x: `${(this.OutsideSelectedIndex + this.dragOffsetIndex) * (100 / this.tarBarList.length)}%` })


        .radialGradient({
          center: ['100%', '0%'],
          radius: '100%',
          repeating: false,
          colors: [['#ffffffff', 0], ['#25ffffff', 0.5]],
        })
        .animation({
          // springMotion 为物理曲线,实际时长由曲线与状态变化决定;duration 在此可忽略
          duration: 300,
          curve: curves.springMotion(0.4, 0.8),
        })

      // ==== Tab 项容器 ====
      Row() {
        ForEach(this.tarBarList, (item: tarBarList, index: number) => {
          Column({ space: 4 }) {
            // 图标
            SymbolGlyph(item.item.icon as Resource)
              .fontSize(23)
              // 注意:fontColor 传 Color/ResourceColor,不要用数组包裹
              .fontColor(this.isTouched(index)
                ? [$r('sys.color.confirm')]
                : [$r('sys.color.font_primary')])

            // 文本
            Text(item.item.text)
              .fontSize(14)
              .fontColor(this.isTouched(index) ? $r('sys.color.confirm') : $r('sys.color.font_primary'))

          }
          .width(`${100 / this.tarBarList.length}%`)
          .justifyContent(FlexAlign.Center)

          // 点击:立即切换到该索引(清理掉本次手势的累计位移)
          .onClick(() => {
            this.dragAccumX = 0;
            this.OutsideSelectedIndex = index;
          })

          // 手势:只认水平,设最小触发距离,避免轻触就抖
          .gesture(
            PanGesture({ direction: PanDirection.Horizontal, distance: this.panMinDistanceVp })

            // 手势开始:记录快照,清零累计
              .onActionStart((e: GestureEvent) => {
                this.dragStartIndex = this.OutsideSelectedIndex;
                this.dragAccumX = 0; // 若你还保留这个变量,可以置 0,但后面不再用它做累计
                this.dragOffsetIndex = 0; // 连续偏移从 0 开始
                this.lastSwitchTick = Date.now();
              })


              .onActionUpdate((e: GestureEvent) => {
                if (this.perTabWidthVp <= 0) {
                  return;
                }

                // 关键:offsetX 是“从手势起点累计的位移”。正=向右,负=向左(官方定义)。
                const raw = e.offsetX / this.perTabWidthVp; // 换算成“索引单位”的连续偏移

                // 边界夹紧:不能拖出 0..(length-1) 的范围
                const min = -this.dragStartIndex;
                const max = (this.tarBarList.length - 1) - this.dragStartIndex;
                this.dragOffsetIndex = Math.min(Math.max(raw, min), max);
              })


              .onActionEnd((e: GestureEvent) => {
                // 连续索引(可能是小数):起始格 + 拖动偏移
                let s = this.dragStartIndex + this.dragOffsetIndex;

                // 按你配置的阈值构造“取整偏置”,例如 distanceRatio=0.45 => stepBias=0.55
                const stepBias = (1 - this.distanceRatio);

                // 若是甩动,给 s 一个方向性偏置(更容易跨到下一格)
                if (Math.abs(e.velocityX) > this.flickVelocity) {
                  s += (e.velocityX > 0 ? stepBias : -stepBias);
                }

                // 根据方向用带阈值的“偏移取整”,一次可跨多格
                let target: number;
                if (this.dragOffsetIndex >= 0) {
                  // 向右:到达每一格的 1 - distanceRatio 才算过界
                  target = Math.floor(s + stepBias);
                } else {
                  // 向左:离开每一格超过 distanceRatio 才算过界
                  target = Math.ceil(s - stepBias);
                }

                // 边界夹紧
                target = Math.min(Math.max(target, 0), this.tarBarList.length - 1);

                // 落位 & 收尾
                this.OutsideSelectedIndex = target;
                this.dragOffsetIndex = 0; // 松手后吸附到整格
                this.dragAccumX = 0;
              })
          );
        })
      }
      .width('100%')
      .height('100%')
    }
    // 用布局后的实际宽度计算“单个 tab 宽度”,避免自己去算 90% × 屏宽
    .onAreaChange((oldArea: Area, newArea: Area) => {
      const total = this.tarBarList.length || 1;
      this.perTabWidthVp = Number(newArea.width) / total;
    })
    // ==== 外层胶囊容器样式(你的原样式保持)====
    .height(56)
    .width('90%')
    .padding(6)
    .borderRadius('50%')
    .radialGradient({
      center: ['100%', '0%'],
      radius: '50%',
      repeating: false,
      colors: [['#ffffffff', 0], ['#25ffffff', 0.5]],
    })
  }

  //以上是透明Tab功能

  build() {
    NavDestination() {
      Tabs({ index: this.OutsideSelectedIndex!! }) {
        TabContent() {
          Column() {
          Text('首页').fontSize(20)
          }.justifyContent(FlexAlign.Center)
          .alignItems(HorizontalAlign.Center)

          .width('100%')
          .height("100%")
        }.tabBar("Home")

        TabContent() {
          Column() {
            Text('2')
          }
        }.tabBar("Analytics")
        TabContent() {
        Text('第二页').fontSize(20)

        }.tabBar("library")

        TabContent() {
          Column() {
            Text('第三页').fontSize(20)


          }.width('100%')

        }.tabBar("profile")
      }.barHeight(0)
      .height('100%')

      Column() {
        this.NavigationTabs()
      }
      .position(1 == 1 ? {
        bottom: 0
      } : undefined)
      .alignItems(HorizontalAlign.Center)
      .justifyContent(FlexAlign.Center)
      .width('100%')
      .padding({ bottom: 8 })
    }
    .backgroundColor('#ff4f4448')
    .hideTitleBar(true)
    .hideBackButton(true)
  }
}
更多关于HarmonyOS鸿蒙Next模仿ios26的玻璃滑动tab效果的实战教程也可以访问 https://www.itying.com/category-93-b0.html

鸿蒙Next实现iOS风格玻璃滑动Tab效果
实现iOS风格玻璃滑动Tab效果,需使用ArkUI的Tabs组件配合自定义样式。
核心实现步骤
-
设置毛玻璃效果
- 通过设置
tabBar的backgroundEffect为BlurStyle - 结合
glass属性实现毛玻璃效果
- 通过设置
-
配置滑动动画
- 滑动动画使用
SwiperController控制 - 配合
PageTransitionEnter和PageTransitionExit定义页面切换动效
- 滑动动画使用
关键代码配置
- 设置
blurRadius调整模糊度 - 使用
animation配置滑动曲线
更多关于HarmonyOS鸿蒙Next模仿ios26的玻璃滑动tab效果的实战系列教程也可以访问 https://www.itying.com/category-93-b0.html

从你的代码和演示来看,你已经实现了一个非常不错的玻璃滑动Tab效果。关于手势滑动的延迟问题,我分析主要有以下几个原因和优化方向:
1. 手势处理逻辑优化
你的onActionUpdate中直接使用e.offsetX计算偏移,这可能导致响应不够及时。建议改用e.velocityX结合时间差来计算更平滑的位移:
.onActionUpdate((e: GestureEvent) => {
  if (this.perTabWidthVp <= 0) return;

  // 使用速度和时间计算增量位移
  const delta = (e.velocityX * 0.016) / this.perTabWidthVp; // 假设60fps
  this.dragOffsetIndex += delta;

  // 边界限制
  const min = -this.dragStartIndex;
  const max = (this.tarBarList.length - 1) - this.dragStartIndex;
  this.dragOffsetIndex = Math.min(Math.max(this.dragOffsetIndex, min), max);
})
2. 动画曲线调整
你使用的springMotion(0.4, 0.8)弹簧曲线在某些场景下可能响应较慢。对于跟手动画,建议使用更灵敏的曲线:
.animation({
  duration: 200, // 缩短动画时间
  curve: curves.springMotion(0.3, 0.9), // 调整刚度和阻尼
})
或者使用自定义缓动函数:
curve: curves.cubicBezier(0.25, 0.1, 0.25, 1) // iOS风格缓动
3. 渲染性能优化
确保滑块的position更新不会触发不必要的重绘。可以添加transition属性:
Row()
  .width(`${100 / this.tarBarList.length}%`)
  .position({ x: `${(this.OutsideSelectedIndex + this.dragOffsetIndex) * (100 / this.tarBarList.length)}%` })
  .transition({ type: TransitionType.All, options: { duration: 150 } }) // 添加过渡
4. 手势识别阈值调整
降低panMinDistanceVp到2-3vp,让手势更早触发:
[@Local](/user/Local) private panMinDistanceVp: number = 2;
5. 使用@State替代@Local
对于需要触发UI更新的变量,使用[@State](/user/State)装饰器:
[@State](/user/State) @Track dragOffsetIndex: number = 0;
[@State](/user/State) @Track OutsideSelectedIndex: number = 0;
6. 避免频繁的AreaChange计算
onAreaChange在布局变化时频繁触发,考虑在aboutToAppear中计算一次:
aboutToAppear() {
  // 根据屏幕宽度计算
  this.perTabWidthVp = (display.getDefaultDisplaySync().width * 0.9) / this.tarBarList.length;
}
7. 图标颜色更新优化
isTouched函数在每次渲染时都会为每个Tab计算,考虑缓存结果或使用更简单的判断逻辑。
你的整体实现思路是正确的,延迟问题主要是手势响应和动画曲线的调优。建议先调整手势识别阈值和动画曲线,这两个改动最容易看到效果。