


HarmonyOS鸿蒙Next中不使用嵌套Grid实现MultiType Grid效果
HarmonyOS鸿蒙Next中不使用嵌套Grid实现MultiType Grid效果 在这里使用GridLayoutOptions的irregularIndexes和onGetIrregularSizeByIndex来实现

定义MultiType类型
enum ItemType {
  banner, //占整行
  label, //占整行
  column2, //一行2列
  column3 //一行3列
}

interface ItemEntity {
  type: ItemType
  color: ResourceColor
}
Grid代码
@Entry
@ComponentV2
struct GridPage {
  @Local array: ItemEntity[] = []
  @Local indexArray: number[] = []

  aboutToAppear(): void {
    this.array = getTestData()
    this.indexArray = Array.from<number, number>({ length: this.array.length }, (_, index) => index)
  }

  build() {
    Grid(undefined, {
      regularSize: [1, 1] ,
      irregularIndexes:this.indexArray,//1,2,3的最小公倍数是6,一行是6个columns,因为没有1行6个的item,所以所有的index都要设置
      onGetIrregularSizeByIndex:(index) =>{
        const type = this.array[index].type
        switch (type){
          case ItemType.banner:
          case ItemType.label:
            return [1,6]//1,2,3的最小公倍数是6,占满6个columns,所以就是占满整行
          case ItemType.column2:
            return [1,3]//占3个columns,就是一行2个(6/3=2)
          default :
            return [1,2]//占2个columns,就是一行3个(6/2=3)
        }
      },
    }) {
      Repeat(this.array)
        .templateId((item) =>{
          return item.type.toString()
        })
        .template(ItemType.banner.toString(),(rpItem) =>{//banner
          GridItem(){
            Text(rpItem.index.toString())
          }.backgroundColor(rpItem.item.color)
          .width('100%')
          .height(100)
        })
        .template(ItemType.label.toString(),(rpItem) =>{//label
          GridItem(){
            Text(rpItem.index.toString())
          }.backgroundColor(rpItem.item.color)
          .width('100%')
          .height(30)
        })
        .template(ItemType.column2.toString(),(rpItem) =>{//column2
          GridItem(){
            Text(rpItem.index.toString())
          }.backgroundColor(rpItem.item.color)
          .width('100%')
          .aspectRatio(1)
        })
        .each((rpItem)=>{//column3
            GridItem(){
              Text(rpItem.index.toString())
            }.backgroundColor(rpItem.item.color)
            .width('100%')
            .aspectRatio(1)
        })
        .virtualScroll({totalCount:this.array.length})
    }
    .columnsTemplate('1fr 1fr 1fr 1fr 1fr 1fr') //1,2,3的最小公倍数是6
    .columnsGap(10)
    .rowsGap(10)
    .height('100%')
    .width('100%')
    .padding(10)
  }
}
测试数据:
function getTestData():ItemEntity[]{
  let array:ItemEntity[] = []
  //banner
  array.push({ type: ItemType.banner, color: Color.Red })
  //label
  array.push({ type: ItemType.label, color: Color.Grey })
  //column2
  for (let i = 0; i < 3; i++) {
    array.push({ type: ItemType.column2, color: Color.Pink })
  }
  //label
  array.push({ type: ItemType.label, color: Color.Grey })
  //column3
  for (let i = 0; i < 100; i++) {
    array.push({ type: ItemType.column3, color: Color.Orange })
  }
  return array

}
最终效果如上图。
存在的问题:
如果把测试的数据column2和column3之间lableitem去掉则会变成:
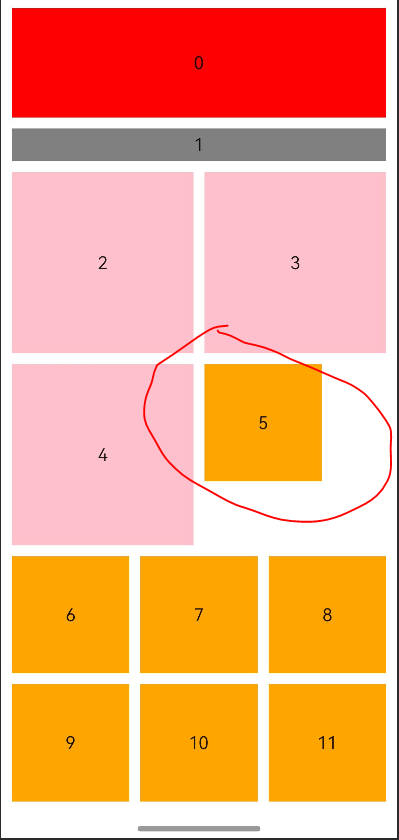
图中红圈这个item怎么跑到上面一行去了!!
个人猜测这个第4行还剩下的宽度大于column3的宽度,所以Grid把它安排到第4行,没有把它安排到下一行。
出现这种情况在column2的最后一行可以填充空白的数据。
更多关于HarmonyOS鸿蒙Next中不使用嵌套Grid实现MultiType Grid效果的实战教程也可以访问 https://www.itying.com/category-93-b0.html

这就是flexbox布局吧?
更多关于HarmonyOS鸿蒙Next中不使用嵌套Grid实现MultiType Grid效果的实战系列教程也可以访问 https://www.itying.com/category-93-b0.html


找HarmonyOS工作还需要会Flutter的哦,有需要Flutter教程的可以学学大地老师的教程,很不错,B站免费学的哦:https://www.bilibili.com/video/BV1S4411E7LY/?p=17


在HarmonyOS Next中,可通过ArkUI的Grid组件配合ForEach循环实现多类型布局。使用条件渲染或自定义组件区分不同类型项,在数据源中定义类型标识,根据标识返回不同UI结构。利用Grid的columnsTemplate属性设置响应式列数,结合不同尺寸的GridItem实现多类型尺寸混合排列。
在HarmonyOS Next中,你遇到的问题是由于Grid布局引擎在计算不规则项位置时的行为导致的。当column2(占3列)项目后面直接跟着column3(占2列)项目时,如果当前行剩余空间大于等于2列但小于3列,column3项目会被放置在该行剩余空间,而不是强制换行。
要解决这个问题,关键在于精确控制每个项目的起始位置。GridLayoutOptions提供了onGetIrregularOffsetByIndex回调,你可以通过它指定每个项目的起始列:
Grid(undefined, {
  regularSize: [1, 1],
  irregularIndexes: this.indexArray,
  onGetIrregularSizeByIndex: (index) => {
    const type = this.array[index].type
    switch (type){
      case ItemType.banner:
      case ItemType.label:
        return [1, 6]
      case ItemType.column2:
        return [1, 3]
      default:
        return [1, 2]
    }
  },
  onGetIrregularOffsetByIndex: (index) => {
    // 计算每个项目应该开始的列
    let currentColumn = 0
    for (let i = 0; i < index; i++) {
      const type = this.array[i].type
      const columns = type === ItemType.banner || type === ItemType.label ? 6 :
                     type === ItemType.column2 ? 3 : 2

      currentColumn += columns
      if (currentColumn >= 6) {
        currentColumn = currentColumn % 6
      }
    }

    // 如果当前行放不下,强制换行
    const currentType = this.array[index].type
    const neededColumns = currentType === ItemType.banner || currentType === ItemType.label ? 6 :
                         currentType === ItemType.column2 ? 3 : 2

    if (currentColumn + neededColumns > 6) {
      return [0, 0] // 换到下一行开始
    }

    return [0, currentColumn]
  }
})
这种方法通过手动计算每个项目的起始位置,确保布局符合预期。对于需要换行的情况,返回[0, 0]让项目从新行开始。
另一种更简洁的方法是使用flexWrap和justifyContent属性,但需要结合GridItem的宽度设置:
Grid() {
  ForEach(this.array, (item, index) => {
    GridItem() {
      // 内容
    }
    .width(this.getItemWidth(item.type))
    .height(this.getItemHeight(item.type))
  })
}
.columnsTemplate('1fr')
.flexWrap(FlexWrap.Wrap)
.justifyContent(FlexAlign.Start)
这种方法更接近传统flex布局,但需要手动计算每个项目的宽度百分比(例如,column2项目宽度为'50%',column3项目宽度为'33.33%')。
你遇到的问题确实是因为Grid的自动布局算法在寻找可用空间时的行为。使用onGetIrregularOffsetByIndex可以更精确地控制布局,确保视觉一致性。