


Golang如何将二维数组转换为RGB图像?
Golang如何将二维数组转换为RGB图像? 这是使用Python的代码:
# Channel01,02,03都是2748*2748大小的二维uint16数组。
# 这里的技巧是先转换为灰度图像,然后将灰度图像合并为RGB图像...
# 我不知道背后的原因,但它确实有效...
r = Image.fromarray(Channel03*0.1).convert('L')
g = Image.fromarray(Channel02*0.1).convert('L')
b = Image.fromarray(Channel01*0.1).convert('L')
image_output = Image.merge("RGB", (r, g, b))
image_output.save("map_picture.bmp)
我尝试在Go中实现相同的行为:
    rect := image.Rect(0, 0, 2748, 2748)
    imgSet := image.NewRGBA64(rect)
    for i := 0; i < length; i++ {
        x := i % 2748
        y := i / 2748
        pixel := color.RGBA64{
            // channel1,2,3与py代码中的相同
            R: channel3[i]/10,
            G: channel2[i]/10,
            B: channel1[i]/10,
            A: 65535,
        }
        imgSet.Set(x, y, pixel)
    }

    outFile, err := os.Create("hybrid.bmp")
    if err != nil {
        t.Error(err)
        return
    }
    defer outFile.Close()
    err = bmp.Encode(outFile, imgSet)
    if err != nil {
        t.Error(err)
        return
    }
}
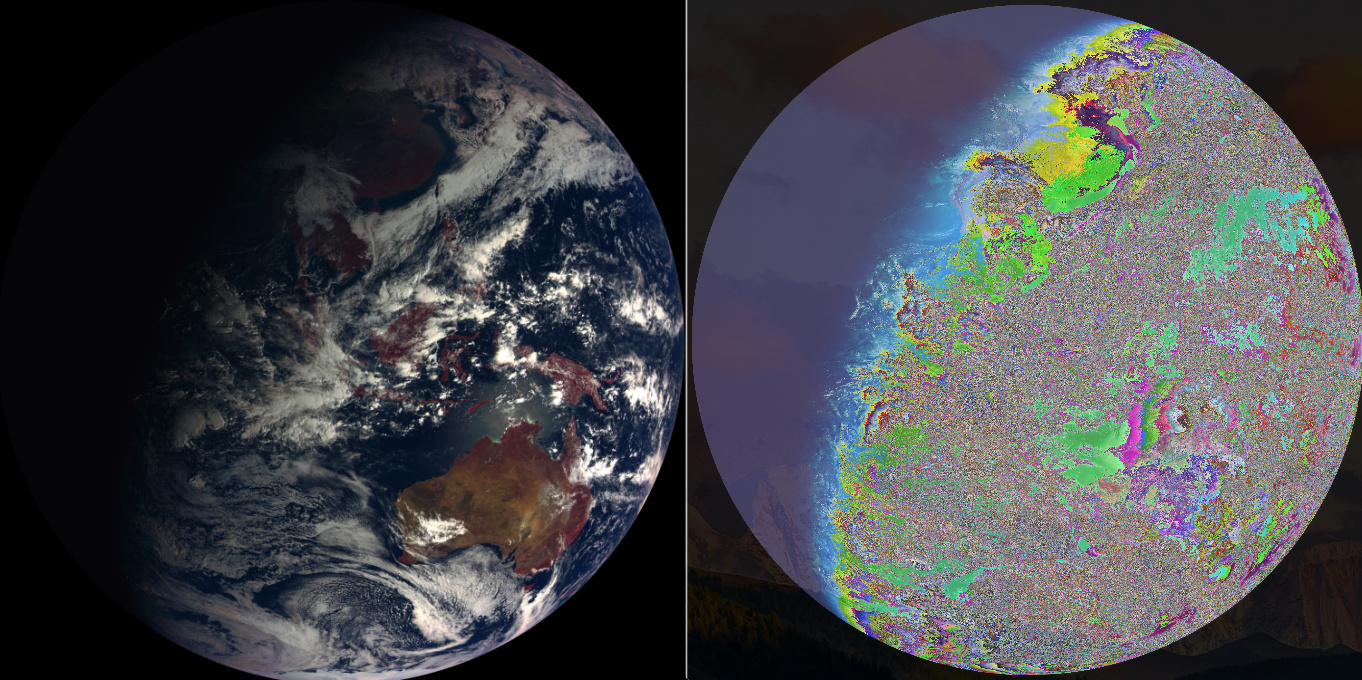
比较结果如下,Go生成的图像看起来质量损失很严重…
那么,如何使用Go获得相同的结果?
更多关于Golang如何将二维数组转换为RGB图像?的实战教程也可以访问 https://www.itying.com/category-94-b0.html
1 回复

更多关于Golang如何将二维数组转换为RGB图像?的实战系列教程也可以访问 https://www.itying.com/category-94-b0.html
在Go中实现与Python代码相同的效果,需要正确理解Python PIL库的转换逻辑。主要问题在于Python代码中的.convert('L')操作和Image.merge()方法。
以下是修正后的Go实现:
package main

import (
    "image"
    "image/color"
    "os"

    "golang.org/x/image/bmp"
)

func main() {
    width, height := 2748, 2748
    rect := image.Rect(0, 0, width, height)

    // 创建三个独立的灰度图像,模拟Python中的convert('L')
    grayR := image.NewGray16(rect)
    grayG := image.NewGray16(rect)
    grayB := image.NewGray16(rect)

    // 填充灰度图像
    for y := 0; y < height; y++ {
        for x := 0; x < width; x++ {
            idx := y*width + x

            // 应用0.1缩放因子(相当于除以10)
            grayR.Set(x, y, color.Gray16{Y: channel3[idx] / 10})
            grayG.Set(x, y, color.Gray16{Y: channel2[idx] / 10})
            grayB.Set(x, y, color.Gray16{Y: channel1[idx] / 10})
        }
    }

    // 创建最终的RGB图像
    rgbImg := image.NewRGBA64(rect)

    // 合并三个灰度通道到RGB图像
    for y := 0; y < height; y++ {
        for x := 0; x < width; x++ {
            // 获取每个通道的灰度值
            r := grayR.Gray16At(x, x).Y
            g := grayG.Gray16At(x, x).Y
            b := grayB.Gray16At(x, x).Y

            // 设置RGB像素,Alpha通道设为最大值
            rgbImg.SetRGBA64(x, y, color.RGBA64{
                R: r,
                G: g,
                B: b,
                A: 65535,
            })
        }
    }

    // 保存为BMP文件
    outFile, err := os.Create("map_picture.bmp")
    if err != nil {
        panic(err)
    }
    defer outFile.Close()

    if err := bmp.Encode(outFile, rgbImg); err != nil {
        panic(err)
    }
}
或者使用更直接的方法,直接创建RGB图像:
package main

import (
    "image"
    "image/color"
    "os"

    "golang.org/x/image/bmp"
)

func main() {
    width, height := 2748, 2748
    rect := image.Rect(0, 0, width, height)
    img := image.NewRGBA64(rect)

    for y := 0; y < height; y++ {
        for x := 0; x < width; x++ {
            idx := y*width + x

            // 直接应用缩放并设置RGB值
            // 注意:Python代码中channel03对应R,channel02对应G,channel01对应B
            r := uint16(float64(channel3[idx]) * 0.1)
            g := uint16(float64(channel2[idx]) * 0.1)
            b := uint16(float64(channel1[idx]) * 0.1)

            // 确保值在0-65535范围内
            if r > 65535 {
                r = 65535
            }
            if g > 65535 {
                g = 65535
            }
            if b > 65535 {
                b = 65535
            }

            img.SetRGBA64(x, y, color.RGBA64{
                R: r,
                G: g,
                B: b,
                A: 65535,
            })
        }
    }

    outFile, err := os.Create("map_picture.bmp")
    if err != nil {
        panic(err)
    }
    defer outFile.Close()

    if err := bmp.Encode(outFile, img); err != nil {
        panic(err)
    }
}
如果图像质量仍然有问题,可以尝试使用NRGBA64格式:
package main

import (
    "image"
    "image/color"
    "os"

    "golang.org/x/image/bmp"
)

func main() {
    width, height := 2748, 2748
    rect := image.Rect(0, 0, width, height)
    img := image.NewNRGBA64(rect)

    for y := 0; y < height; y++ {
        for x := 0; x < width; x++ {
            idx := y*width + x

            // 使用浮点数计算确保精度
            r := uint16(float64(channel3[idx]) * 0.1)
            g := uint16(float64(channel2[idx]) * 0.1)
            b := uint16(float64(channel1[idx]) * 0.1)

            img.SetNRGBA64(x, y, color.NRGBA64{
                R: r,
                G: g,
                B: b,
                A: 65535,
            })
        }
    }

    outFile, err := os.Create("map_picture.bmp")
    if err != nil {
        panic(err)
    }
    defer outFile.Close()

    if err := bmp.Encode(outFile, img); err != nil {
        panic(err)
    }
}
关键点:
- Python的
convert('L')创建的是灰度图像,在Go中对应image.Gray16 - 确保使用正确的通道顺序:channel03→R,channel02→G,channel01→B
- 使用浮点数计算缩放因子0.1,而不是整数除法
- 考虑使用
NRGBA64格式,它支持预乘alpha通道