


HarmonyOS鸿蒙Next中使用Flex构建动态响应式标签云
HarmonyOS鸿蒙Next中使用Flex构建动态响应式标签云
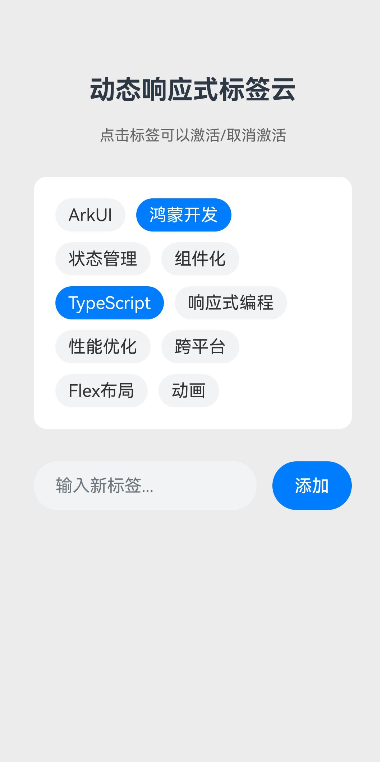
如何使用 Flex 构建动态响应式标签云?

实现思路
1、定义数据模型,创建一个接口 TagData,包含 text(标签文本)和 isActive(是否激活)两个属性。
2、创建可换行的Flex容器,使用 Flex 组件作为标签云的容器。
应用场景
这种动态标签云布局非常实用,文章/商品标签,技能/兴趣选择,筛选器等都非常常用 。
实现效果
完整代码
import promptAction from '@ohos.promptAction';

// 1. 定义数据模型
interface TagData {
  text: string;
  isActive: boolean;
}

@Entry
@Component
struct FlexTagCloudPage {
  // 初始标签数据
  @State tags: TagData[] = [
    { text: 'ArkUI', isActive: false },
    { text: '鸿蒙开发', isActive: true },
    { text: '状态管理', isActive: false },
    { text: '组件化', isActive: false },
    { text: 'TypeScript', isActive: true },
    { text: '响应式编程', isActive: false },
    { text: '性能优化', isActive: false },
    { text: '跨平台', isActive: false },
    { text: 'Flex布局', isActive: false },
    { text: '动画', isActive: false },
  ];

  // 用于输入新标签
  @State newTagText: string = '';

  // 监听输入框变化,按回车键也可添加
  @Watch('handleTagInput')
  @State newTagTextForWatch: string = '';

  handleTagInput() {

  }

  // 切换标签激活状态
  toggleTag(index: number) {
    this.tags[index].isActive = !this.tags[index].isActive;
  }

  // 添加新标签
  addNewTag() {
    const trimmedText = this.newTagText.trim();
    if (trimmedText && !this.tags.some(tag => tag.text === trimmedText)) {
      this.tags.push({ text: trimmedText, isActive: false });
      this.newTagText = '';
      promptAction.showToast({ message: `已添加标签: ${trimmedText}` });
    } else if (this.tags.some(tag => tag.text === trimmedText)) {
      promptAction.showToast({ message: '标签已存在' });
    }
  }

  build() {
    Column() {
      Text('动态响应式标签云')
        .fontSize(24)
        .fontWeight(FontWeight.Bold)
        .margin({ top: 50, bottom: 20 })

      Text('点击标签可以激活/取消激活')
        .fontSize(14)
        .fontColor('#666666')
        .margin({ bottom: 30 })

      // 创建可换行的Flex容器
      Flex({
        direction: FlexDirection.Row,
        wrap: FlexWrap.Wrap,
        alignContent: FlexAlign.Start,
        justifyContent: FlexAlign.Start
      }) {
        // 动态渲染标签
        ForEach(this.tags, (tag: TagData, index: number) => {
          Text(tag.text)
            .fontSize(16)
            .padding({ left: 12, right: 12, top: 6, bottom: 6 })
            .margin(5)
            .borderRadius(18)
            .backgroundColor(tag.isActive ? '#007DFF' : '#F1F3F5')
            .fontColor(tag.isActive ? Color.White : '#333333')
            .onClick(() => {
              this.toggleTag(index);
            })
            .animation({ duration: 200, curve: Curve.EaseInOut })
        })
      }
      .width('90%')
      .padding(15)
      .backgroundColor(Color.White)
      .borderRadius(12)

      // 添加新标签的交互区域
      Row() {
        TextInput({ placeholder: '输入新标签...' })
          .width('70%')
          .height(45)
          .backgroundColor('#F1F3F5')
          .borderRadius(22)
          .padding({ left: 20 })
          .onChange((value: string) => {
            this.newTagTextForWatch = value;
            this.newTagText = value;
          })

        Button('添加')
          .width('25%')
          .height(45)
          .backgroundColor('#007DFF')
          .borderRadius(22)
          .margin({ left: '5%' })
          .onClick(() => {
            this.addNewTag();
          })
      }
      .width('90%')
      .margin({ top: 30 })

    }
    .width('100%')
    .height('100%')
    .justifyContent(FlexAlign.Start)
    .backgroundColor('#ECECEC')
    .padding({ top: 20, left: 16, right: 16 })
  }
}
更多关于HarmonyOS鸿蒙Next中使用Flex构建动态响应式标签云的实战系列教程也可以访问 https://www.itying.com/category-93-b0.html

在HarmonyOS Next中,使用Flex布局构建动态响应式标签云,主要通过Flex容器的flexWrap属性设置为Wrap实现自动换行。结合ForEach动态渲染标签项,每个标签使用Flex布局自适应内容宽度。通过监听窗口或屏幕尺寸变化,利用媒体查询或屏幕适配接口调整Flex容器的justifyContent、alignItems等属性,实现不同屏幕尺寸下的响应式排列。标签云的动态性可通过数据驱动更新,响应式效果由Flex布局的弹性特性与屏幕适配能力共同实现。

在HarmonyOS Next中,使用Flex布局构建动态响应式标签云,核心在于利用Flex的弹性特性与ArkTS的状态管理能力。以下是关键实现步骤:
-
布局结构:使用
Flex容器包裹标签项,设置wrap属性实现自动换行,并通过justifyContent和alignItems控制对齐方式。Flex({ wrap: FlexWrap.Wrap, justifyContent: FlexAlign.Start, alignItems: ItemAlign.Center }) { // 标签项 } .width('100%') -
动态标签生成:使用
[@State](/user/State)装饰器管理标签数据数组,通过ForEach循环渲染每个标签项。[@State](/user/State) tagList: Array<string> = ['标签1', '标签2', ...]; ForEach(this.tagList, (item: string) => { Text(item) .padding(10) .backgroundColor(Color.Blue) .borderRadius(20) }, (item: string) => item) -
响应式设计:结合
mediaQuery或屏幕尺寸监听,动态调整标签字体大小、间距或列数。例如,通过@StorageProp或@LocalStorageLink管理断点状态,在aboutToAppear中监听屏幕变化。 -
交互与动画:为标签添加点击事件,结合
animateTo实现缩放或颜色变化的交互动效,增强用户体验。
此方案通过Flex弹性布局与ArkTS响应式数据驱动,可高效实现标签云的动态响应效果。