


HarmonyOS鸿蒙Next中如何使用renderGroup实现模糊背景
HarmonyOS鸿蒙Next中如何使用renderGroup实现模糊背景 如何使用renderGroup实现模糊背景及毛玻璃效果?

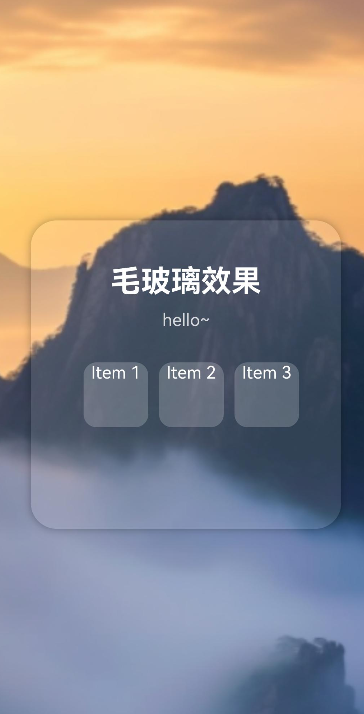
效果
实现思路
这个实现比较简单,我们先通过 @State 绑定模糊半径变量。然后在 UI 层级上,使用 Stack 布局。底层为高饱和度背景图,顶层为包含内容的容器。最后对顶层容器应用 renderGroup开启 就可以了
使用场景
这种完全可以应用在音乐播放器中,专辑封面作为背景,播放控件悬浮在模糊的专辑图之上,且模糊度随播放进度动态呼吸变化。
完整代码
@Entry
@Component
struct FrostGlassDemo {

  build() {
    Stack({ alignContent: Alignment.Center }) {
      Image($r('app.media.taiyang'))
        .width('100%')
        .height('100%')
        .objectFit(ImageFit.Cover)


      // 毛玻璃效果容器
      Column() {
        Text("毛玻璃效果")
          .fontSize(28)
          .fontWeight(FontWeight.Bold)
          .fontColor(Color.White)
          .margin({ top: 20, bottom: 10 })

        Text("hello~")
          .fontSize(16)
          .fontColor(Color.White)
          .opacity(0.8)
          .margin({ bottom: 30 })

        // 内容卡片
        Row() {
          ForEach([1, 2, 3], (item: number) => {
            Column() {
              Text("Item " + item)
                .fontColor(Color.White)
            }
            .width(60)
            .height(60)
            .backgroundColor('rgba(255, 255, 255, 0.2)')
            .borderRadius(12)
            .margin({ left: 10 })
          })
        }
      }
      .width('80%')
      .height('40%')
      .padding(20)
      .borderRadius(24)
      // 增强毛玻璃的质感
      .backgroundColor('rgba(255, 255, 255, 0.1)')
      .backdropBlur(0)
      .shadow({ radius: 20, color: 'rgba(0,0,0,0.3)' })
      // 开启 renderGroup 以优化离屏渲染
      .renderGroup(true)

    }
    .width('100%')
    .height('100%')
    .onClick(() => {

    }
    )
  }

}
更多关于HarmonyOS鸿蒙Next中如何使用renderGroup实现模糊背景的实战系列教程也可以访问 https://www.itying.com/category-93-b0.html

在HarmonyOS Next中,使用renderGroup实现模糊背景主要涉及RenderNode和Effect。创建一个RenderNode,将其设置为模糊效果,然后作为背景组件的renderGroup属性值。关键步骤包括构建模糊效果的RenderNode,并将其赋值给需要模糊背景的组件。

在HarmonyOS Next中,可以使用renderGroup配合filter属性实现模糊背景(毛玻璃)效果。关键步骤如下:
-
创建背景层与内容层:将模糊对象(如背景图片)与前景内容分别放入不同的
renderGroup中,确保它们处于不同的渲染层。 -
应用模糊滤镜:在背景层的
renderGroup上通过.filter方法或属性添加模糊效果,例如:// 背景层 renderGroup() .filter(ImageFilter.blur(10)) // 设置模糊半径 -
叠加显示:通过
Stack等布局容器将背景层与内容层叠加,背景模糊后,上层内容可保持清晰,形成毛玻璃视觉效果。
注意:合理控制renderGroup的渲染层级和模糊半径,以平衡性能与效果。具体实现需结合UI结构调整。