


HarmonyOS 鸿蒙Next中如何实现百度日历效果?
HarmonyOS 鸿蒙Next中如何实现百度日历效果?
如何实现百度日历效果?
4 回复


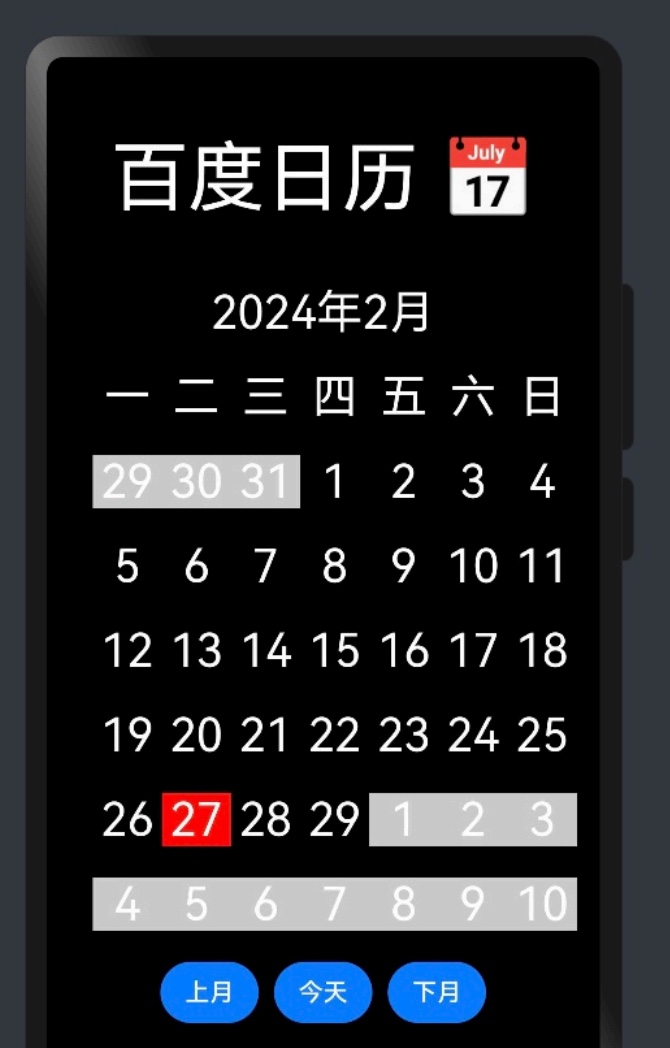
效果
开发思路
- 熟练掌握日期语法
创建日期对象:  const  date = new Date()
获取当前年份: date.getFullYear()
获取当前月份: date.getMonth()     返回0~11  实际使用+1    生活中 1~12
获取当前几号/日期: date.getDate()     例如今天27号
获取当前星期几:  date.getDay()      留心返回的是0~6     0代表星期日
获取本月多少天: const currentLastRi  =  new Date(当前年2024,  当前月2,  数字).getDate()
获取本月1号星期几:new Date(当前年, 当前月-1必须减去1的, 1).getDay()
-
完整日历界面布局
-
通过日期语法获取本月数据
-
通过日期语法获取上月展示数据
-
通过日期语法获取下月展示数据
-
上月今天下月按钮逻辑处理
完整代码
class DayItemType {
  year:number
  month:number
  day:number
  type: 'prev' | '' | "current" | 'next'

  constructor(year:number,month:number, day:number, type:'prev' | '' | "current" | 'next') {
    this.year = year
    this.month = month
    this.day = day
    this.type = type
  }
}


@Extend(Text) function txtStyle(type:  'prev' | '' | "current" | 'next' = '') {
  .fontColor(Color.White)
  .fontWeight(700)
  .fontSize(20)
  .layoutWeight(1)
  .textAlign(TextAlign.Center).margin({bottom:20})
  // .backgroundColor(['prev','next'].includes(type) ? '#ccc' : '#000')
  // .backgroundColor(({
  //   prev: '#ccc',
  //   next: '#ccc',
  //   current: Color.Red,
  //   '': '#000'
  // })[type])

  // .backgroundColor(['#ccc','#ccc',Color.Black,Color.Red][0])
  //  ['prev','next','','current'].indexOf(type)
  .backgroundColor(['#ccc','#ccc',Color.Black,Color.Red][   ['prev','next','','current'].indexOf(type)   ])
}


@Entry
@Component
struct Test {

  private currentDate: Date = new Date()  // 当前日期对象
  private currentYear: number = this.currentDate.getFullYear()  // 当前年
  @State currentMonth: number = this.currentDate.getMonth()+1   // 当前月  返回的是0~11 生活中得+1 也就是1-12月
  private currentRi: number = this.currentDate.getDate()        // 当前日
  private weekName:string[] = ['一', '二', '三', '四', '五', '六', '日']
  @State data:DayItemType[][] = [
  ]

  aboutToAppear() {
    this.getData()
  }

  //    获取本月多少天:const currentLastRi  =  new Date(当前年2024,  当前月2,  数字).getDate()
  // 获取本月1号星期几:new Date(当前年, 当前月-1必须减去1的, 1).getDay()
  getData() {
    this.data = []
    // 1 声明temp变量,存放上月、本月、下月 日期对象   DayItemType
    const temp: DayItemType[] = []
    // 2 计算上月、本月、下月  push temp 中
    // - 2.2 上月
        // a) 获取上月最后一天
        const prevLastRi  =  new Date(this.currentYear,  this.currentMonth-1,  0).getDate()  // 这里-1 是因为上月最后一天
        // b) 获取本月1号星期几切记不为真默认7
        const weekNameNum = new Date(this.currentYear, this.currentMonth-1, 1).getDay()  || 7 // 这里-1 本月就必须-1  上月1号星期几就得-2
        // c) 根据公式计算上月展示几个 showRi   -1
        const showRi = weekNameNum - 1
        // d)循环生成上月数据  根据公式来
        for (let prevRi=prevLastRi-showRi; prevRi<prevLastRi; prevRi++) {
          temp.push(  new DayItemType(this.currentYear, this.currentMonth-1, prevRi+1, 'prev') ) // -1 上个月数据
        }
    // - 2.1 本月
       // a)获取本月最后一天
       const currentLastRi  =  new Date(this.currentYear,  this.currentMonth,  0).getDate()
       // b)循环1-最后一天   push到temp中就行
        const tempYear = (new Date).getFullYear()
        const tempMonth = (new Date).getMonth()+1
        for (let ri=1; ri<=currentLastRi; ri++) {
            temp.push( new DayItemType(
                this.currentYear,
                this.currentMonth,
                ri,
                ri===this.currentRi && this.currentMonth===tempMonth && this.currentYear===tempYear ? 'current': ''
            ))
        }
    // - 2.3 下月
        const nextRiTotal = 42-temp.length
        for (let nextRi=1; nextRi<=nextRiTotal; nextRi++) {
          temp.push(  new DayItemType(this.currentYear, this.currentMonth+1, nextRi, 'next') )
        }
    // 3 计算每7天保存一次到data中
    // - 3.1 声明temp2变量默认空数组 DayItemType类型
    let temp2: DayItemType[] = []
    // - 3.2 遍历所有temp数据
    for (let i=0; i<temp.length; i++) {
      temp2.push(temp[i])
      // - 3.3 temp.length取余7===0  代表存满7天 保存下    记得清空  存下一次
      if (temp2.length%7===0) {
        this.data.push(temp2)
        temp2=[]
      }
    }
    if (temp2.length) this.data.push(temp2)
    // - 3.4 循环结束如果temp居然不是空的  有剩余的数据 单独一行
    // 4 视图循环展示
  }

  build() {
    Column() {
      Text('百度日历📅').fontSize(40).fontColor(Color.White).width('100%').textAlign(TextAlign.Center)
      Text(`2024年${this.currentMonth}月`).fontSize(20).fontColor(Color.White).width('100%').textAlign(TextAlign.Center).margin({top:20,bottom:20})

      // 日头
      Row() {
        ForEach(this.weekName, (item:string) => {
          Text(item).txtStyle()
        })
      }

      // 日内容
      ForEach(this.data, (rowItem: DayItemType[]) => {
        // 行
        Row() {
          // 列
          ForEach(rowItem, (colItem: DayItemType) => {
            Text(colItem.day.toString()).txtStyle(colItem.type)
          })
          // 列
        }
        // 行
      })


      // 按钮组
      Row() {
        Button('上月').onClick(() => {
          this.currentMonth--
          this.getData()
        })
        Button('本月').onClick(() => {
          this.currentMonth = (new Date).getMonth()+1
          this.getData()
        })
        Button('下月').onClick(() => {
          this.currentMonth++
          this.getData()
        })
      }
      // 按钮组
    }.width('100%').height('100%').backgroundColor(Color.Black).padding(20)
  }
}

在HarmonyOS Next中,可通过ArkUI的Canvas组件自定义绘制日历界面,结合自定义弹窗组件实现日期选择交互。使用LazyForEach加载月份数据以优化性能。具体实现需调用系统日历接口获取日期信息,并利用声明式UI的响应式更新机制动态渲染视图。
