


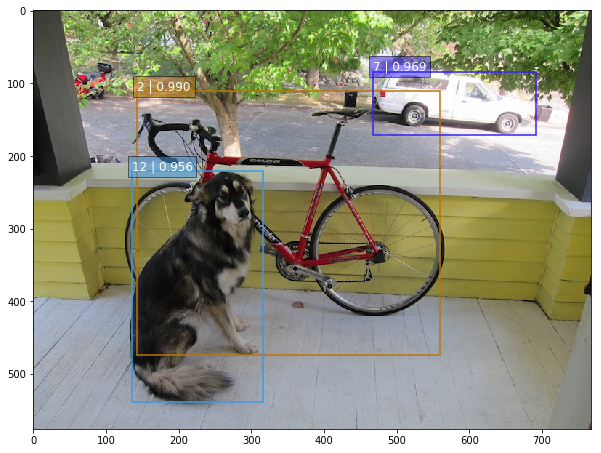
Python中如何使用SSD-Tensorflow进行单图片多盒目标检测
昨天类似的 YOLO: https://www.v2ex.com/t/392671#reply0
下载这个项目
https://github.com/balancap/SSD-Tensorflow
解压 checkpoint files in ./checkpoint
unzip ssd_300_vgg.ckpt.zip
运行 jupyter 文件命令
jupyter notebook notebooks/ssd_notebook.ipynb
项目说明: http://www.tensorflownews.com/2017/09/22/ssd-single-shot-multibox-detector-in-tensorflow/
项目地址: https://github.com/balancap/SSD-Tensorflow
更多 TensorFlow 教程: http://www.tensorflownews.com
Python中如何使用SSD-Tensorflow进行单图片多盒目标检测
1 回复

要使用SSD-Tensorflow对单张图片进行多目标检测,你需要先加载预训练模型,然后处理输入图片并进行推理。这里以SSD-MobileNet模型为例,提供一个完整的代码示例。
首先,确保安装了必要的库:
pip install tensorflow opencv-python numpy
以下是核心代码:
import cv2
import numpy as np
import tensorflow as tf
from object_detection.utils import label_map_util
from object_detection.utils import visualization_utils as vis_util

# 1. 加载模型和标签
PATH_TO_MODEL = 'ssd_mobilenet_v2_coco_2018_03_29/frozen_inference_graph.pb'
PATH_TO_LABELS = 'mscoco_label_map.pbtxt'

detection_graph = tf.Graph()
with detection_graph.as_default():
    od_graph_def = tf.compat.v1.GraphDef()
    with tf.io.gfile.GFile(PATH_TO_MODEL, 'rb') as fid:
        serialized_graph = fid.read()
        od_graph_def.ParseFromString(serialized_graph)
        tf.import_graph_def(od_graph_def, name='')

# 加载标签映射
category_index = label_map_util.create_category_index_from_labelmap(PATH_TO_LABELS, use_display_name=True)

# 2. 加载并预处理图片
def load_image_into_numpy_array(image_path):
    image = cv2.imread(image_path)
    image = cv2.cvtColor(image, cv2.COLOR_BGR2RGB)
    return image

# 3. 执行检测
def run_inference_for_single_image(image, graph):
    with graph.as_default():
        with tf.compat.v1.Session() as sess:
            # 获取输入输出张量
            image_tensor = graph.get_tensor_by_name('image_tensor:0')
            detection_boxes = graph.get_tensor_by_name('detection_boxes:0')
            detection_scores = graph.get_tensor_by_name('detection_scores:0')
            detection_classes = graph.get_tensor_by_name('detection_classes:0')
            num_detections = graph.get_tensor_by_name('num_detections:0')

            # 扩展图片维度并运行推理
            image_expanded = np.expand_dims(image, axis=0)
            (boxes, scores, classes, num) = sess.run(
                [detection_boxes, detection_scores, detection_classes, num_detections],
                feed_dict={image_tensor: image_expanded})

    return boxes, scores, classes, num

# 4. 主函数
def detect_objects(image_path, output_path='output.jpg'):
    # 加载图片
    image_np = load_image_into_numpy_array(image_path)

    # 运行检测
    boxes, scores, classes, num = run_inference_for_single_image(image_np, detection_graph)

    # 可视化结果
    vis_util.visualize_boxes_and_labels_on_image_array(
        image_np,
        np.squeeze(boxes),
        np.squeeze(classes).astype(np.int32),
        np.squeeze(scores),
        category_index,
        use_normalized_coordinates=True,
        line_thickness=3,
        min_score_thresh=0.5)

    # 保存结果
    output_image = cv2.cvtColor(image_np, cv2.COLOR_RGB2BGR)
    cv2.imwrite(output_path, output_image)
    print(f"检测完成,结果保存至: {output_path}")

# 使用示例
if __name__ == "__main__":
    detect_objects('test.jpg')
关键点说明:
- 需要下载SSD预训练模型(如
ssd_mobilenet_v2_coco)和对应的标签文件 visualize_boxes_and_labels_on_image_array函数会自动绘制检测框和类别标签- 通过调整
min_score_thresh参数可以控制检测的置信度阈值
模型文件可以从TensorFlow Model Zoo获取,标签文件需要与训练数据对应。
总结:核心就是加载模型、预处理图片、运行推理、可视化结果。