


Python中使用TensorFlow和Google物体识别API识别电影中的物体(以《生活大爆炸》为例)
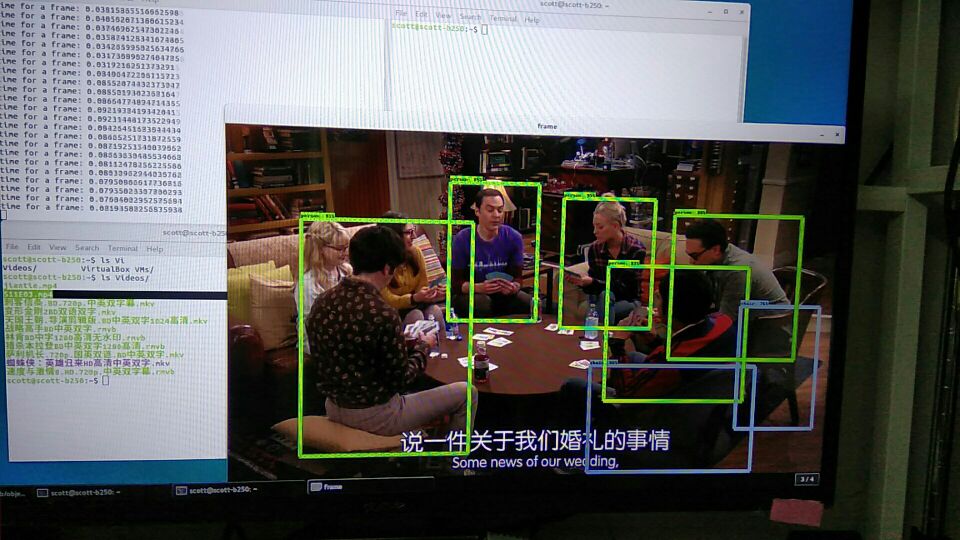
使用 google 物体识别的 api 来识别电影里面的物体。目前可以做到每秒 30 帧。
https://github.com/scotthuang1989/object_detection_with_tensorflow
分享自 TensorFlow QQ 群的彼岸:314148034
Target
detect people in a video or from camera. can choose what detection method we are using. Project Structure
From google
object label and detecion api data object_detection My module
myutil: help function object_detection_tf.py: main module for detecting object Usage
run following command python object_detection_tf.py -v /home/scott/Videos/S11E03.mp4
you need replace the video file with your choice Current Status
on my nvidia 1060 (6GB RAM ), the speed is ~25 frame per second, but gpu utilization is below 30%, I will use multiprocessing to speed up.
更多机器学习资源: http://www.tensorflownews.com/
Python中使用TensorFlow和Google物体识别API识别电影中的物体(以《生活大爆炸》为例)

我理解你想用TensorFlow结合Google的物体识别API来分析《生活大爆炸》剧集中的物体。不过这里有个概念需要澄清:Google物体识别API是云端服务,而TensorFlow是本地深度学习框架。通常我们会选择其中一种方案。
方案一:使用TensorFlow Object Detection API(本地部署) 这是更常见的做法,可以在本地视频帧上运行检测模型:
import cv2
import numpy as np
import tensorflow as tf
from object_detection.utils import label_map_util
from object_detection.utils import visualization_utils as vis_util

# 1. 加载预训练模型和标签
MODEL_NAME = 'ssd_mobilenet_v2_coco_2018_03_29'
PATH_TO_CKPT = f'{MODEL_NAME}/frozen_inference_graph.pb'
PATH_TO_LABELS = 'mscoco_label_map.pbtxt'

detection_graph = tf.Graph()
with detection_graph.as_default():
    od_graph_def = tf.compat.v1.GraphDef()
    with tf.io.gfile.GFile(PATH_TO_CKPT, 'rb') as fid:
        od_graph_def.ParseFromString(fid.read())
        tf.import_graph_def(od_graph_def, name='')

# 加载标签映射
category_index = label_map_util.create_category_index_from_labelmap(
    PATH_TO_LABELS, use_display_name=True)

# 2. 处理视频帧
def detect_objects_in_video(video_path, output_path):
    cap = cv2.VideoCapture(video_path)
    frame_width = int(cap.get(cv2.CAP_PROP_FRAME_WIDTH))
    frame_height = int(cap.get(cv2.CAP_PROP_FRAME_HEIGHT))
    fps = int(cap.get(cv2.CAP_PROP_FPS))

    fourcc = cv2.VideoWriter_fourcc(*'mp4v')
    out = cv2.VideoWriter(output_path, fourcc, fps,
                         (frame_width, frame_height))

    with detection_graph.as_default():
        with tf.compat.v1.Session(graph=detection_graph) as sess:
            while cap.isOpened():
                ret, frame = cap.read()
                if not ret:
                    break

                # 转换为RGB并扩展维度
                image_np_expanded = np.expand_dims(
                    cv2.cvtColor(frame, cv2.COLOR_BGR2RGB), axis=0)

                # 获取张量
                image_tensor = detection_graph.get_tensor_by_name(
                    'image_tensor:0')
                boxes = detection_graph.get_tensor_by_name(
                    'detection_boxes:0')
                scores = detection_graph.get_tensor_by_name(
                    'detection_scores:0')
                classes = detection_graph.get_tensor_by_name(
                    'detection_classes:0')
                num_detections = detection_graph.get_tensor_by_name(
                    'num_detections:0')

                # 运行检测
                (boxes, scores, classes, num_detections) = sess.run(
                    [boxes, scores, classes, num_detections],
                    feed_dict={image_tensor: image_np_expanded})

                # 可视化结果
                vis_util.visualize_boxes_and_labels_on_image_array(
                    frame,
                    np.squeeze(boxes),
                    np.squeeze(classes).astype(np.int32),
                    np.squeeze(scores),
                    category_index,
                    use_normalized_coordinates=True,
                    line_thickness=2)

                out.write(frame)

    cap.release()
    out.release()
    cv2.destroyAllWindows()

# 使用示例
detect_objects_in_video('big_bang_theory_episode.mp4', 'output_detected.mp4')
方案二:使用Google Cloud Vision API(云端服务) 如果坚持要用Google API,需要先安装客户端库并设置认证:
from google.cloud import videointelligence_v1 as vi
import io

def detect_objects_google_cloud(video_path):
    client = vi.VideoIntelligenceServiceClient()

    with io.open(video_path, 'rb') as f:
        video_content = f.read()

    features = [vi.Feature.OBJECT_TRACKING]

    operation = client.annotate_video(
        request={
            "features": features,
            "input_content": video_content
        }
    )

    result = operation.result(timeout=180)

    # 解析结果
    for annotation in result.annotation_results[0].object_annotations:
        print(f"物体: {annotation.entity.description}")
        print(f"置信度: {annotation.confidence:.2%}")
        for track in annotation.tracks:
            print(f"出现时间: {track.segment.start_time_offset} - "
                  f"{track.segment.end_time_offset}")
实际建议:
- 对于连续视频分析,TensorFlow本地方案更合适
- 需要先下载预训练模型(如COCO数据集训练的模型)
- 处理电视剧集时考虑采样关键帧以提高效率
用TensorFlow Object Detection API更实际。