


HarmonyOS鸿蒙Next中如何实现瀑布流布局?
HarmonyOS鸿蒙Next中如何实现瀑布流布局? 问题描述:需要实现瀑布流布局,展示不等高的图片卡片

**详细回答:**使用鸿蒙的WaterFlow 组件实现瀑布流,通过设置 columns 数控制列数,结合图片的实际高度实现不等高展示。
解决步骤:
导入 WaterFlow 组件,设置列数和间距模拟不同高度的图片数据,绑定到 WaterFlow 的数据源为每个瀑布流项设置不同的高度,展示不等高卡片,自定义一个WaterFlowView
示例代码:
/**
 * @author J.query
 * @date 2025/12/25 11:13
 * @email j-query@foxmail.com
 * Description: 瀑布流布局演示 - 实现多列不等高卡片
 */

// 定义瀑布流数据项类型
interface WaterFlowItemData {
  id: number;
  title: string;
  description: string;
  height: number;
  color: string;
  imageUrl?: string;
}

@Component
export struct WaterFlowView {
  private dataArray: WaterFlowItemData[] = [];

  aboutToAppear() {
    // 初始化数据,生成不同高度的卡片
    this.dataArray = [];
    for (let i = 0; i < 20; i++) {
      const heights = [120, 150, 180, 200, 220, 250, 280];
      const randomHeight = heights[Math.floor(Math.random() * heights.length)];
      this.dataArray.push({
        id: i,
        title: `卡片 ${i + 1}`,
        description: `这是第 ${i + 1} 个卡片的描述内容,展示了瀑布流布局的效果。`,
        height: randomHeight,
        color: this.getRandomColor(),
        imageUrl: i % 3 === 0 ? `网络图片地址/${randomHeight}` : undefined
      });
    }
  }

  // 生成随机颜色
  getRandomColor(): string {
    const colors = [
      '#FFE5B4', '#B4C7E7', '#D5E8D4', '#F8CECC', '#E1D5E7',
      '#FFF2CC', '#D9EAD3', '#D0E0E3', '#E6D0DE', '#F4CCCC'
    ];
    return colors[Math.floor(Math.random() * colors.length)];
  }

  // 添加新项目
  addNewItem() {
    const heights = [120, 150, 180, 200, 220, 250, 280];
    const randomHeight = heights[Math.floor(Math.random() * heights.length)];
    const newItem: WaterFlowItemData = {
      id: this.dataArray.length,
      title: `新增卡片 ${this.dataArray.length + 1}`,
      description: `这是新增的卡片,高度为 ${randomHeight}px`,
      height: randomHeight,
      color: this.getRandomColor(),
      imageUrl: this.dataArray.length % 3 === 0 ? `网络图片地址/${randomHeight}` : undefined
    };
    this.dataArray.push(newItem);
  }

  build() {
    Column() {
      // 标题栏
      Text('瀑布流布局演示')
        .fontSize(24)
        .fontWeight(FontWeight.Bold)
        .margin({ bottom: 10 })

      // 操作按钮
      Row() {
        Button('添加卡片')
          .onClick(() => {
            this.addNewItem();
          })
        Button('刷新数据')
          .margin({ left: 10 })
          .onClick(() => {
            this.aboutToAppear();
          })
      }
      .margin({ bottom: 15 })

      // 瀑布流容器
      WaterFlow() {
        ForEach(this.dataArray, (item: WaterFlowItemData, index: number) => {
          FlowItem() {
            // 卡片容器
            Column() {
              // 如果有图片则显示图片
              if (item.imageUrl) {
                Image(item.imageUrl)
                  .width('100%')
                  .height(item.height)
                  .objectFit(ImageFit.Cover)
                  .borderRadius(8)
                Text(item.description)
                  .fontSize(12)
                  .margin({ top: 10, left: 10, right: 10, bottom: 15 })
                  .maxLines(3)
                  .textOverflow({ overflow: TextOverflow.Ellipsis })
              } else {
                // 没有图片时显示彩色背景块
                Column() {
                  Text(item.title)
                    .fontSize(16)
                    .fontWeight(FontWeight.Medium)
                    .textAlign(TextAlign.Center)
                    .margin({ top: 15 })
                  Text(item.description)
                    .fontSize(12)
                    .margin({ top: 10, left: 10, right: 10, bottom: 15 })
                    .maxLines(3)
                    .textOverflow({ overflow: TextOverflow.Ellipsis })
                }
                .width('100%')
                .height(item.height)
                .backgroundColor(item.color)
                .borderRadius(8)
                .justifyContent(FlexAlign.Center)
              }
            }
            .width('100%')
            .padding(10)
            .backgroundColor(Color.White)
            .borderRadius(12)
            .shadow({
              radius: 4,
              color: '#1f000000',
              offsetX: 2,
              offsetY: 2
            })
            .margin({ bottom: 5 })
          }
        })
      }
      .scrollBar(BarState.Off) // 隐藏滚动条
      .onScrollIndex((startIndex: number, endIndex: number) => {
        // 滚动时的回调,可以用来实现滚动加载
        console.info(`滚动范围: ${startIndex} - ${endIndex}`);
        // 检查是否滚动到底部
        if (endIndex === this.dataArray.length - 1) {
          console.info('滚动到底部,可以加载更多数据');
          // 延迟执行,避免重复触发
          setTimeout(() => {
            this.addNewItem();
          }, 1000);
        }
      })
    }
    .width('100%')
    .height('100%')
    .padding({ top: 20, left: 15, right: 15, bottom: 20 })
  }
}
使用方式:
/**
 * @author J.query
 * @date 2025/12/25 14:00
 * @email j-query@foxmail.com
 * Description: 瀑布流演示页面
 */

import { WaterFlowView } from '../utils/WaterFlowView';

@Entry
@Component
struct WaterFlowDemoPage {
  build() {
    Column() {
      WaterFlowView()
    }
    .width('100%')
    .height('100%')
  }
}
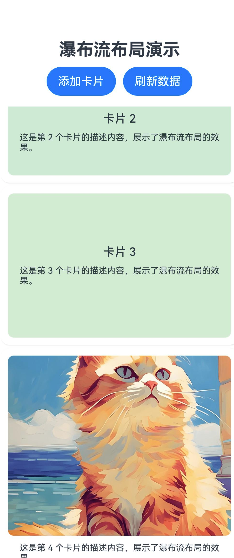
**效果图:**页面展示 2列瀑布流布局,卡片按图片高度不等高排列,间距均匀,滚动流畅,无布局错乱。
更多关于HarmonyOS鸿蒙Next中如何实现瀑布流布局?的实战系列教程也可以访问 https://www.itying.com/category-93-b0.html

在HarmonyOS Next中,实现瀑布流布局可使用ArkUI的WaterFlow组件。该组件通过设置columnsTemplate属性定义列数和宽度比例,例如"1fr 1fr"表示两列等宽。数据项通过ForEach动态渲染到WaterFlowItem中,每个项目可自定义高度。布局方向支持垂直或水平滚动。

在HarmonyOS Next中,实现瀑布流布局(展示不等高卡片)的核心是使用WaterFlow容器组件。以下是关键实现步骤和代码示例:
1. 使用WaterFlow组件
在ArkUI(基于声明式范式)中,直接使用WaterFlow作为容器,通过columnsTemplate设置列数,rowsTemplate设置行高自适应。
示例代码:
// 构建瀑布流布局
WaterFlow() {
  ForEach(this.imageList, (item: ImageItem) => {
    FlowItem() {
      // 自定义卡片组件,高度由内容撑开
      ImageCard({ data: item })
    }
  }, (item: ImageItem) => item.id.toString())
}
.columnsTemplate("1fr 1fr") // 两列布局
.rowsTemplate("auto") // 行高自适应
2. 数据驱动与性能优化
- 数据源:建议使用
@State或@Observed装饰器管理卡片数据,数据变化时自动刷新布局。 - 懒加载:通过
WaterFlow的onReachEnd事件监听滚动到底部,动态追加数据。 - 图片加载:使用
Image组件时,可配合objectFit属性控制图片缩放模式(如Cover),避免卡片高度跳跃。
3. 自定义卡片高度
若需精确控制卡片高度差异,可在数据模型中预计算或动态计算高度,并通过height属性设置:
FlowItem() {
  Column() {
    Image(item.src)
      .objectFit(ImageFit.Cover)
      .height(item.calculatedHeight) // 根据图片比例动态计算
    Text(item.title)
  }
}
.width('100%')
4. 布局调优
- 间距调整:通过
columnsGap和rowsGap设置卡片间距。 - 边距设置:在
WaterFlow外层嵌套Scroll或List容器时,注意处理滚动冲突。
注意事项
- 瀑布流布局对大量数据(如图片列表)的渲染性能要求较高,建议结合
LazyForEach分片加载数据。 - 在
FlowItem中避免嵌套过多复杂组件,减少布局计算开销。
通过以上方式,可高效实现适配不同屏幕、动态高度的瀑布流布局。实际开发中需根据数据量和交互需求调整细节参数。