


基于预设的Golang版Minecraft皮肤随机生成器
基于预设的Golang版Minecraft皮肤随机生成器
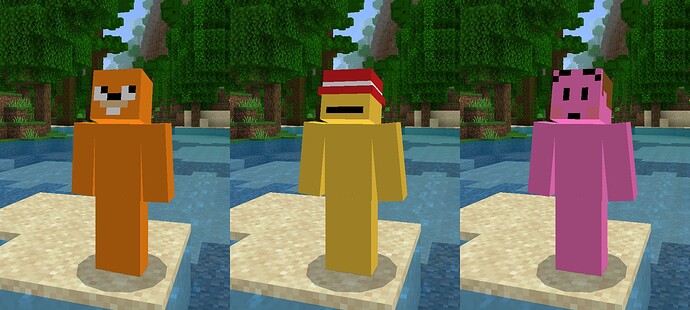
大家好!我构建了一个基于预设的Minecraft随机皮肤生成器。
基本上,你可以为皮肤的任意部分(甚至是完整的皮肤)选择你自己的预设,软件会根据混合生成一个随机皮肤。我会继续完善这个软件,希望有更多人能尝试使用。我非常感谢任何形式的反馈和捐赠! 🙂
源代码:
GitHub - nellfs/minecraft-skin-randomizer: 一个基于预设的Minecraft随机皮肤生成器
更多关于基于预设的Golang版Minecraft皮肤随机生成器的实战教程也可以访问 https://www.itying.com/category-94-b0.html

更多关于基于预设的Golang版Minecraft皮肤随机生成器的实战系列教程也可以访问 https://www.itying.com/category-94-b0.html
这是一个非常酷的项目!通过预设来生成随机Minecraft皮肤的想法很有创意,特别是允许用户为不同部分设置预设,然后混合生成最终皮肤。
我查看了你的代码,整体结构很清晰。让我分享一些Go语言方面的专业见解:
1. 并发处理优化 你的皮肤生成过程可以很好地利用Go的并发特性。目前你是顺序处理,但可以改为并发生成不同部分:
func generateSkinConcurrently(presets map[string]Preset) (*Skin, error) {
    var wg sync.WaitGroup
    errChan := make(chan error, len(presets))
    skin := &Skin{Parts: make(map[string]*image.RGBA)}

    for partName, preset := range presets {
        wg.Add(1)
        go func(name string, p Preset) {
            defer wg.Done()
            part, err := generatePart(p)
            if err != nil {
                errChan <- fmt.Errorf("生成%s失败: %w", name, err)
                return
            }
            skin.mu.Lock()
            skin.Parts[name] = part
            skin.mu.Unlock()
        }(partName, preset)
    }

    wg.Wait()
    close(errChan)

    if len(errChan) > 0 {
        return nil, <-errChan
    }
    return skin, nil
}
2. 图像处理性能
我看到你使用了image/draw进行图像操作。对于像素级操作,直接访问像素数组会更高效:
func blendPixels(dst, src *image.RGBA, opacity float64) {
    dstBounds := dst.Bounds()
    srcBounds := src.Bounds()

    for y := dstBounds.Min.Y; y < dstBounds.Max.Y; y++ {
        for x := dstBounds.Min.X; x < dstBounds.Max.X; x++ {
            dstIdx := (y-dstBounds.Min.Y)*dst.Stride + (x-dstBounds.Min.X)*4
            srcIdx := (y-srcBounds.Min.Y)*src.Stride + (x-srcBounds.Min.X)*4

            // Alpha混合算法
            alpha := uint8(opacity * 255)
            dst.Pix[dstIdx+0] = uint8((int(dst.Pix[dstIdx+0])*(255-int(alpha)) +
                                      int(src.Pix[srcIdx+0])*int(alpha)) / 255)
            dst.Pix[dstIdx+1] = uint8((int(dst.Pix[dstIdx+1])*(255-int(alpha)) +
                                      int(src.Pix[srcIdx+1])*int(alpha)) / 255)
            dst.Pix[dstIdx+2] = uint8((int(dst.Pix[dstIdx+2])*(255-int(alpha)) +
                                      int(src.Pix[srcIdx+2])*int(alpha)) / 255)
        }
    }
}
3. 预设系统扩展 你的预设系统可以进一步抽象,支持更多类型的随机化算法:
type Generator interface {
    Generate(baseColor color.RGBA) *image.RGBA
    Name() string
}

type PatternGenerator struct {
    pattern [][]uint8
}

func (pg *PatternGenerator) Generate(baseColor color.RGBA) *image.RGBA {
    img := image.NewRGBA(image.Rect(0, 0, 64, 64))
    for y := 0; y < 64; y++ {
        for x := 0; x < 64; x++ {
            if pg.pattern[y][x] == 1 {
                img.Set(x, y, baseColor)
            }
        }
    }
    return img
}

type GradientGenerator struct {
    startColor, endColor color.RGBA
}

func (gg *GradientGenerator) Generate(baseColor color.RGBA) *image.RGBA {
    img := image.NewRGBA(image.Rect(0, 0, 64, 64))
    for y := 0; y < 64; y++ {
        ratio := float64(y) / 64.0
        r := uint8(float64(gg.startColor.R)*(1-ratio) + float64(gg.endColor.R)*ratio)
        g := uint8(float64(gg.startColor.G)*(1-ratio) + float64(gg.endColor.G)*ratio)
        b := uint8(float64(gg.startColor.B)*(1-ratio) + float64(gg.endColor.B)*ratio)
        for x := 0; x < 64; x++ {
            img.SetRGBA(x, y, color.RGBA{R: r, G: g, B: b, A: 255})
        }
    }
    return img
}
4. 缓存机制 考虑到皮肤生成可能需要重复使用相同的预设组合,可以添加缓存:
type SkinCache struct {
    sync.RWMutex
    cache map[string]*image.RGBA
    ttl   time.Duration
}

func NewSkinCache(ttl time.Duration) *SkinCache {
    return &SkinCache{
        cache: make(map[string]*image.RGBA),
        ttl:   ttl,
    }
}

func (sc *SkinCache) Get(key string) (*image.RGBA, bool) {
    sc.RLock()
    defer sc.RUnlock()
    skin, exists := sc.cache[key]
    return skin, exists
}

func (sc *SkinCache) Set(key string, skin *image.RGBA) {
    sc.Lock()
    defer sc.Unlock()
    sc.cache[key] = skin
    time.AfterFunc(sc.ttl, func() {
        sc.Lock()
        delete(sc.cache, key)
        sc.Unlock()
    })
}
5. 测试覆盖率 为随机生成器编写测试很重要,这里是一个示例测试:
func TestSkinGenerator(t *testing.T) {
    preset := Preset{
        Name: "test",
        Colors: []color.RGBA{
            {R: 255, G: 0, B: 0, A: 255},
            {R: 0, G: 255, B: 0, A: 255},
        },
        Pattern: "checkerboard",
    }

    generator := NewSkinGenerator()
    skin, err := generator.Generate(preset)

    if err != nil {
        t.Fatalf("生成皮肤失败: %v", err)
    }

    if skin == nil {
        t.Fatal("生成的皮肤为nil")
    }

    // 验证皮肤尺寸
    bounds := skin.Bounds()
    if bounds.Dx() != 64 || bounds.Dy() != 64 {
        t.Errorf("皮肤尺寸错误: 期望 64x64, 得到 %dx%d", bounds.Dx(), bounds.Dy())
    }

    // 验证至少有一些非透明像素
    opaquePixels := 0
    for y := bounds.Min.Y; y < bounds.Max.Y; y++ {
        for x := bounds.Min.X; x < bounds.Max.X; x++ {
            _, _, _, a := skin.At(x, y).RGBA()
            if a > 0 {
                opaquePixels++
            }
        }
    }

    if opaquePixels == 0 {
        t.Error("皮肤完全透明")
    }
}
你的项目在架构上做得很好,模块化的设计让扩展变得容易。这些优化建议可以帮助提升性能,特别是在处理大量皮肤生成请求时。继续完善这个项目,社区会从中受益!