


HarmonyOS鸿蒙Next中flutter怎么获取实例化的鸿蒙组件对象
HarmonyOS鸿蒙Next中flutter怎么获取实例化的鸿蒙组件对象 【问题描述】:flutter怎么获取实例化的鸿蒙组件对象
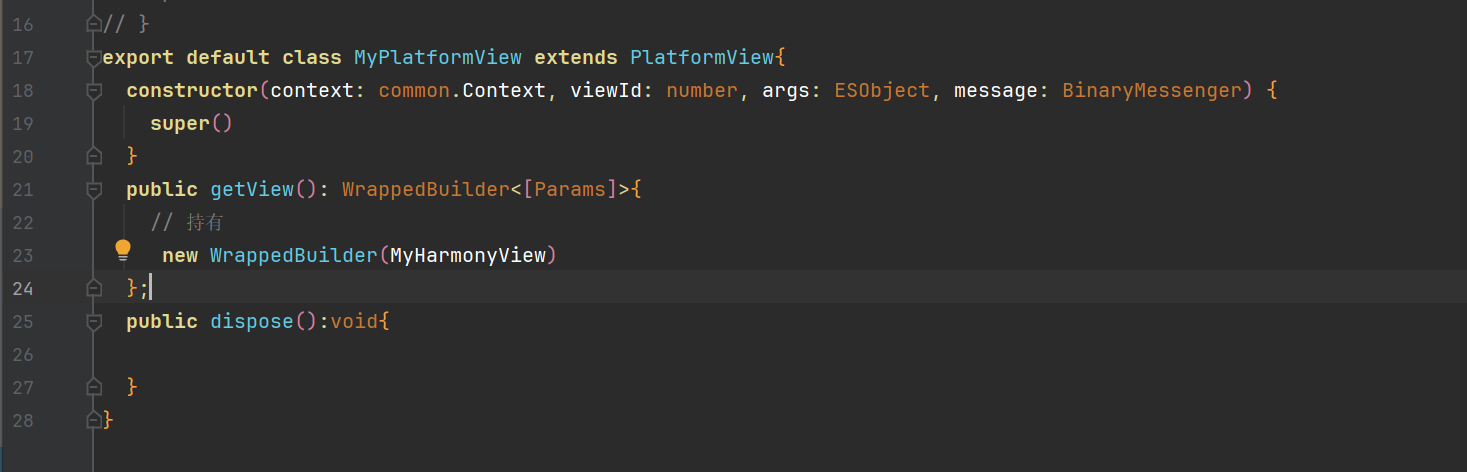
【问题现象】:WrappedBuilder怎么获取实例化的鸿蒙组件对象(MyHarmonyView对象)
更多关于HarmonyOS鸿蒙Next中flutter怎么获取实例化的鸿蒙组件对象的实战教程也可以访问 https://www.itying.com/category-92-b0.html

开发者您好,可以基于PlatformView实现ArkTS组件同层渲染,flutter获取实例化的HarmonyOS组件对象可以参考如下步骤和示例:
- flutter开发环境配置。 环境配置指导。
- 创建项目。 执行flutter create --platforms ohos platform_demo创建项目。 cd到platform_demo目录下,执行flutter pub get下载依赖。
- 代码实现。 代码实现分为Native侧和dart侧。
Native侧。
- 使用DevEco Studio工具打开platform_demo\ohos项目。
- 在platform_demo\ohos\entry\src\main\ets\entryability目录下实现代码。
- 新建CustomView.ets文件,CustomView用于在flutter Widget里显示。
- 定义一个Component,代表ohos的PlatformView的定义。
@Component struct ButtonComponent { @Prop params: Params customView: CustomView = this.params.platformView as CustomView @StorageLink('numValue') storageLink: string = "first" @State bkColor: Color = Color.Red build() { Column() { Button("发送数据给flutter") .border({ width: 2, color: Color.Blue}) .backgroundColor(this.bkColor) .onTouch((event: TouchEvent) => { console.log("nodeController button on touched") }) .onClick((event: ClickEvent) => { this.customView.sendMessage(); console.log("nodeController button on click") }) Text(`来自flutter的数据 : ${this.storageLink}`) .onTouch((event: TouchEvent) => { console.log("nodeController text on touched") }) }.alignItems(HorizontalAlign.Center) .justifyContent(FlexAlign.Center) .direction(Direction.Ltr) .width('100%') .height('100%') } } - 定义一个builder方法,放入自定义Component组件。
@Builder function ButtonBuilder(params: Params) { ButtonComponent({ params: params }) .backgroundColor(Color.Yellow) } - 继承PlatformView实现一个自定义的CustomView,实现getView接口,返回WrappedBuilder(ButtonBuilder),放入builder方法。
import MethodChannel, { MethodCallHandler, MethodResult } from '@ohos/flutter_ohos/src/main/ets/plugin/common/MethodChannel'; import PlatformView, { Params } from '@ohos/flutter_ohos/src/main/ets/plugin/platform/PlatformView'; import common from '@ohos.app.ability.common'; import { BinaryMessenger } from '@ohos/flutter_ohos/src/main/ets/plugin/common/BinaryMessenger'; import StandardMethodCodec from '@ohos/flutter_ohos/src/main/ets/plugin/common/StandardMethodCodec'; import MethodCall from '@ohos/flutter_ohos/src/main/ets/plugin/common/MethodCall'; @Observed export class CustomView extends PlatformView implements MethodCallHandler { numValue: string = "test"; methodChannel: MethodChannel; index: number = 1; constructor(context: common.Context, viewId: number, args: ESObject, message: BinaryMessenger) { super(); console.log("nodeController viewId:" + viewId) // 注册消息通道,消息通道根据具体需求添加,代码仅作为示例 this.methodChannel = new MethodChannel(message, `com.rex.custom.ohos/customView${viewId}`, StandardMethodCodec.INSTANCE); this.methodChannel.setMethodCallHandler(this); } onMethodCall(call: MethodCall, result: MethodResult): void { // 接受Dart侧发来的消息 let method: string = call.method; let link1: SubscribedAbstractProperty<number> = AppStorage.link('numValue'); switch (method) { case 'getMessageFromflutterView': let value: ESObject = call.args; this.numValue = value; link1.set(value) console.log("nodeController receive message from dart: " + this.numValue); result.success(true); break; } } public sendMessage = () => { console.log("nodeController sendMessage") // 向Dart侧发送消息 this.methodChannel.invokeMethod('getMessageFromOhosView', 'natvie - ' + this.index++); } getView(): WrappedBuilder<[Params]> { return new WrappedBuilder(ButtonBuilder); } dispose(): void { } } - 实现一个自定义的PlatformViewFactory,在其create方法中创建自定义的PlatformView的实例。
import common from '@ohos.app.ability.common'; import MessageCodec from '@ohos/flutter_ohos/src/main/ets/plugin/common/MessageCodec'; import PlatformViewFactory from '@ohos/flutter_ohos/src/main/ets/plugin/platform/PlatformViewFactory'; import { BinaryMessenger } from '@ohos/flutter_ohos/src/main/ets/plugin/common/BinaryMessenger'; import PlatformView from '@ohos/flutter_ohos/src/main/ets/plugin/platform/PlatformView'; import { CustomView } from './CustomView'; export class CustomFactory extends PlatformViewFactory { message: BinaryMessenger; constructor(message: BinaryMessenger, createArgsCodes: MessageCodec<Object>) { super(createArgsCodes); this.message = message; } public create(context: common.Context, viewId: number, args: Object): PlatformView { return new CustomView(context, viewId, args, this.message); } } - 新建一个继承于flutterPlugin的CustomPlugin插件,在onAttachedToEngine中,注册自定义的PlatformViewFactory。
import { flutterPlugin, flutterPluginBinding } from '@ohos/flutter_ohos/src/main/ets/embedding/engine/plugins/flutterPlugin'; import StandardMessageCodec from '@ohos/flutter_ohos/src/main/ets/plugin/common/StandardMessageCodec'; import { CustomFactory } from './CustomFactory'; export class CustomPlugin implements flutterPlugin { getUniqueClassName(): string { return 'CustomPlugin'; } onAttachedToEngine(binding: flutterPluginBinding): void { binding.getPlatformViewRegistry()?. registerViewFactory('com.rex.custom.ohos/customView', new CustomFactory(binding.getBinaryMessenger(), StandardMessageCodec.INSTANCE)); } onDetachedFromEngine(binding: flutterPluginBinding): void {} } - 打开EntryAbility.ets文件,添加Plugin(也可以把自定义PlatformView写在一个OpenHarmony插件中,在应用中沿用,就不用在此显式添加插件)
import { flutterAbility } from '@ohos/flutter_ohos' import flutterEngine from '@ohos/flutter_ohos/src/main/ets/embedding/engine/flutterEngine'; import { CustomPlugin } from './CustomPlugin'; import { GeneratedPluginRegistrant } from '../plugins/GeneratedPluginRegistrant'; export default class EntryAbility extends flutterAbility { configureflutterEngine(flutterEngine: flutterEngine) { super.configureflutterEngine(flutterEngine) GeneratedPluginRegistrant.registerWith(flutterEngine) this.addPlugin(new CustomPlugin()); } } - Dart侧。
- 使用Android Studio工具打开platform_demo项目。
- 在platform_demo\lib目录下实现代码。
- 新建CustomOhosView,用于显示Native侧的CustomView的Widget OhosView组件就是桥接PlatformView的关键。
- viewType:传递给Native侧,告知插件需要创建那个PlatformView,这个PlatformView需要在插件初始化时注册。
- onPlatformViewCreated:PlatformView创建成功时的回调。
- creationParams:传递给PlatformView的初始化参数。
- 实现CustomOhosView,使用OhosView组件,viewType需要和ets侧flutterPlugin做registerViewFactory操作时指定的viewType一致。
import 'dart:async';

import 'package:flutter/material.dart';
import 'package:flutter/services.dart';

typedef OnViewCreated = Function(CustomViewController);

// 自定义OhosView
class CustomOhosView extends StatefulWidget {
  final OnViewCreated onViewCreated;

  const CustomOhosView(this.onViewCreated, {Key? key}) : super(key: key);

  @override
  State<CustomOhosView> createState() => _CustomOhosViewState();
}

class _CustomOhosViewState extends State<CustomOhosView> {
  late MethodChannel _channel;

  @override
  Widget build(BuildContext context) {
    return _getPlatformFaceView();
  }

  Widget _getPlatformFaceView() {
    return OhosView(
      viewType: 'com.rex.custom.ohos/customView',
      onPlatformViewCreated: _onPlatformViewCreated,
      creationParams: const <String, dynamic>{'initParams': 'hello world'},
      creationParamsCodec: const StandardMessageCodec(),
    );
  }

  void _onPlatformViewCreated(int id) {
    _channel = MethodChannel('com.rex.custom.ohos/customView$id');
    final controller = CustomViewController._(
      _channel,
    );
    widget.onViewCreated(controller);
  }
}
- 在CustomOhosView所在文件中新建CustomViewController,用于实现Dart侧与Native侧的交互。
class CustomViewController { final MethodChannel _channel; final StreamController<String> _controller = StreamController<String>(); CustomViewController._( this._channel, ) { _channel.setMethodCallHandler( (call) async { switch (call.method) { case 'getMessageFromOhosView': // 从Native端获取数据 final result = call.arguments as String; _controller.sink.add(result); break; } }, ); } Stream<String> get customDataStream => _controller.stream; // 发送数据给Native Future<void> sendMessageToOhosView(String message) async { await _channel.invokeMethod( 'getMessageFromflutterView', message, ); } } - 修改platform_demo\lib\main.dart文件中的代码。
import 'dart:math';

import 'package:flutter/material.dart';
import 'custom_ohos_view.dart';

void main() {
  runApp(const MaterialApp(home: MyHome()));
}

class MyHome extends StatelessWidget {
  const MyHome({Key? key}) : super(key: key);

  @override
  Widget build(BuildContext context) {
    return const Scaffold(
      body: CustomExample(),
    );
  }
}

class CustomExample extends StatefulWidget {
  const CustomExample({Key? key}) : super(key: key);

  @override
  State<CustomExample> createState() => _CustomExampleState();
}

class _CustomExampleState extends State<CustomExample> {
  String receivedData = '';
  CustomViewController? _controller;

  void _onCustomOhosViewCreated(CustomViewController controller) {
    _controller = controller;
    _controller?.customDataStream.listen((data) {
      //接收到来自OHOS端的数据
      setState(() {
        receivedData = '来自ohos的数据:$data';
      });
    });
  }

  Widget _buildOhosView() {
    return Expanded(
      child: Container(
        color: Colors.blueAccent.withAlpha(60),
        child: CustomOhosView(_onCustomOhosViewCreated),
      ),
      flex: 1,
    );
  }

  Widget _buildflutterView() {
    return Expanded(
      child: Stack(
        alignment: AlignmentDirectional.bottomCenter,
        children: [
          Column(
            mainAxisAlignment: MainAxisAlignment.center,
            mainAxisSize: MainAxisSize.max,
            children: [
              TextButton(
                onPressed: () {
                  final randomNum = Random().nextInt(10);
                  _controller
                      ?.sendMessageToOhosView('flutter - $randomNum ');
                },
                child: const Text('发送数据给ohos'),
              ),
              const SizedBox(height: 10),
              Text(receivedData),
            ],
          ),
          const Padding(
            padding: EdgeInsets.only(bottom: 15),
            child: Text(
              'flutter - View',
              style: TextStyle(
                fontSize: 20,
                fontWeight: FontWeight.bold,
              ),
            ),
          ),
        ],
      ),
      flex: 1,
    );
  }

  @override
  Widget build(BuildContext context) {
    return Column(
      children: [
        _buildOhosView(),
        _buildflutterView(),
      ],
    );
  }
}
通过如上所示操作我们就可以实现flutter对Native侧的组件调用。在CustomView中引用我们所需的组件即可用到所需的Native能力,如引用FormMenu组件则可用到应用内创建服务卡片的Native能力。
详见:官方文档。
更多关于HarmonyOS鸿蒙Next中flutter怎么获取实例化的鸿蒙组件对象的实战系列教程也可以访问 https://www.itying.com/category-92-b0.html


在HarmonyOS Next中,通过Flutter的WrappedBuilder获取底层实例化的鸿蒙组件对象(如MyHarmonyView),目前没有直接公开的API支持。Flutter for HarmonyOS的设计原则是封装鸿蒙原生组件,提供统一的Flutter Widget接口,开发者通常无需直接操作底层鸿蒙对象。
若需访问特定功能,建议通过WrappedBuilder的builder方法传递配置参数,或利用Flutter侧的事件通道(如MethodChannel)与鸿蒙原生侧通信,间接控制组件行为。直接获取实例化对象可能破坏框架封装性,影响兼容性。请优先查阅Flutter for HarmonyOS官方文档,关注组件接口的更新。