


HarmonyOS鸿蒙Next中如何给AI生成的图片添加隐式标识
HarmonyOS鸿蒙Next中如何给AI生成的图片添加隐式标识 【问题描述】:根据相关法律规定,对AI生成的图片需添加隐式标识,这个隐式标识该如何添加,找了相关的文档,说是要修改图片的元数据,但是这个元数据该如何获取,获取之后如何修改,修改之后怎么显示到图片上,是否有具体的代码示例可供参考
【问题现象】:给AI生成的图片添加隐式标识,不知道该如何操作
【版本信息】:6.0
【复现代码】:不涉及
【尝试解决方案】:参考Image KIT的 setProperties方法,但是没有完整示例,不知道如何使用,https://developer.huawei.com/consumer/cn/doc/harmonyos-references/arkts-apis-image-metadata#setproperties13,能提供一个完整可运行的示例吗
更多关于HarmonyOS鸿蒙Next中如何给AI生成的图片添加隐式标识的实战教程也可以访问 https://www.itying.com/category-93-b0.html

import { image } from '@kit.ImageKit';
import { fileIo as fs } from '@kit.CoreFileKit';
import { hilog } from '@kit.PerformanceAnalysisKit';

export interface ImageMetadata {
  width?: string;
  height?: string;
  dateTime?: string;
  make?: string;
  model?: string;
  software?: string;
  userComment?: string;
  imageDescription?: string;
  copyright?: string;
  artist?: string;
}

export class ImageMetadataUtil {
  private static readonly TAG = 'ImageMetadataUtil';

  static async readImageMetadata(filePath: string): Promise<ImageMetadata> {
    try {
      const file = await fs.open(filePath, fs.OpenMode.READ_ONLY);
      const imageSource = image.createImageSource(file.fd);

      const metadata: ImageMetadata = {};

      // 读取图片信息来获取基本的宽高
      try {
        const imageInfo = await imageSource.getImageInfo(0);
        if (imageInfo) {
          metadata.width = imageInfo.size.width.toString();
          metadata.height = imageInfo.size.height.toString();
        }
      } catch (error) {
        hilog.warn(0x0000, ImageMetadataUtil.TAG, '读取图片基本信息失败');
      }

      // 🔧 修复:使用与写入时完全一致的属性键
      try {
        const software = await imageSource.getImageProperty('Software'); // 首字母大写,与写入时一致
        if (software) {
          metadata.software = software;
        }
      } catch (error) {
        hilog.warn(0x0000, ImageMetadataUtil.TAG, '读取属性 Software 失败');
      }

      try {
        const userComment = await imageSource.getImageProperty('USER_COMMENT');
        if (userComment) {
          metadata.userComment = userComment;
        }
      } catch (error) {
        hilog.warn(0x0000, ImageMetadataUtil.TAG, '读取属性 USER_COMMENT 失败');
      }

      try {
        const imageDescription = await imageSource.getImageProperty('ImageDescription'); // 驼峰命名,与写入时一致
        if (imageDescription) {
          metadata.imageDescription = imageDescription;
        }
      } catch (error) {
        hilog.warn(0x0000, ImageMetadataUtil.TAG, '读取属性 ImageDescription 失败');
      }

      await imageSource.release();
      await fs.close(file);

      return metadata;
    } catch (error) {
      hilog.error(0x0000, ImageMetadataUtil.TAG, `读取图片元数据失败: ${JSON.stringify(error)}`);
      throw new Error(`读取图片元数据失败: ${JSON.stringify(error)}`);
    }
  }

  static async modifyImageProperty(filePath: string, propertyKey: string, value: string): Promise<void> {
    try {
      const file = await fs.open(filePath, fs.OpenMode.READ_WRITE);
      const imageSource = image.createImageSource(file.fd);

      await imageSource.modifyImageProperty(propertyKey, value);

      await imageSource.release();
      await fs.close(file);

      hilog.info(0x0000, ImageMetadataUtil.TAG, `成功修改属性 ${propertyKey} 为 ${value}`);
    } catch (error) {
      hilog.error(0x0000, ImageMetadataUtil.TAG, `修改图片属性失败: ${JSON.stringify(error)}`);
      throw new Error(`修改图片属性失败: ${JSON.stringify(error)}`);
    }
  }

  static async addAIImageIdentifier(filePath: string, identifier: string): Promise<void> {
    try {
      const file = await fs.open(filePath, fs.OpenMode.READ_WRITE);
      const imageSource = image.createImageSource(file.fd);

      // 尝试使用不同的属性键和更简单的值格式,提高兼容性
      // 🔧 修复:跳过USER_COMMENT属性,只写入Software和ImageDescription
      interface ExifProperty {
        key: string;
        value: string;
      }

      const propertiesToTry: ExifProperty[] = [
        { key: 'Software', value: 'AI Generated' },
        { key: 'ImageDescription', value: 'AI Generated' }
      ];

      let successCount = 0;

      for (const prop of propertiesToTry) {
        try {
          await imageSource.modifyImageProperty(prop.key, prop.value);
          hilog.info(0x0000, ImageMetadataUtil.TAG, `成功写入属性 ${prop.key}: ${prop.value}`);
          successCount++;
        } catch (error) {
          hilog.warn(0x0000, ImageMetadataUtil.TAG, `写入属性 ${prop.key} 失败: ${JSON.stringify(error)}`);
          // 继续尝试其他属性,不中断流程
        }
      }

      await imageSource.release();
      await fs.close(file);

      if (successCount === 0) {
        throw new Error(`添加AI图片标识失败: 所有属性写入尝试均失败`);
      }

      hilog.info(0x0000, ImageMetadataUtil.TAG, `成功添加AI图片标识,共写入 ${successCount} 个属性`);
    } catch (error) {
      hilog.error(0x0000, ImageMetadataUtil.TAG, `添加AI图片标识失败: ${JSON.stringify(error)}`);
      throw new Error(`添加AI图片标识失败: ${JSON.stringify(error)}`);
    }
  }

  static async checkAIImageIdentifier(filePath: string): Promise<boolean> {
    try {
      const metadata = await ImageMetadataUtil.readImageMetadata(filePath);

      const software = metadata.software?.toLowerCase() || '';
      const userComment = metadata.userComment?.toLowerCase() || '';
      const imageDescription = metadata.imageDescription?.toLowerCase() || '';

      const aiKeywords = ['ai generated', 'ai', 'artificial intelligence', 'machine learning'];

      for (const keyword of aiKeywords) {
        if (software.includes(keyword) || userComment.includes(keyword) || imageDescription.includes(keyword)) {
          return true;
        }
      }

      return false;
    } catch (error) {
      hilog.error(0x0000, ImageMetadataUtil.TAG, `检查AI图片标识失败: ${JSON.stringify(error)}`);
      return false;
    }
  }

  static async getAIImageIdentifier(filePath: string): Promise<string | null> {
    try {
      const metadata = await ImageMetadataUtil.readImageMetadata(filePath);

      if (metadata.userComment) {
        return metadata.userComment;
      }

      if (metadata.software) {
        return metadata.software;
      }

      if (metadata.imageDescription?.startsWith('AI Generated:')) {
        return metadata.imageDescription.substring('AI Generated:'.length).trim();
      }

      return null;
    } catch (error) {
      hilog.error(0x0000, ImageMetadataUtil.TAG, `获取AI图片标识失败: ${JSON.stringify(error)}`);
      return null;
    }
  }

  static async batchAddAIIdentifier(filePaths: string[], identifier: string): Promise<void> {
    const results = await Promise.allSettled(
      filePaths.map(filePath => ImageMetadataUtil.addAIImageIdentifier(filePath, identifier))
    );

    const successCount = results.filter(result => result.status === 'fulfilled').length;
    const failCount = results.filter(result => result.status === 'rejected').length;

    hilog.info(0x0000, ImageMetadataUtil.TAG, `批量添加AI标识完成: 成功 ${successCount}, 失败 ${failCount}`);
  }
}
import { hilog } from '@kit.PerformanceAnalysisKit';
import { picker } from '@kit.CoreFileKit';
import { ImageMetadataUtil, ImageMetadata } from '../utils/ImageMetadataUtil';
@Entry
@Component
struct AIImageIdentifierPage {
@State selectedImagePath: string = '';
@State imageMetadata: ImageMetadata = {};
@State hasAIIdentifier: boolean = false;
@State aiIdentifier: string = '';
@State operationResult: string = '';
@State isProcessing: boolean = false;
async selectImage() {
try {
const documentPicker = new picker.DocumentViewPicker();
const documentSelectOptions = new picker.DocumentSelectOptions();
documentSelectOptions.maxSelectNumber = 1;
documentSelectOptions.fileSuffixFilters = ['.jpg', '.jpeg', '.png'];
const result = await documentPicker.select(documentSelectOptions);
if (result && result.length > 0) {
this.selectedImagePath = result[0];
this.operationResult = '图片选择成功,正在读取元数据...';
await this.readImageMetadata();
}
} catch (error) {
this.operationResult = `选择图片失败: ${JSON.stringify(error)}`;
hilog.error(0x0000, 'AIImageIdentifier', `选择图片失败: ${JSON.stringify(error)}`);
}
}
async readImageMetadata() {
try {
this.isProcessing = true;
this.imageMetadata = await ImageMetadataUtil.readImageMetadata(this.selectedImagePath);
this.hasAIIdentifier = await ImageMetadataUtil.checkAIImageIdentifier(this.selectedImagePath);
this.aiIdentifier = await ImageMetadataUtil.getAIImageIdentifier(this.selectedImagePath) || '';
this.operationResult = '元数据读取成功';
this.isProcessing = false;
} catch (error) {
this.operationResult = `读取元数据失败: ${JSON.stringify(error)}`;
this.isProcessing = false;
hilog.error(0x0000, 'AIImageIdentifier', `读取元数据失败: ${JSON.stringify(error)}`);
}
}
async addAIIdentifier() {
if (!this.selectedImagePath) {
this.operationResult = '请先选择图片';
return;
}
try {
this.isProcessing = true;
const identifier = `AI Generated Image - ${new Date().toISOString()} - HarmonyOS 6.0`;
await ImageMetadataUtil.addAIImageIdentifier(this.selectedImagePath, identifier);
await this.readImageMetadata();
this.operationResult = 'AI标识添加成功';
this.isProcessing = false;
} catch (error) {
this.operationResult = `添加AI标识失败: ${JSON.stringify(error)}`;
this.isProcessing = false;
hilog.error(0x0000, 'AIImageIdentifier', `添加AI标识失败: ${JSON.stringify(error)}`);
}
}
async checkAIIdentifier() {
if (!this.selectedImagePath) {
this.operationResult = '请先选择图片';
return;
}
try {
this.isProcessing = true;
this.hasAIIdentifier = await ImageMetadataUtil.checkAIImageIdentifier(this.selectedImagePath);
this.aiIdentifier = await ImageMetadataUtil.getAIImageIdentifier(this.selectedImagePath) || '';
this.operationResult = this.hasAIIdentifier ? '检测到AI标识' : '未检测到AI标识';
this.isProcessing = false;
} catch (error) {
this.operationResult = `检查AI标识失败: ${JSON.stringify(error)}`;
this.isProcessing = false;
hilog.error(0x0000, 'AIImageIdentifier', `检查AI标识失败: ${JSON.stringify(error)}`);
}
}
build() {
Column() {
Text('AI图片隐式标识工具')
.fontSize(24)
.fontWeight(FontWeight.Bold)
.margin(20)
.textAlign(TextAlign.Center)
Button('选择图片')
.width('80%')
.height(50)
.margin(10)
.onClick(() => this.selectImage())
.enabled(!this.isProcessing)
if (this.selectedImagePath) {
Text(`已选择: ${this.selectedImagePath.split('/').pop()}`)
.fontSize(14)
.margin(10)
.textAlign(TextAlign.Center)
.maxLines(2)
.textOverflow({ overflow: TextOverflow.Ellipsis })
Row() {
Button('添加AI标识')
.width('45%')
.height(45)
.margin(5)
.onClick(() => this.addAIIdentifier())
.enabled(!this.isProcessing)
Button('检查AI标识')
.width('45%')
.height(45)
.margin(5)
.onClick(() => this.checkAIIdentifier())
.enabled(!this.isProcessing)
}
.width('80%')
.margin(10)
}
if (this.isProcessing) {
LoadingProgress()
.width(30)
.height(30)
.margin(20)
Text('处理中...')
.fontSize(14)
.margin(10)
}
if (this.operationResult) {
Text(this.operationResult)
.fontSize(16)
.margin(15)
.padding(10)
.backgroundColor('#f0f0f0')
.borderRadius(8)
.width('90%')
.textAlign(TextAlign.Center)
}
if (Object.keys(this.imageMetadata).length > 0) {
Text('图片元数据')
.fontSize(18)
.fontWeight(FontWeight.Bold)
.margin(15)
Column() {
this.metadataItem('宽度', this.imageMetadata.width)
this.metadataItem('高度', this.imageMetadata.height)
this.metadataItem('拍摄时间', this.imageMetadata.dateTime)
this.metadataItem('设备制造商', this.imageMetadata.make)
this.metadataItem('设备型号', this.imageMetadata.model)
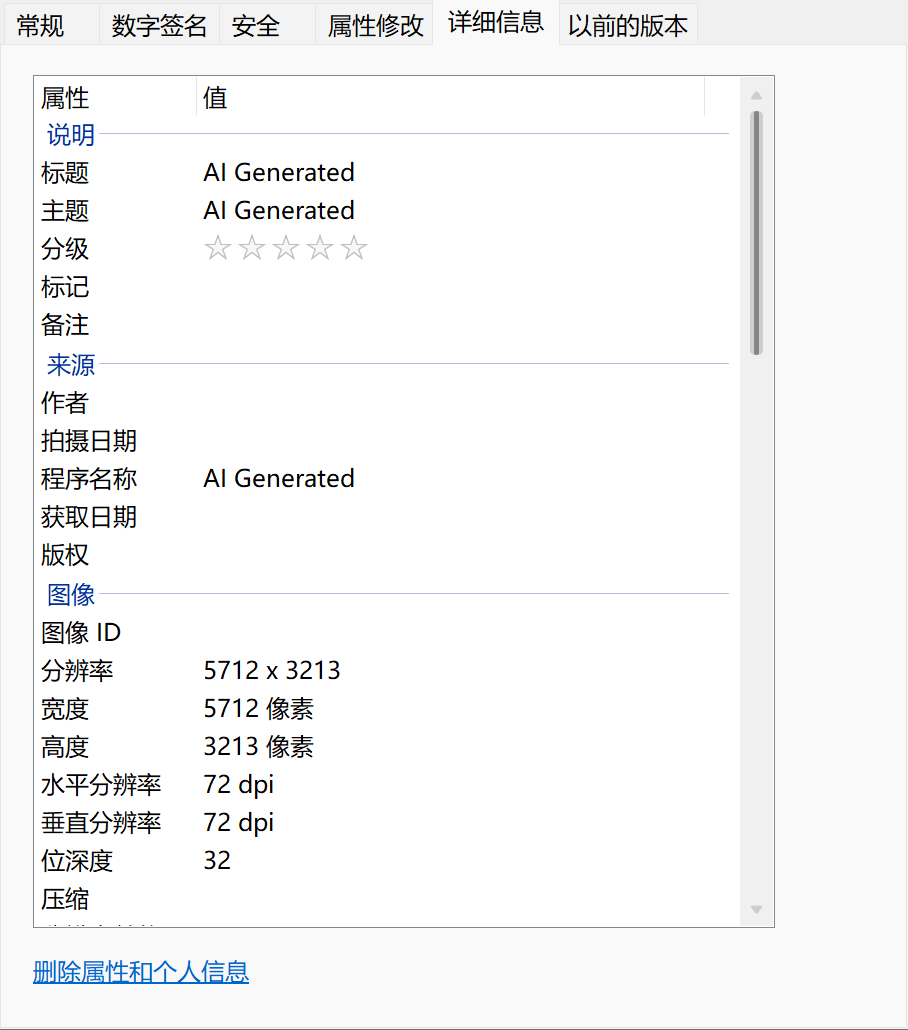
this.metadataItem('软件', this.imageMetadata.software)
this.metadataItem('用户注释', this.imageMetadata.userComment)
this.metadataItem('图片描述', this.imageMetadata.imageDescription)
this.metadataItem('版权', this.imageMetadata.copyright)
this.metadataItem('作者', this.imageMetadata.artist)
}
.width('90%')
.backgroundColor('#ffffff')
.borderRadius(10)
.padding(15)
}
if (this.hasAIIdentifier) {
Column() {
Text('✓ 检测到AI生成标识')
.fontSize(16)
.fontWeight(FontWeight.Bold)
.fontColor('#4CAF50')
.margin(10)
if (this.aiIdentifier) {
Text(`标识内容: ${this.aiIdentifier}`)
.fontSize(14)
.margin(5)
.maxLines(3)
.textOverflow({ overflow: TextOverflow.Ellipsis })
}
}
.width('90%')
.backgroundColor('#E8F5E9')
.borderRadius(10)
.padding(15)
.margin(20)
}
Text('使用说明')
.fontSize(18)
.fontWeight(FontWeight.Bold)
.margin(15)
Column() {
Text('1. 选择需要处理的图片文件')
.fontSize(14)
.margin(5)
.textAlign(TextAlign.Start)
.width('100%')
Text('2. 点击"添加AI标识"按钮添加隐式标识')
.fontSize(14)
.margin(5)
.textAlign(TextAlign.Start)
.width('100%')
Text('3. 标识会写入图片的EXIF元数据中')
.fontSize(14)
.margin(5)
.textAlign(TextAlign.Start)
.width('100%')
Text('4. 可通过"检查AI标识"验证标识是否添加成功')
.fontSize(14)
.margin(5)
.textAlign(TextAlign.Start)
.width('100%')
Text('5. 元数据包括软件、用户注释、图片描述等字段')
.fontSize(14)
.margin(5)
.textAlign(TextAlign.Start)
.width('100%')
}
.width('90%')
.backgroundColor('#FFF3E0')
.borderRadius(10)
.padding(15)
.margin(10)
}
.width('100%')
.height('100%')
.backgroundColor('#f5f5f5')
}
@Builder
metadataItem(label: string, value?: string) {
if (value) {
Row() {
Text(`${label}: `)
.fontSize(14)
.fontWeight(FontWeight.Medium)
.fontColor('#666666')
Text(value)
.fontSize(14)
.fontColor('#333333')
.layoutWeight(1)
.maxLines(2)
.textOverflow({ overflow: TextOverflow.Ellipsis })
}
.width('100%')
.margin(8)
}
}
}
更新了一下,现在可以了
更多关于HarmonyOS鸿蒙Next中如何给AI生成的图片添加隐式标识的实战系列教程也可以访问 https://www.itying.com/category-93-b0.html


您好,我是使用上述代码,添加AI标识提示成功,但是检查AI标识一直提示未检测到,是什么原因呢,求大佬指教
下面是log
RenderAnimat1onl10.
setExpecteaFrameRateRangei1,
Isource_map145lthe stack without line info
读取属性 SOFTWARE 失败
5日
source_map145]the stack without line info
读取属性 USER_COMMENT 失败
stsigne
[source map145lthe stack without line info
读取属性 IMAGE_DESCRIPTION 失败
Connect:uri = ******/media
OnAbilityConnectDone: reg uri:******/media, rev uri:******dialibrary.medialibra
[ACCS144]0N_ABILITY_CONNECT DONE end,DataShareExtAbility
ConnectDataShareExtAbility:uri=******/media. ret =0
DisconnectDataShareExtAbility:uri:******/media,ret =0
OnAbilityDisconnectDone: reg uri:, rev uri:******dialibrary.medialibrarydata//D
[ACCS152J0N_ABILITY DISCONNECT DONE end,DataShareExtAbility
[source_map145lthe stack without line info
读取属性 SOFTWARE 失败
[source map145lthe stack without line info
读取属性 USER_COMMENT 失败
[source map145lthe stack without line info
读取属性 IMAGE_DESCRIPTION 失败,

隐式的不好加,那就用显示的啊!
图片内容显式标识方法如下:
a) 图片内容显式标识应采用文字提示。
b) 图片内容显式标识应同时包含以下要素:
- 人工智能要素:包含“人工智能”或“AI”,表明使用人工智能技术;
- 生成合成要素:包含“生成”和/或“合成”,表明内容制作方式为生成和/或合成。
c) 图片内容显式标识应位于图片的边或角。
d) 图片内容显式标识使用的字型应清晰可辨。
e) 图片内容显式标识的文字高度不应低于画面最短边长度的5%。
注:非矩形图片的最短边指可完全将该图片包含在内部的矩形的最短边。


在HarmonyOS鸿蒙Next中,可通过AI图片生成服务的API接口,在生成图片时直接添加隐式标识。具体使用ArkTS调用相关模块,设置标识参数即可嵌入。该功能由系统底层提供支持,无需额外处理图像数据。

在HarmonyOS Next中,给AI生成的图片添加隐式标识,可以通过修改图片的元数据(metadata)来实现。这通常涉及使用Image组件和相关的元数据操作API。以下是一个基于你提供的文档链接的完整示例,展示如何读取、修改并保存图片的元数据,以添加隐式标识。
完整代码示例
假设你有一个AI生成的图片文件路径,需要在其元数据中添加一个自定义标识(例如,键为AI_Generated,值为true)。代码使用ArkTS编写,适用于HarmonyOS Next 6.0版本。
import image from '@ohos.multimedia.image';
import fileio from '@ohos.file.fs';

// 假设图片文件路径
const imagePath = 'path/to/your/ai_generated_image.jpg';

// 步骤1:读取图片文件并获取元数据
async function addImplicitIdentifier() {
  try {
    // 打开图片文件
    const file = await fileio.open(imagePath, fileio.OpenMode.READ_WRITE);
    const imageSource = image.createImageSource(file.fd);

    // 获取图片的元数据
    const metadata = await imageSource.getImagePropertyKeys();
    console.log('原始元数据键列表:', metadata);

    // 步骤2:修改元数据,添加隐式标识
    // 创建一个新的元数据对象,包含现有数据和新增标识
    const newProperties = {
      'AI_Generated': 'true', // 自定义隐式标识
      'Creation_Software': 'HarmonyOS_AI_Tool' // 可选:添加其他标识
    };

    // 使用setProperties方法更新元数据
    await imageSource.setProperties(newProperties);
    console.log('元数据已更新,添加了隐式标识。');

    // 步骤3:保存修改后的图片(可选:保存为新文件或覆盖原文件)
    // 这里以覆盖原文件为例,先创建ImagePacker来编码图片
    const imagePacker = image.createImagePacker();
    const packOptions = {
      format: 'image/jpeg', // 根据图片格式调整,如PNG用'image/png'
      quality: 100 // 保持原质量
    };

    // 获取图片数据并打包
    const imageData = await imageSource.getImageData();
    const packedData = await imagePacker.packing(imageData, packOptions);

    // 将打包后的数据写回原文件(覆盖)
    await fileio.write(file.fd, packedData);
    await fileio.close(file);

    console.log('图片已保存,隐式标识添加完成。');
  } catch (error) {
    console.error('添加隐式标识失败:', error);
  }
}

// 调用函数
addImplicitIdentifier();
关键点说明
- 元数据操作:使用
image.createImageSource获取图片源,通过getImagePropertyKeys()查看现有元数据键,然后使用setProperties()添加自定义键值对(如AI_Generated: true)。这符合法律要求的隐式标识方式,因为元数据不直接显示在图片视觉内容上。 - 保存修改:修改元数据后,需要重新编码并保存图片。示例中使用了
createImagePacker()将图片数据打包,并覆盖原文件。你可以调整路径以保存为新文件(避免覆盖原文件)。 - 显示标识:隐式标识存储在元数据中,不会直接显示在图片上。如果需要验证,可以使用元数据读取工具(如代码中的
getImagePropertyKeys())检查键值对。 - 格式支持:代码以JPEG格式为例,如果图片是PNG或其他格式,需调整
format参数(如PNG用'image/png')。确保ImagePacker支持目标格式。
注意事项
- 该示例基于HarmonyOS Next的Image Kit API,需在DevEco Studio中配置相关权限(如文件读写权限
ohos.permission.READ_MEDIA和ohos.permission.WRITE_MEDIA)。 - 隐式标识的具体内容(如键名和值)应根据法律法规或业务需求定义,示例中
AI_Generated仅为示意。 - 如果图片元数据已存在同名键,
setProperties()会覆盖其值;建议先检查现有元数据以避免冲突。
这个示例提供了从读取到保存的完整流程,你可以直接集成到项目中,根据实际路径和标识需求调整代码。