


HarmonyOS鸿蒙Next中键盘弹出时顶部导航栏被顶出屏幕且输入框被遮挡导致布局异常
HarmonyOS鸿蒙Next中键盘弹出时顶部导航栏被顶出屏幕且输入框被遮挡导致布局异常 问题1:键盘弹出时,顶部导航栏被挤出屏幕
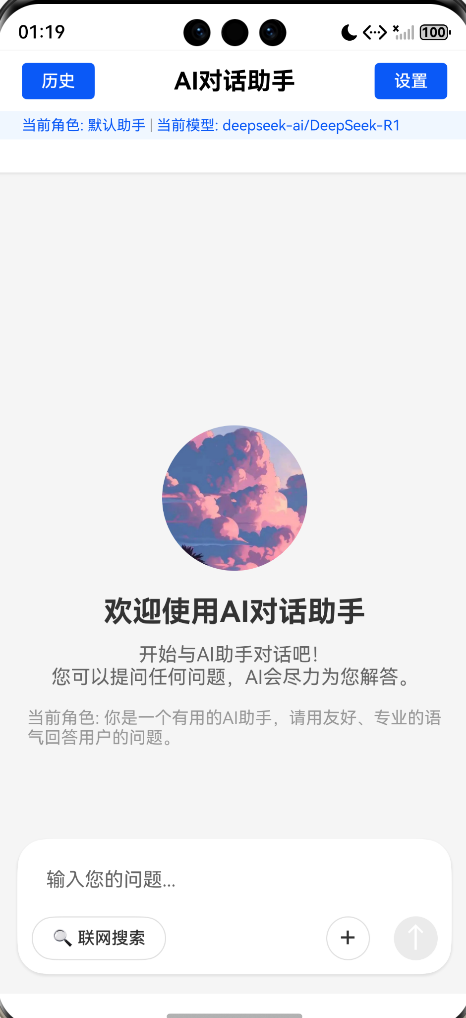
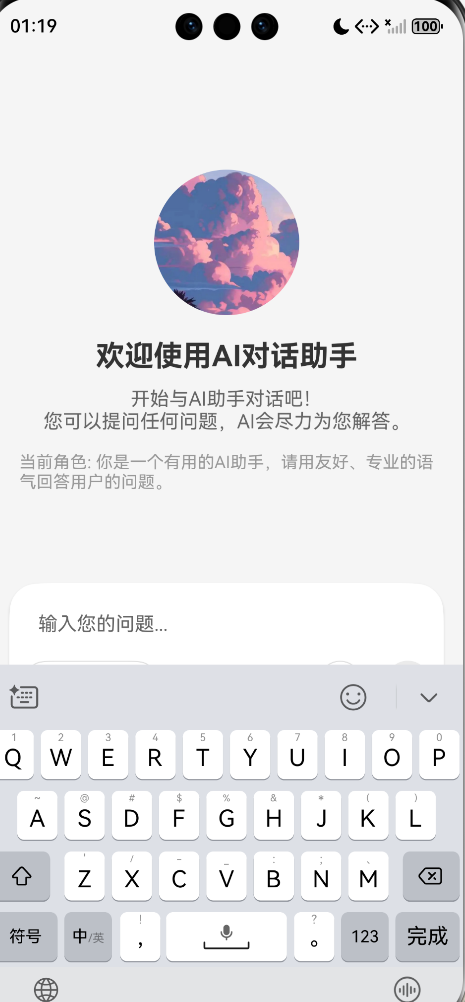
现象描述: 页面布局使用 Column 作为根容器,包含导航栏(高度100px)和 Scroll(layoutWeight: 1) 当点击输入框触发键盘弹出时,顶部导航栏会被向上推到屏幕可视区域之外,完全看不见 导航栏作为 Column 的子元素,固定高度100px
期望行为: 键盘弹出时,导航栏应保持固定在屏幕顶部,始终可见
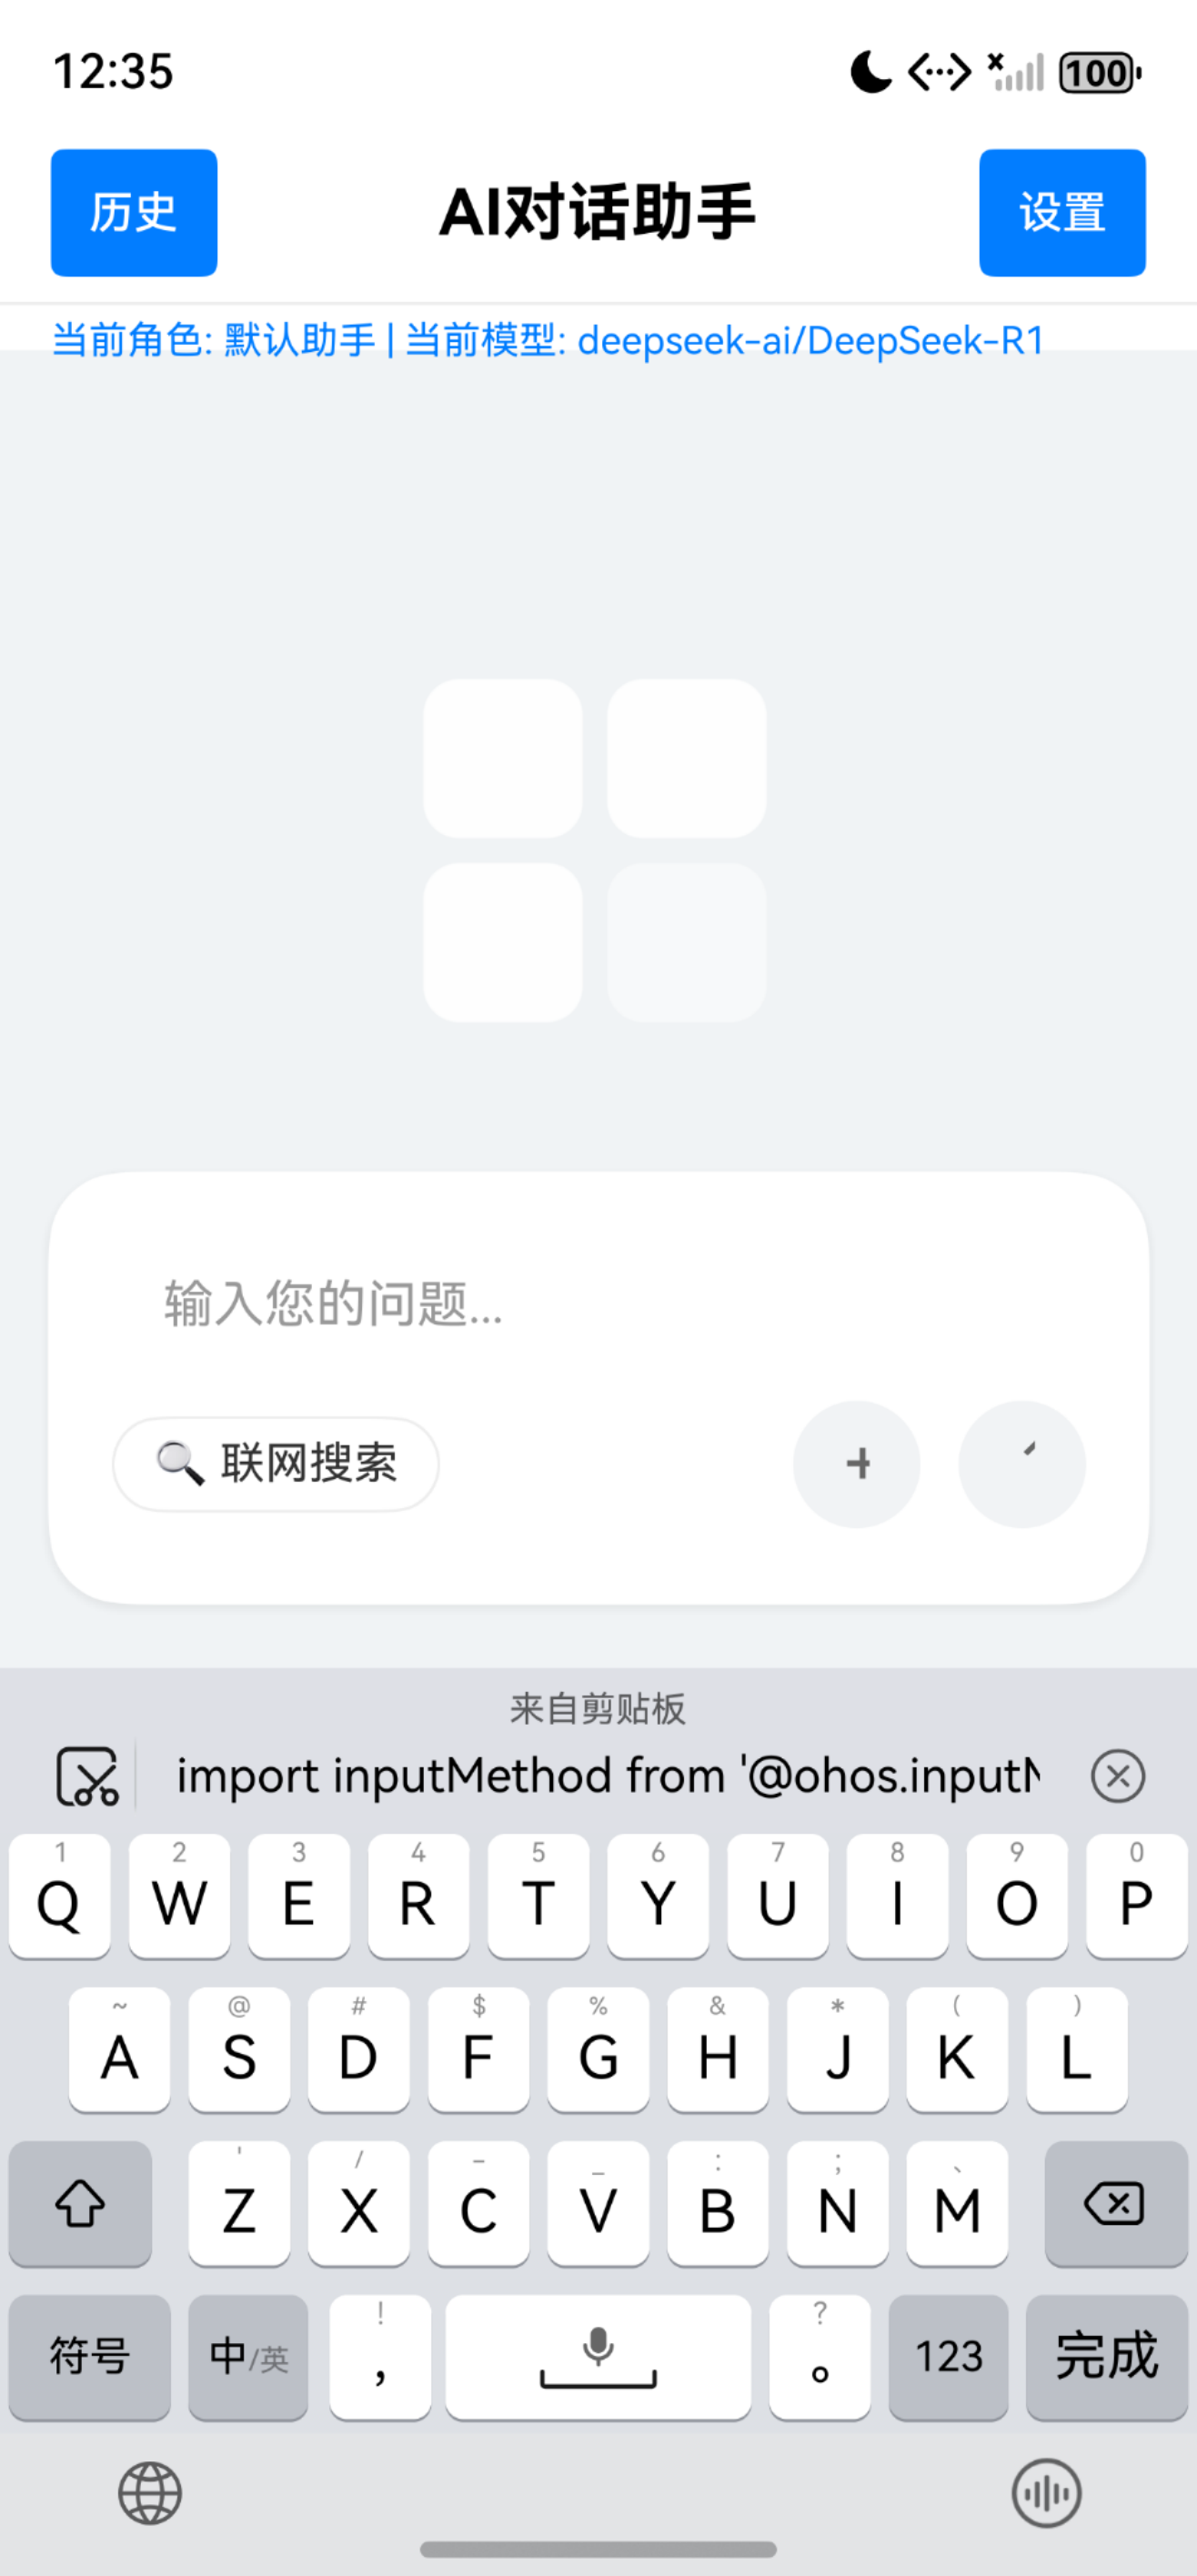
问题2:键盘弹出时,输入框下半部分被遮挡
现象描述: 输入框位于 Scroll 内部,使用绝对定位:.position({ x: 0, y: ‘100%’ }) + .translate({ x: 0, y: ‘-100%’ }) 键盘弹出后,输入框仅上半部分可见,联网搜索按钮、发送按钮等下半部分被键盘完全遮挡
期望行为: 键盘弹出时,输入框应自动上移至键盘上方,完全可见
已尝试的方案
方案1:使用 Stack 作为根容器,Scroll 在内部,导航栏和输入框使用绝对定位。结果:导航栏和输入框位置异常。
方案2:使用 Column 作为根容器,Scroll 使用 layoutWeight: 1。结果:导航栏仍然被挤出屏幕。
方案3:使用 Scroll 作为根容器,内部使用 Stack。结果:位置异常。
方案4:使用键盘监听,动态调整 Scroll 和输入框的位置。结果:效果不理想。
更多关于HarmonyOS鸿蒙Next中键盘弹出时顶部导航栏被顶出屏幕且输入框被遮挡导致布局异常的实战教程也可以访问 https://www.itying.com/category-93-b0.html

跑了个demo,看看:
import inputMethod from '@ohos.inputMethod';
import { KeyboardAvoidMode } from '@ohos.arkui.UIContext';
@Entry
@Component
struct AIDialogAssistant {
  @State safeArea: SafeAreaType[] = [SafeAreaType.SYSTEM]
  @State layerIndex: number = 2

  // 1. 固定参数
  private navBarHeight: number = 110; // 增加高度以适应两行
  private inputAreaHeight: number = 140; // 增加输入框区域高度

  // 2. 动态状态:键盘高度(控制输入框位置)
  @State keyboardHeight: number = 0;

  build() {
    // 根容器:Stack(实现分层固定,避免流式布局挤压)
    Stack({ alignContent: Alignment.TopStart }) {
      // ========== 层1:顶部导航栏 ==========
      Column() {
        // 第一行:标题和操作按钮
        Row() {
          Button('历史')
            .backgroundColor('#007DFF')
            .borderRadius(4)
            .fontSize(14)
            .padding({ left: 12, right: 12, top: 6, bottom: 6 })
            .fontColor('#FFFFFF');

          Text('AI对话助手')
            .fontSize(20)
            .fontWeight(FontWeight.Bold)
            .fontColor('#000000');

          Button('设置')
            .backgroundColor('#007DFF')
            .borderRadius(4)
            .fontSize(14)
            .padding({ left: 12, right: 12, top: 6, bottom: 6 })
            .fontColor('#FFFFFF');
        }
        .width('100%')
        .justifyContent(FlexAlign.SpaceBetween)
        .alignItems(VerticalAlign.Center)
        .padding({ left: 16, right: 16, top: 8, bottom: 8 })

        Divider().color('#EEEEEE').strokeWidth(1)

        // 第二行:状态信息
        Row() {
          Text() {
            Span('当前角色: ')
            Span('默认助手')
            Span(' | ')
            Span('当前模型: ')
            Span('deepseek-ai/DeepSeek-R1')
          }
          .fontSize(12)
          .fontColor('#007DFF')
        }
        .width('100%')
        .padding({ left: 16, top: 4, bottom: 4 })
      }
      .expandSafeArea(this.safeArea)
      .zIndex(this.layerIndex)
      .width('100%')
      .height(this.navBarHeight)
      .position({ top: 0, left: 0 })
      .backgroundColor('#FFFFFF');

      // ========== 层2:中间内容区 ==========
      Scroll() {
        Column() {
          // 头像
          Image($r('app.media.foreground'))
            .width(160)
            .height(160)
            .borderRadius(80)
            .margin({ top: 40 });

          // 欢迎标题
          Text('欢迎使用AI对话助手')
            .fontSize(28)
            .fontWeight(FontWeight.Bold)
            .margin({ top: 24 });

          // 欢迎描述
          Text('开始与AI助手对话吧!\n您可以提问任何问题,AI会尽力为您解答。')
            .fontSize(16)
            .fontColor('#666666')
            .textAlign(TextAlign.Center)
            .lineHeight(24)
            .margin({ top: 16, left: 40, right: 40 });

          // 角色说明
          Text('当前角色: 你是一个有用的AI助手,请用友好、专业的语气回答用户的问题。')
            .fontSize(14)
            .fontColor('#999999')
            .margin({ top: 24, left: 40, right: 40, bottom: 40 })
            .textAlign(TextAlign.Center);
        }
        .width('100%')
      }
      .width('100%')
      .height('100%')
      .margin({
        top: this.navBarHeight,
        bottom: this.inputAreaHeight
      })
      .backgroundColor('#F1F3F5');

      // ========== 层3:底部输入框 ==========
      Column() {
        Column() {
          // 输入框占位符/区域
          TextInput({ placeholder: '输入您的问题...' })
            .width('100%')
            .height(60)
            .placeholderColor('#999999')
            .backgroundColor(Color.Transparent)
            .fontSize(18);

          // 功能按钮行
          Row() {
            // 联网搜索按钮
            Row() {
              Text('🔍 联网搜索')
                .fontSize(14)
                .fontColor('#333333')
            }
            .backgroundColor(Color.White)
            .border({ width: 1, color: '#EEEEEE' })
            .borderRadius(20)
            .padding({ left: 12, right: 12, top: 6, bottom: 6 });

            Blank();

            // 功能按钮
            Row() {
              Button('+')
                .fontSize(20)
                .fontColor('#666666')
                .backgroundColor('#F1F3F5')
                .width(40)
                .height(40)
                .borderRadius(20)
                .margin({ right: 12 });

              Button('↑')
                .fontSize(20)
                .fontColor('#666666')
                .backgroundColor('#F1F3F5')
                .width(40)
                .height(40)
                .borderRadius(20);
            }
          }
          .width('100%')
          .padding({ bottom: 12 });
        }
        .width('92%')
        .backgroundColor(Color.White)
        .borderRadius(24)
        .padding({ left: 20, right: 20, top: 12, bottom: 12 })
        .shadow({ radius: 10, color: '#10000000', offsetX: 0, offsetY: 4 });
      }
      .width('100%')
      .padding({ bottom: 20 })
      .position({ bottom: 0 });
    }
    .width('100%')
    .height('100%')
    .backgroundColor('#F1F3F5');
  }
  // ========== 监听键盘高度变化(核心逻辑) ==========
  aboutToAppear() {
    this.getUIContext().setKeyboardAvoidMode(KeyboardAvoidMode.RESIZE)
    // 监听键盘弹出/收起,更新键盘高度
    // 注意:inputMethod API可能不支持keyboardHeightChange事件
    // 暂时注释掉相关代码,避免编译错误
    // inputMethod.getController().on('keyboardHeightChange', (height: number) => {
    //   this.keyboardHeight = height;
    // });
  }

  // 页面销毁时移除监听,避免内存泄漏
  aboutToDisappear() {
    // inputMethod.getController().off('keyboardHeightChange');
  }
}
更多关于HarmonyOS鸿蒙Next中键盘弹出时顶部导航栏被顶出屏幕且输入框被遮挡导致布局异常的实战系列教程也可以访问 https://www.itying.com/category-93-b0.html

问题1,2你可以通过设置setKeyboardAvoidMode为KeyboardAvoidMode.RESIZE(压缩模式)解决,通常在页面aboutToAppear中设置:
aboutToAppear(): void {
  this.getUIContext().setKeyboardAvoidMode(KeyboardAvoidMode.RESIZE)
}
另外,你还可以给容器设置expandSafeArea属性,控制组件扩展其安全区域,达到使其不被安全区域遮挡的目的,详情可查看官方文档API:expandSafeArea官方文档介绍
其他情况可参考官方最佳实践:软键盘避让机制


在HarmonyOS Next中,键盘弹出时布局异常通常是由于窗口未正确适配软键盘。系统默认使用窗口能力(WindowStage)的avoidArea事件处理键盘区域,但若未设置合适的布局模式(如应用窗口模式设置为未指定或全屏),会导致导航栏被顶出。建议检查窗口配置,确保使用avoidArea监听并调整布局,或使用弹性布局(Flex)配合响应式设计。

这是一个在HarmonyOS Next应用开发中常见的、与键盘交互和布局适配相关的典型问题。问题的核心在于键盘弹出时,系统默认的“窗口内容避让”行为与您当前的布局结构产生了冲突。
问题根因分析
-
导航栏被顶出屏幕:当键盘弹出时,系统会尝试调整应用窗口的布局,以避免内容被键盘遮挡。在您的
Column布局中,Scroll组件设置了layoutWeight: 1,它会占据除导航栏外的所有剩余空间。系统进行“避让”调整时,可能会将整个Column的内容(包括导航栏)上推,导致导航栏移出可视区域。 -
输入框被遮挡:您对输入框使用了
position({ x: 0, y: '100%' })和translate({ x: 0, y: '-100%' })的组合来实现相对于Scroll底部的定位。然而,当键盘弹出、Scroll的布局区域被压缩时,这个定位的基准(Scroll的底部)发生了变化,但输入框的绝对位置可能没有及时、准确地跟随调整,导致其部分区域落入键盘下方。
解决方案建议
针对这两个问题,推荐采用 “固定导航栏 + 可滚动内容区自适应” 的布局模式,并结合 position 和 margin 的灵活运用,而不是完全依赖 translate。
方案:使用 Stack 作为根容器,明确分层
-
整体结构:
@Entry @Component struct YourPage { // 可以添加状态变量来响应键盘高度变化(如果需要更精细控制) build() { Stack({ alignContent: Alignment.TopStart }) { // 第一层:可滚动的主要内容区域 (位于底层) Scroll() { Column() { // 您页面的主要列表或内容 // ... // 在这里留出底部空间,用于放置“虚拟”的输入框占位符,防止最后的内容被遮挡 Blank() .height('输入框高度 + 安全间距') // 例如:60vp } } .width('100%') .height('100%') // 关键属性:设置Scroll避开系统安全区域(包括可能弹出的键盘区域) .avoidKeyboard(true) // 第二层:顶部固定导航栏 (覆盖在Scroll之上) Column() { // 您的导航栏内容 Text('导航栏').height(100).width('100%').backgroundColor(Color.Orange) } .width('100%') .height(100) .position({ x: 0, y: 0 }) // 固定在顶部 .zIndex(1) // 确保导航栏在滚动内容之上 // 第三层:底部固定输入栏 (覆盖在Scroll之上) Column() { // 您的输入框、按钮等 TextInput({ placeholder: '请输入...' }) Button('发送') } .width('100%') // 设置合适的背景色 .backgroundColor(Color.White) .position({ x: 0, y: '100%' }) // 先定位到容器底部 .margin({ bottom: 0 }) // 初始状态下,底部边距为0 .zIndex(1) // 确保输入栏在滚动内容之上 } .width('100%') .height('100%') } } -
关键点解析:
Stack分层:将导航栏和输入框通过Stack的层叠特性固定在屏幕的顶部和底部,使其脱离Scroll的滚动流。zIndex确保它们始终可见。Scroll.avoidKeyboard(true):这是HarmonyOS Next中处理键盘遮挡的核心API。设置后,Scroll组件会自动调整其内部布局,确保焦点输入项在键盘弹出时可见。它通过改变Scroll的布局区域来实现,而不是推挤整个窗口。- 底部输入框定位:使用
position({ x: 0, y: '100%' })将输入框的顶部对齐到Stack容器的底部。然后,通过后续的布局属性(如margin、offset或结合状态管理动态设置position的y值)来调整其最终位置。在初始状态或键盘未弹出时,可以设置margin({ bottom: 0 })使其紧贴屏幕底部。 Scroll内的占位Blank:在Scroll的内容末尾添加一个Blank组件,其高度等于输入框高度加安全间距。这可以确保当用户滚动到最底部时,最后一项内容不会被固定在底部的输入框遮挡。- 动态调整(进阶):如果
avoidKeyboard的默认行为仍不满足需求(例如需要更精确控制输入框与键盘的间距),可以监听键盘事件(通过window.on('keyboardHeightChange')),获取键盘高度,并动态更新输入框的margin({ bottom: keyboardHeight })或position的y值。
总结
优先使用 Scroll 组件的 avoidKeyboard(true) 属性来处理键盘弹出时的内容避让。同时,采用 Stack 将导航栏和输入框剥离出滚动流并固定。这种方法更符合HarmonyOS Next的布局推荐,能有效解决导航栏被顶出和输入框被遮挡的问题,代码也更清晰易维护。