


HarmonyOS鸿蒙Next开发相关的问题,求大佬求解一下
HarmonyOS鸿蒙Next开发相关的问题,求大佬求解一下 是这样的,就是我想实现一个通信功能,就是服务端发送三个数据,然后DevEco Studio写的代码可以接受这三个数据并且可以在UI画面显示出来,可是报错了,求大佬帮我一下谢谢!
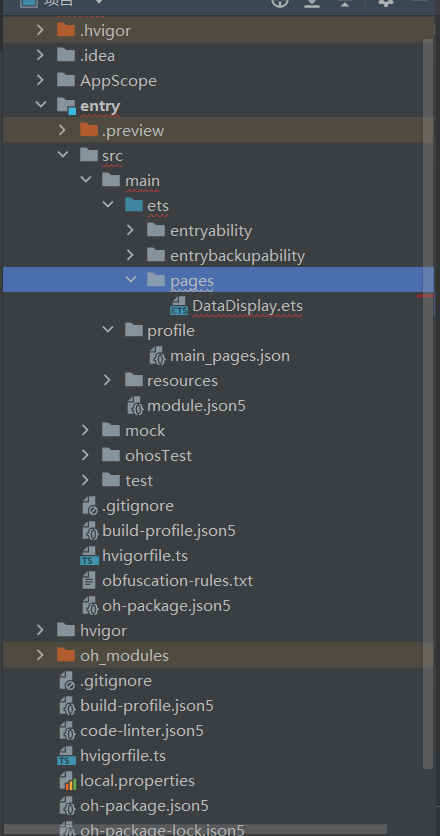
DataDispaly .ets
import http from '@ohos.net.http';
import promptAction from '@ohos.promptAction';
import time from'@ohos.timer'

@Entry
@Component
struct DataDisplay {
  // 定义状态变量存储服务端数据
  @State ox: string = "加载中...";
  @State heart: string = "加载中...";
  @State temperature: string = "加载中...";
  @State lastUpdated: string = "从未更新";
  @State isLoading: boolean = false;

  // 定时器ID
  private timerId: number = -1;
  // 刷新间隔(毫秒)
  private refreshInterval: number = 5000; // 5秒刷新一次

  // 页面显示时启动定时刷新
  onPageShow() {
    this.startAutoRefresh();
  }

  // 页面隐藏时停止定时刷新
  onPageHide() {
    this.stopAutoRefresh();
  }

  // 组件销毁时确保定时器已停止
  aboutToDisappear() {
    this.stopAutoRefresh();
  }

  // 启动自动刷新
  startAutoRefresh() {
    // 先停止可能存在的定时器
    this.stopAutoRefresh();

    // 立即获取一次数据
    this.fetchDataFromServer();

    // 设置定时器,定期获取数据
    this.timerId = timer.setInterval(() => {
      this.fetchDataFromServer();
    }, this.refreshInterval);
  }

  // 停止自动刷新
  stopAutoRefresh() {
    if (this.timerId !== -1) {
      timer.clearInterval(this.timerId);
      this.timerId = -1;
    }
  }

  // 从服务端获取数据
  fetchDataFromServer() {
    if (this.isLoading) {
      return; // 如果正在加载,不重复请求
    }

    this.isLoading = true;
    let httpRequest = http.createHttp();

    // 服务端API地址,使用8081端口
    const url = 'http://localhost:8081?ox=111&heart=323&temperature=211232';

    httpRequest.request(
      url,
      {
        method: http.RequestMethod.GET,
        header: {
          'Content-Type': 'application/json'
        }
      },
      (err, data) => {
        this.isLoading = false;
        httpRequest.destroy(); // 销毁请求,释放资源

        // 处理错误
        if (err) {
          console.error(`请求错误: ${JSON.stringify(err)}`);
          promptAction.showToast({
            message: '获取数据失败',
            duration: 2000
          });
          return;
        }

        // 处理响应数据
        if (data.result) {
          try {
            // 解析服务端返回的JSON数据
            const response = JSON.parse(data.result as string);

            // 更新UI数据 - 假设服务端返回的数据结构包含这三个字段
            // 如果服务端直接返回这三个参数,可以直接解析
            this.ox = response.ox || response.received?.ox || "未知";
            this.heart = response.heart || response.received?.heart || "未知";
            this.temperature = response.temperature || response.received?.temperature || "未知";

            // 更新最后更新时间
            const now = new Date();
            this.lastUpdated = `最后更新: ${now.toTimeString().slice(0, 8)}`;

            console.log('数据更新成功');
          } catch (parseError) {
            console.error(`解析数据错误: ${parseError}`);
            promptAction.showToast({
              message: '解析数据失败',
              duration: 2000
            });
          }
        } else {
          promptAction.showToast({
            message: '未收到有效数据',
            duration: 2000
          });
        }
      }
    );
  }

  build() {
    Column({ space: 20 }) {
      Text('实时生理数据监测')
        .fontSize(24)
        .fontWeight(FontWeight.Bold)
        .margin({ top: 30 });

      Text(this.lastUpdated)
        .fontSize(14)
        .fontColor('#666666');

      // 数据卡片容器
      Column({ space: 15 }) {
        // 血氧数据卡片
        DataCard({
          title: '血氧值',
          value: this.ox,
          unit: 'mmHg',
          icon: 'oxygen'
        })

        // 心率数据卡片
        DataCard({
          title: '心率',
          value: this.heart,
          unit: '次/分',
          icon: 'heart'
        })

        // 体温数据卡片
        DataCard({
          title: '体温',
          value: this.temperature,
          unit: '°C',
          icon: 'temperature'
        })
      }
      .width('90%')
      .margin({ top: 20 })

      // 控制按钮
      Row({ space: 15 }) {
        Button(this.isLoading ? '加载中...' : '立即刷新')
          .width(150)
          .onClick(() => this.fetchDataFromServer())
          .enabled(!this.isLoading)

        Button(this.timerId === -1 ? '启动自动刷新' : '停止自动刷新')
          .width(150)
          .backgroundColor(this.timerId === -1 ? '#007AFF' : '#F53F3F')
          .onClick(() => {
            if (this.timerId === -1) {
              this.startAutoRefresh();
              promptAction.showToast({ message: '已启动自动刷新' });
            } else {
              this.stopAutoRefresh();
              promptAction.showToast({ message: '已停止自动刷新' });
            }
          })
      }
      .margin({ top: 30 })
    }
    .width('100%')
    .height('100%')
    .backgroundColor('#F5F5F5')
  }
}

// 数据卡片组件
@Component
struct DataCard {
  @Prop title: string;
  @Prop value: string;
  @Prop unit: string;
  @Prop icon: string;

  build() {
    Column() {
      Text(this.title)
        .fontSize(16)
        .fontColor('#666666')
        .margin({ bottom: 5 })

      Row({ space: 5 }) {
        Text(this.value)
          .fontSize(28)
          .fontWeight(FontWeight.Bold)

        Text(this.unit)
          .fontSize(18)
          .fontColor('#666666')
          .alignSelf(VerticalAlign.Bottom)
          .margin({ bottom: 4 })
      }
    }
    .width('100%')
    .padding(20)
    .backgroundColor('#FFFFFF')
    .borderRadius(15)
    .shadow({ radius: 6, color: '#00000010', offsetX: 0, offsetY: 2 })
  }
}
module.json5
{
  "module": {
    "name": "entry",
    "type": "entry",
    "description": "$string:module_desc",
    "mainElement": "EntryAbility",
    "deviceTypes": [
      "phone"
    ],
    "deliveryWithInstall": true,
    "installationFree": false,
    "pages": "$profile:main_pages",
    "requestPermissions": [
      {
        "name": "ohos.permission.INTERNET"  // 网络权限
      }
    ],
    "abilities": [
      {
        "name": "EntryAbility",
        "srcEntry": "./ets/entryability/EntryAbility.ets",
        "description": "$string:EntryAbility_desc",
        "icon": "$media:layered_image",
        "label": "$string:EntryAbility_label",
        "startWindowIcon": "$media:startIcon",
        "startWindowBackground": "$color:start_window_background",
        "exported": true,
        "skills": [
          {
            "entities": [
              "entity.system.home"
            ],
            "actions": [
              "ohos.want.action.home"
            ]
          }
        ]
      }
    ]
  }
}
main_pages.json
{
  "src": [
    "pages/DataDisplay"
  ]
}
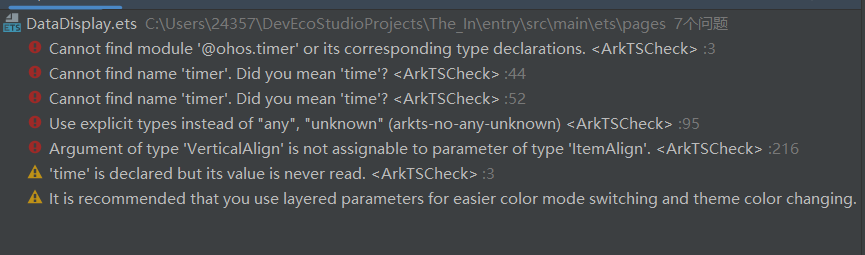
只有dataDisplay这个文件出错了,其他的没有
更多关于HarmonyOS鸿蒙Next开发相关的问题,求大佬求解一下的实战教程也可以访问 https://www.itying.com/category-93-b0.html

import time from’@ohos.timer’ - 报错中说没有这个模块,删掉。
要用定时器的话,直接用
const intervalId:number = setInterval(() => { //… }, 1000);
更多关于HarmonyOS鸿蒙Next开发相关的问题,求大佬求解一下的实战系列教程也可以访问 https://www.itying.com/category-93-b0.html

鸿蒙Next基于ArkTS开发,使用ArkUI框架构建界面。开发需安装DevEco Studio 4.0及以上版本,并配置HarmonyOS SDK。应用开发主要涉及声明式UI、状态管理等核心概念,通过Stage模型进行应用架构设计。

根据你提供的截图和代码,问题出在 DataDisplay.ets 文件中的 import 语句和 timer 对象的使用上。
主要错误原因:
- 导入语句错误:
import time from '@ohos.timer'的写法不正确。在 HarmonyOS Next 的 ArkTS 中,@ohos.timer模块的 API 是直接导出的,不需要from关键字。 - timer 对象未定义:由于导入方式错误,导致代码中使用的
timer.setInterval和timer.clearInterval中的timer对象未被正确识别,因此编译器报错“找不到名称 ‘timer’”。
解决方案:
修改 DataDisplay.ets 文件顶部的导入语句,并调整 timer 的调用方式。
步骤 1:修正导入语句 将:
import time from '@ohos.timer'
修改为:
import timer from '@ohos.timer'
或者,由于你只使用了 timer 的 setInterval 和 clearInterval 方法,也可以使用解构导入(更推荐):
import { setInterval, clearInterval } from '@ohos.timer';
步骤 2:修正 timer 调用方式
根据你选择的导入方式,调整代码中 timer 的调用。
-
如果你使用
import timer from '@ohos.timer': 代码中的timer.setInterval和timer.clearInterval保持不变即可。 -
如果你使用解构导入
import { setInterval, clearInterval } from '@ohos.timer': 需要将代码中所有timer.setInterval改为setInterval,所有timer.clearInterval改为clearInterval。
修改后的代码示例(使用解构导入):
import http from '@ohos.net.http';
import promptAction from '@ohos.promptAction';
// 修正导入语句
import { setInterval, clearInterval } from '@ohos.timer';

@Entry
@Component
struct DataDisplay {
  // ... 其他状态变量保持不变 ...

  // 启动自动刷新
  startAutoRefresh() {
    this.stopAutoRefresh();
    this.fetchDataFromServer();
    // 使用直接导入的 setInterval
    this.timerId = setInterval(() => {
      this.fetchDataFromServer();
    }, this.refreshInterval);
  }

  // 停止自动刷新
  stopAutoRefresh() {
    if (this.timerId !== -1) {
      // 使用直接导入的 clearInterval
      clearInterval(this.timerId);
      this.timerId = -1;
    }
  }

  // ... fetchDataFromServer 和 build 方法保持不变 ...
}
完成以上修改后,timer API 的导入和使用就符合 HarmonyOS Next 的 ArkTS 规范了,相关的编译错误应该会消失。你的网络请求和UI更新逻辑本身没有明显问题,修正导入语句后即可正常运行。