


HarmonyOS鸿蒙Next中在线CAD二开实现箭头引注和多重引线标注
HarmonyOS鸿蒙Next中在线CAD二开实现箭头引注和多重引线标注
前言
本章介绍如何利用 mxcad 插件实现在 CAD 图纸中箭头引注的功能,该功能中用户点击画布确定箭头起点,再次连续点击画布确定箭头引线顶点及终点位置。
用户可自定义选择箭头形状,上标文字和下标文字内容,还可以根据绘制需求修改文字位置等,帮助用户快速标注图纸内容,增加图纸内容的完整性和可读性。
功能实现
1.实现自定义箭头引注类
为了方便后期管理与修改标注,我们可以通过继承[McDbCustomEntity]自定义实体类来扩展实现自定义箭头引注类,然后我们可以利用[McDbMText]或[McDbText]构造测量信息多文本对象,将标注信息绘制在页面中。
下面示例的箭头引注类中我们提供了箭头、点、十字、半箭头等箭头样式,以及上下标文字在线端、齐线中、齐线端等对齐方式,用户可参考下面的示例代码根据自身项目需求进行二次开发,为方便管理我们将箭头样式和文字对齐方式设置为枚举对象,代码如下:
// 箭头样式
enum arrowType {
  // 箭头
  arrow,
  // 半箭头
  halfArrow,
  // 点
  point,
  // 十字
  cross,
  // 无
  none
}
// 文字对齐方式
export enum alginType {
  // 始端
  start,
  // 中间
  middle,
  // 末端
  end
}
箭头引注自定义实体代码如下,下面示例只作参考,用户可根据自身需求修改, 代码如下:
class McDbTestArrowCitation extends McDbCustomEntity {
    // 定义McDbTestConMeasurement内部的点对象
    // 箭头线点数组
    private points: McGePoint3d[] = [];
    // 文字点位置集合
    private positionArr: McGePoint3d[] = [];
    // 文字高度
    private height: number = 0;
    // 上标文字内容
    private _textUp: string = "";
    // 下标文字内容
    private _textDown: string = "";
    // 箭头样式
    private _arrowType: number = arrowType.arrow;
    // 对齐方式
    private _alginType: number = alginType.start;
    // 记录初始长度
    private arrowLength: number = MxFun.viewCoordLong2Cad(20);;
    // 文字旋转角度
    private angle: number = 0;
    // 构造函数
    constructor(imp?: any) {
        super(imp);
    }
    // 创建函数
    public create(imp: any) {
        return new McDbTestArrowCitation(imp)
    }
    // 获取类名
    public getTypeName(): string {
        return "McDbTestArrowCitation";
    }
    //设置或获取文本字高
    public set textHeight(val: number) {
        this.height = val;
    }
    public get textHeight(): number {
        return this.height;
    }
    //设置或获取上标文本
    public set textUp(val: string) {
        this._textUp = val;
    }
    public get textUp(): string {
        return this._textUp;
    }
    //设置或获取下标文本
    public set textDown(val: string) {
        this._textDown = val;
    }
    public get textDown(): string {
        return this._textDown;
    }
    //设置或获取箭头样式
    public set arrowType(val: number) {
        this._arrowType = val;
    }
    public get arrowType(): number {
        return this._arrowType;
    }
    //设置或获取对齐样式
    public set alginType(val: number) {
        this._alginType = val;
    }
    public get alginType(): number {
        return this._alginType;
    }
    // 读取自定义实体数据
    public dwgInFields(filter: IMcDbDwgFiler): boolean {
        this.points = filter.readPoints("points").val;
        this.positionArr = filter.readPoints("positionArr").val;
        this._textDown = filter.readString("textDown").val;
        this._textUp = filter.readString("textUp").val;
        this._arrowType = filter.readLong("arrowType").val;
        this._alginType = filter.readLong("alginType").val;
        this.arrowLength = filter.readLong("arrowLength").val;
        this.angle = filter.readDouble("angle").val;
        this.height = filter.readDouble("height").val;
        return true;
    }
    // 写入自定义实体数据
    public dwgOutFields(filter: IMcDbDwgFiler): boolean {
        filter.writePoints("points", this.points);
        filter.writePoints("positionArr", this.positionArr);
        filter.writeString("textDown", this._textDown);
        filter.writeString("textUp", this._textUp);
        filter.writeLong("arrowType", this._arrowType);
        filter.writeLong("alginType", this._alginType);
        filter.writeLong("arrowLength", this.arrowLength);
        filter.writeDouble("angle", this.angle);
        filter.writeDouble("height", this.height);
        return true;
    }
    // 移动自定义对象的夹点
    public moveGripPointsAt(iIndex: number, dXOffset: number, dYOffset: number, dZOffset: number) {
        this.assertWrite();
        const length = this.points.length
        if (iIndex <= length - 1) {
            this.points[iIndex].x += dXOffset;
            this.points[iIndex].y += dYOffset;
            this.points[iIndex].z += dZOffset;
        }
        if (iIndex === length - 1) {
            this.positionArr.forEach(position => {
                position.x += dXOffset;
                position.y += dYOffset;
                position.z += dZOffset;
            });
            this.reCountData();
        };
        if (iIndex > length - 1) {
            this.positionArr.forEach((position, index) => {
                if (iIndex - length === index) {
                    position.x += dXOffset;
                    position.y += dYOffset;
                    position.z += dZOffset;
                }
            });
        }
    };
    // 获取自定义对象的夹点
    public getGripPoints(): McGePoint3dArray {
        let ret = new McGePoint3dArray()
        this.points.forEach(pt => {
            ret.append(pt)
        });
        this.positionArr.forEach(pt => {
            ret.append(pt);
        })
        return ret;
    };
    // 画箭头
    private drawArrow(): McDbEntity[] {
        const pt1 = this.points[0];
        const pt2 = this.points[1];
        if (this._arrowType === arrowType.arrow || this._arrowType === arrowType.halfArrow) {
            const vec = pt2.sub(pt1).normalize().mult(this.arrowLength);
            const pt = pt1.clone().addvec(vec);
            const _vec = vec.clone().rotateBy(Math.PI / 2).normalize().mult(this.arrowLength / 8);
            const pt3 = pt.clone().addvec(_vec);
            const pt4 = pt.clone().subvec(_vec);
            const solid = new McDbHatch();
            this._arrowType === arrowType.arrow ? solid.appendLoop(new McGePoint3dArray([pt1, pt3, pt4])) : solid.appendLoop(new McGePoint3dArray([pt1, pt3, pt]));
            return [solid]
        }else if(this._arrowType === arrowType.point){
            const solid = new McDbHatch();
            solid.appendCircleLoop(pt1.x,pt1.y,this.arrowLength/3);
            return [solid]
        }else if(this._arrowType === arrowType.cross){
            const point1 = pt1.clone().addvec(McGeVector3d.kXAxis.normalize().mult(this.arrowLength/2));
            const point2 = pt1.clone().subvec(McGeVector3d.kXAxis.normalize().mult(this.arrowLength/2));
            const point3 = pt1.clone().addvec(McGeVector3d.kYAxis.normalize().mult(this.arrowLength/2));
            const point4 = pt1.clone().subvec(McGeVector3d.kYAxis.normalize().mult(this.arrowLength/2));
            const line1 = new McDbLine(point1,point2);
            const line2 = new McDbLine(point3, point4);
            return [line1,line2]
        }
    }
    // 画文字
    private drawText(): McDbEntity[] {
        const textArr = [];
        const textUp = new McDbText();
        textUp.height = this.height;
        textUp.textString = this._textUp;
        textUp.position = textUp.alignmentPoint = this.positionArr[0];
        textUp.horizontalMode = McDb.TextHorzMode.kTextLeft;
        textUp.rotate(this.positionArr[0], this.angle);
        if (this._alginType === alginType.middle || this._alginType === alginType.end) {
            const textDown = new McDbMText()
            textDown.contents = this._textDown;
            textDown.location = this.positionArr[1];
            textDown.textHeight = this.height;
            textDown.attachment = McDb.AttachmentPoint.kTopCenter;
            textDown.rotate(this.positionArr[1], this.angle);
            if (this._alginType === alginType.middle) {
                textUp.horizontalMode = McDb.TextHorzMode.kTextMid;
            }
            if (this._alginType === alginType.end) {
                textDown.attachment = McDb.AttachmentPoint.kTopLeft;
            }
            textArr.push(textDown);
        }
        textArr.push(textUp);
        return textArr
    }
    // 绘制实体
    public worldDraw(draw: MxCADWorldDraw): void {
        // 画多段线
        const pl = new McDbPolyline();
        this.points.forEach((pt) => {
            pl.addVertexAt(pt);
        });
        draw.drawEntity(pl);
        // 画箭头
        if(this._arrowType !== arrowType.none && this.points.length > 1){
            const arrowArr = this.drawArrow();
            arrowArr.forEach( arrow =>{
                draw.drawEntity(arrow)
            })
        }
        if (this.points.length > 1) {
            // 画标注
            const textArr = this.drawText();
            textArr.forEach(text => {
                draw.drawEntity(text)
            })
        }
    }
    private reCountData() {
        const length = this.points.length;
        // 获取最后一段直线的方向与旋转角度
        if (length > 1) {
            const pt1 = this.points[length - 2];
            const pt2 = this.points[length - 1];
            if (!this.height) {
                this.height = this.arrowLength*(2/3);
            };
            const vec = pt2.sub(pt1).normalize().mult(this.height / 2);
            const _vec = vec.clone().rotateBy(Math.PI / 2).normalize().mult(this.height / 2);
            this.angle = vec.angleTo2(McGeVector3d.kXAxis, McGeVector3d.kNegateZAxis);
            if (Math.PI * (3 / 2) > this.angle && this.angle > Math.PI / 2) {
                this.angle += Math.PI;
                _vec.negate();
            }
            if (this._alginType === alginType.start) {
                // 在线端,只有上标文字
                const position = pt2.clone().addvec(vec).subvec(_vec);
                this.positionArr[0] = position;
            } else if (this._alginType === alginType.middle) {
                // 齐线中,上下标文字居中
                const distance = pt1.distanceTo(pt2);
                const midPt = pt1.clone().addvec(vec.normalize().mult(distance / 2))
                this.positionArr[1] = midPt.clone().subvec(_vec);
                this.positionArr[0] = midPt.clone().addvec(_vec);
            } else if (this._alginType === alginType.end) {
                // 齐线端,上下标文字在末尾
                this.positionArr[1] = pt2.clone().addvec(vec).subvec(_vec);
                this.positionArr[0] = pt2.clone().addvec(vec).addvec(_vec);
            }
        }
    }
    // 添加顶点
    public addVertex(pt: McGePoint3d) {
        this.assertWrite();
        this.points.push(pt);
        this.reCountData();
    }
    // 获取顶点数组
    public getPoints() {
        return this.points;
    }
};
2. 注册自定义类信息
运行代码:
new McDbTestArrowCitation().rxInit();
3.调用McDbTestArrowCitation自定义箭头引注类
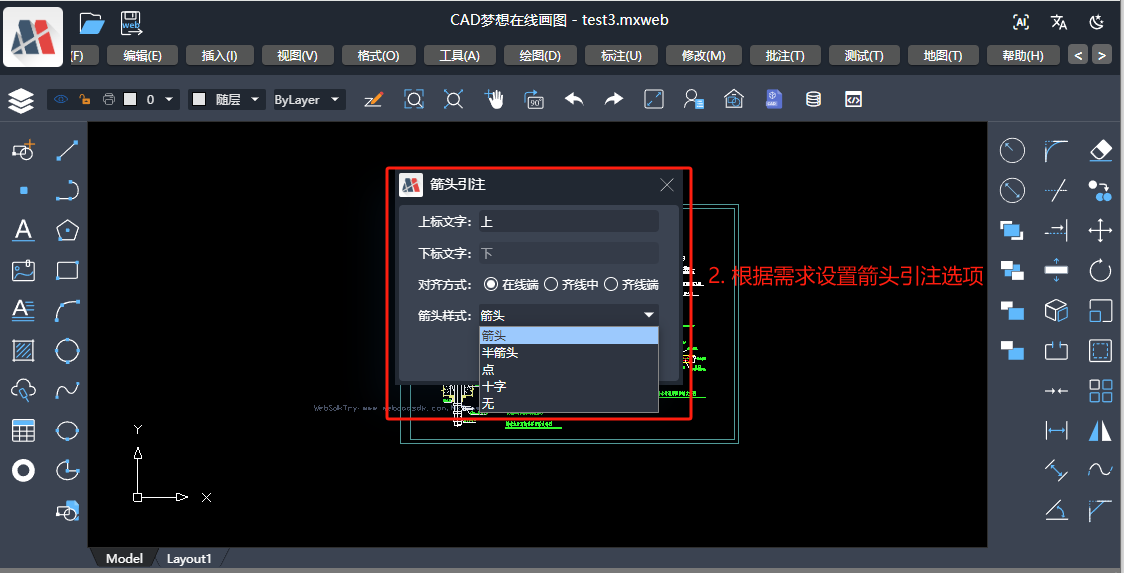
3.1设置箭头样式,上下标文字内容及对齐方式
我们可以利用[MxCADUiPrString()]根据根据用户输入得到上下标文字内容,或者通过其他方式直接赋值。选择箭头样式或对齐方式时,我们可以通过[MxCADUiPrKeyWord()]根据用户选择的关键词来设置相应操作,代码如下:
// 设置箭头样式
const getArrowStyle = new MxCADUiPrKeyWord()
getArrowStyle.setMessage("请选着箭头样式:")
getArrowStyle.setKeyWords("[箭头(A)/半箭头(HA)/点(P)/十字(C)/无(N)]")
let arrowStyle = await getArrowStyle.go();
// 转换arrowStyle的值
switch (arrowStyle) {
    case 'A':
        arrowStyle = arrowType.arrow;
    case 'HA':
        arrowStyle = arrowType.halfArrow;
    case 'P':
        arrowStyle = arrowType.point;
    case 'C':
        arrowStyle = arrowType.cross;
    case 'N':
        arrowStyle = arrowType.none;
    default:
        arrowStyle = arrowType.arrow;
}
// 设置对齐方式
const getAlignType = new MxCADUiPrKeyWord()
getAlignType.setMessage("请选择上下标文字对齐方式:")
getAlignType.setKeyWords("[在线端(S)/齐线中(M)/齐线端(E)]")
let alignType = await getAlignType.go();
// 转换alignType的值
switch (alignType) {
    case 'S':
        alginType = alginType.start;
    case 'M':
        alginType = alginType.middle;
    case 'E':
        alginType = alginType.end;
    default:
        alginType = alginType.start;
}
/**
 设置上下标文字
 在线端只能设置上标文字
 */
const getStrUp = new MxCADUiPrString();
getStrUp.setMessage('请设置上标文字内容:');
let strUp = await getStrUp.go();
if (!strUp) strUp = "上";
let strDown = "";
if(alignType === "M" || alignType === "R"){
  const getStrDown = new MxCADUiPrString();
  getStrDown.setMessage('请设置下标文字内容:');
  strDown = await getStrDown.go();
  if (!strDown) strDown = "下";
}
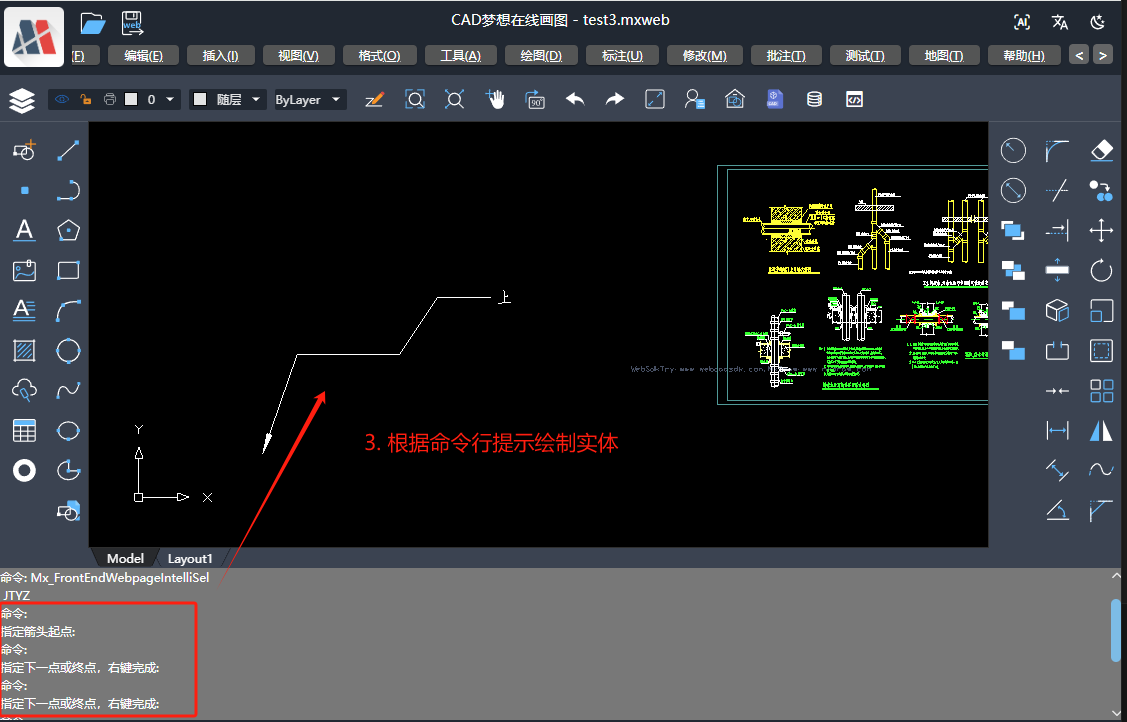
3.2. 获取箭头起点,及引线顶点
我们可以利用取点对象[MxCADUiPrPoint]连续取点来获取箭头起点和引线的各个顶点。结合上述步骤中获取的箭头引注的信息,构造新的箭头引注对象,并动态绘制方便用户观察,代码如下:
const arrowCiatat = new McDbTestArrowCitation();
arrowCiatat.textUp = strUp;
arrowCiatat.textDown = strDown;
arrowCiatat.arrowType = arrowStyle;
arrowCiatat.alginType = alginType;
const getPoint = new MxCADUiPrPoint();
getPoint.setMessage('指定箭头起点:');
const point = await getPoint.go();
if (!point) return;
arrowCiatat.addVertex(point);
while (true) {
  const getPt = new MxCADUiPrPoint();
  getPt.setMessage('指定下一点或终点,右键完成');
  getPt.setUserDraw((pt, pw) => {
   const _clone = arrowCiatat.clone() as McDbTestArrowCitation;
   _clone.addVertex(pt);
   pw.drawMcDbEntity(_clone)
  })
  const pt = await getPt.go();
  if (!pt) break;
  arrowCiatat.addVertex(pt);
}
const mxcad = MxCpp.getCurrentMxCAD();
mxcad.drawEntity(arrowCiatat);
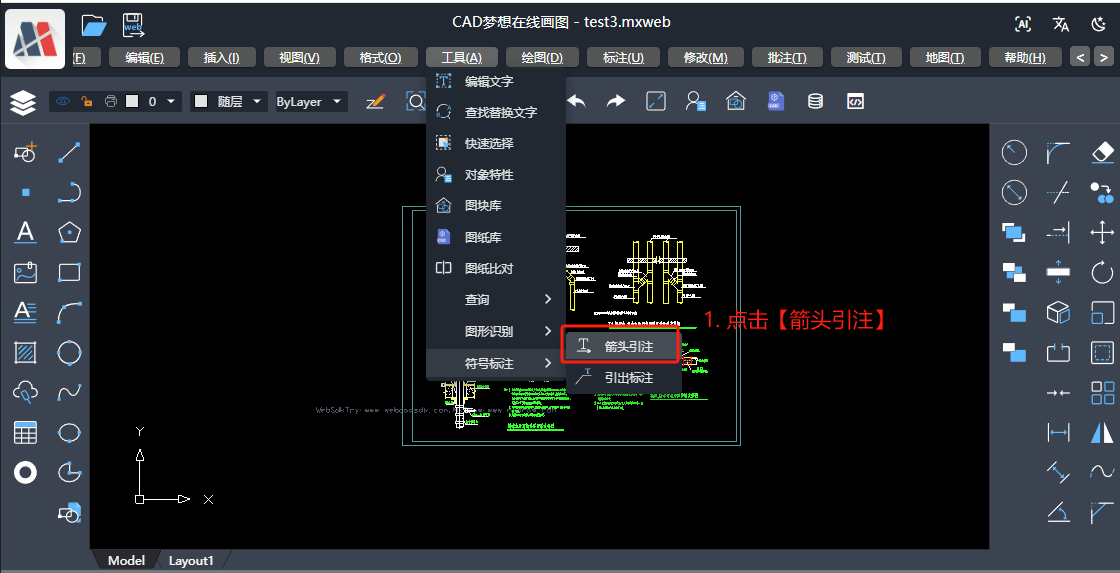
功能实践
在线示例demo:https://demo.mxdraw3d.com:3000/mxcad/,操作流程如下图:
更多关于HarmonyOS鸿蒙Next中在线CAD二开实现箭头引注和多重引线标注的实战教程也可以访问 https://www.itying.com/category-93-b0.html

在HarmonyOS Next中实现在线CAD的箭头引注和多重引线标注,需使用ArkTS/ArkUI进行Canvas 2D绘制。通过定义路径(Path2D)绘制箭头形状,结合文本绘制实现引注。多重引线标注需管理多个引线节点,使用贝塞尔曲线(bezierCurveTo)连接。坐标计算基于Canvas上下文,通过触摸事件获取标注点位置。
更多关于HarmonyOS鸿蒙Next中在线CAD二开实现箭头引注和多重引线标注的实战系列教程也可以访问 https://www.itying.com/category-93-b0.html

在HarmonyOS Next中实现CAD二开的箭头引注和多重引线标注,核心在于利用mxcad插件的自定义实体能力。通过继承McDbCustomEntity类,可以创建灵活的自定义标注实体,支持多种箭头样式(箭头、半箭头、点、十字等)和文字对齐方式(在线端、齐线中、齐线端)。
关键步骤包括:
- 定义自定义实体类:封装箭头引注的几何数据(点数组、文字位置、箭头样式等),并实现
worldDraw方法进行绘制。 - 序列化支持:通过
dwgInFields和dwgOutFields方法实现数据的读写,确保标注可保存和加载。 - 交互绘制:结合
MxCADUiPrPoint等交互工具,实现用户点击画布动态绘制引线,并通过setUserDraw提供实时预览。 - 样式定制:利用枚举管理箭头样式和对齐方式,通过
MxCADUiPrKeyWord等让用户选择参数。
该方案充分利用了mxcad的扩展性,在HarmonyOS Next的ArkTS环境中可稳定运行,适合需要高定制化的CAD标注场景。