


HarmonyOS鸿蒙Next中如何实现长按后拖动组件
HarmonyOS鸿蒙Next中如何实现长按后拖动组件
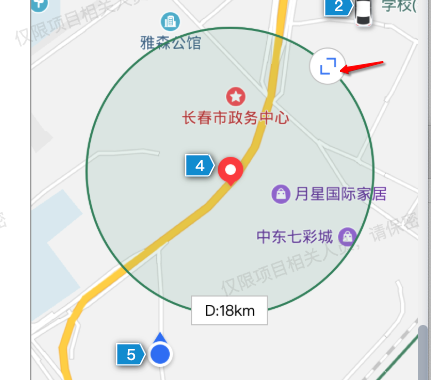
RelativeContainer里放了地图, 这个绿圈,还有拖拽那个图标,还有下面那个显示直径的。
拖拽那个图标和显示直径都是相对于,绿圈来定位的。如何实现在长按拖动这个拖拽图标,来改变绿圈的宽高。
代码大致如下
build() {
  RelativeContainer() {
    // 纯地图组件高德的
    CommonMapView()
      .width('100%')
      .height('100%')
      .onAreaChange((oldValue: Area, newValue: Area) => {
        this.area = newValue
      })
      .id('mapView')

    // 一个系统的圈或者系统的矩形
    if (this.geoFenceInfo?.shape === GeoFenceShape.CIRCLE) {
      Circle()
        .width(this.circleWH)
        .height(this.circleWH)
        .stroke(this.getStrokeColor())
        .strokeWidth(px2vp(8))
        .fill(this.getFillColor())
        .id('showShapeCircle')
        .alignRules({
          center: { anchor: "mapView", align: VerticalAlign.Center },
          middle: { anchor: "mapView", align: HorizontalAlign.Center },
        })
        .onAreaChange((oldValue, newValue) => {
          this.screenCircleArea = newValue
        })
    } else {

      Rect()
        .width(this.rectangleW)
        .height(this.rectangleH)
        .stroke(this.getStrokeColor())
        .strokeWidth(px2vp(8))
        .fill(this.getFillColor())
        .id('showShapeRectangle')
        .alignRules({
          center: { anchor: "mapView", align: VerticalAlign.Center },
          middle: { anchor: "mapView", align: HorizontalAlign.Center },
        })
    }

    // 中心Marker
    Image($r('app.media.ic_vc_geo_fence_center'))
      .objectFit(ImageFit.None)
      .width(32)
      .height(36)
      .id('showShapeCenterMarker')
      .alignRules({
        center: {
          anchor: this.geoFenceInfo?.shape === GeoFenceShape.CIRCLE ? 'showShapeCircle' : 'showShapeRectangle',
          align: VerticalAlign.Center
        },
        middle: {
          anchor: this.geoFenceInfo?.shape === GeoFenceShape.CIRCLE ? 'showShapeCircle' : 'showShapeRectangle',
          align: HorizontalAlign.Center
        },
      })

    // 右上角的拖动缩放
    Image($r('app.media.ic_vc_geo_size_edit'))
      .objectFit(ImageFit.None)
      .width(this.sizeEditIconWH)
      .height(this.sizeEditIconWH)
      .id('showShapeDrag')
      .alignRules({
        top: {
          anchor: this.geoFenceInfo?.shape === GeoFenceShape.CIRCLE ? 'showShapeCircle' : 'showShapeRectangle',
          align: VerticalAlign.Top
        },
        right: {
          anchor: this.geoFenceInfo?.shape === GeoFenceShape.CIRCLE ? 'showShapeCircle' : 'showShapeRectangle',
          align: HorizontalAlign.End
        },
      })
      .offset({
        x: this.geoFenceInfo?.shape === GeoFenceShape.CIRCLE ?
          -(Number(this.screenCircleArea?.width ?? 0) * 0.425 / 4) + this.sizeEditIconWH * 0.5 :
          this.sizeEditIconWH * 0.5,
        y: this.geoFenceInfo?.shape === GeoFenceShape.CIRCLE ?
          Number(this.screenCircleArea?.width ?? 0) * 0.425 / 4 - this.sizeEditIconWH * 0.5 :
          -this.sizeEditIconWH * 0.5,
      })
      .gesture(
            //这里的代码好像有问题,应该用手指组,但是加了长按手势后一直走cancel
          PanGesture({ fingers: 1 })
            .onActionStart((_event) => {

            })
            .onActionUpdate(event => {
              animateTo({ curve: curves.interpolatingSpring(0, 1, 400, 38) }, () => {
                console.log(`offsetX: ${event.offsetX}, offsetY: ${event.offsetY}`)
                if (this.geoFenceInfo?.shape === GeoFenceShape.CIRCLE) {
                  let offsetDistance = Math.min(event.offsetX, event.offsetY)
                  this.circleWH = Math.max(this.circleWH + offsetDistance, 0);
                } else {
                  this.rectangleW = Math.max(this.rectangleW + event.offsetX, 0);
                  this.rectangleH = Math.max(this.rectangleH + event.offsetY, 0);

                }
                this.handleChange()
              })
            })
            .onActionEnd(() => {


              this.reset()
            })

      )


    // 中心下文的直径或者宽高显示
    Text(this.getSizeTagText())
      .fontSize(14)
      .fontColor($r('app.color.color_000000'))
      .borderWidth(1)
      .borderColor($r('app.color.color_CCCCCC'))
      .backgroundColor($r('app.color.color_FFFFFF'))
      .padding({
        left: 12,
        top: 4,
        right: 12,
        bottom: 4
      })
      .onAreaChange((oldValue, newValue) => {
        this.sizeTagArea = newValue
      })
      .alignRules({
        bottom: {
          anchor: this.geoFenceInfo?.shape === GeoFenceShape.CIRCLE ? 'showShapeCircle' : 'showShapeRectangle',
          align: VerticalAlign.Bottom
        },
        middle: {
          anchor: this.geoFenceInfo?.shape === GeoFenceShape.CIRCLE ? 'showShapeCircle' : 'showShapeRectangle',
          align: HorizontalAlign.Center
        },
      })
      .offset({ x: 0, y: (Number(this.sizeTagArea?.height ?? 0) * 0.5) })

  }
}
更多关于HarmonyOS鸿蒙Next中如何实现长按后拖动组件的实战教程也可以访问 https://www.itying.com/category-93-b0.html

【背景知识】
组合手势:手势识别组合,即两种及以上手势组合为复合手势,支持顺序识别、并发识别和互斥识别。
【参考方案】
可参考组件拖拽移动及放大缩小示例,通过组合手势实现组件跟手拖拽移动效果,通过修改Grid的属性实现组件的放大缩小效果。
-
通过组合手势实现组件跟手拖拽移动效果,当组件移动到对应位置时刷新组件排列。
// 手势传出组件移动信息 .gesture( GestureGroup(GestureMode.Sequence, LongPressGesture({ repeat: true }) .onAction((event?: GestureEvent) => { if (this.selectedItem === undefined) { this.selectedItem = item // 记录起始位置 this.dragStartX = Number(event?.target.area.globalPosition.x) - item.width / 2 this.dragStartY = Number(event?.target.area.globalPosition.y) - item.height / 2 } }) ... PanGesture({ fingers: 1 }) ... .onActionUpdate(event => { // 记录偏移量 this.offsetY = event.offsetY this.offsetX = event.offsetX this.getUIContext().animateTo({ curve: curves.interpolatingSpring(0, 1, 400, 38) }, () => { this.handleDrag() // 处理拖拽函数 }) }) ... }) ) ... // 将组件移动到首位,刷新组件排列 let tmp = this.gridItems.splice(index, 1) this.gridItems.splice(0, 0, tmp[0]) this.positionMode = PositionMode.COLUMNS this.setRowsColumns() -
通过修改组件的宽高,同步修改Grid的rowsTemplate以及columnsTemplate参数,实现组件的放大缩小效果。
// 修改第一、二行的高度
this.columnsFirstHeightTmp = this.columnsFirstHeight + this.offsetY
this.columnsSecondHeightTmp = this.columnsSecondHeight - this.offsetY
...
// 同步修改grid的rowsTemplate以及columnsTemplate参数
this.rowsT = this.columnsFirstHeightTmp + 'fr ' + this.columnsSecondHeightTmp + 'fr ' +
  (this.fullHeightTmp - this.columnsFirstHeightTmp - this.columnsSecondHeightTmp) + 'fr'
this.columnsT = '1fr'
更多关于HarmonyOS鸿蒙Next中如何实现长按后拖动组件的实战系列教程也可以访问 https://www.itying.com/category-93-b0.html

实现长按拖动调整组件尺寸的功能,需要结合手势识别与动态布局更新。
优化步骤
1/使用组合手势替代单独PanGesture:
.gesture(
  GestureGroup(
    GesturePriority.Low,
    LongPressGesture({ repeat: true })
      .onAction(() => {
        console.log('LongPress triggered')
      }),
    PanGesture({ fingers: 1, distance: 5 })
      .onActionUpdate(event => {
        // 处理拖动逻辑
      })
  )
)
2/ 动态尺寸计算
//记录初始尺寸
@State startWidth: number = 0
@State startHeight: number = 0

// 在onActionStart中初始化
.onActionStart(() => {
  this.startWidth = this.circleWH
  this.startHeight = this.circleWH
})
......

//增量计算逻辑优化
.onActionUpdate(event => {
  const delta = Math.sqrt(event.offsetX ** 2 + event.offsetY ** 2)
  const newSize = this.startWidth + delta * 2
  this.circleWH = Math.max(newSize, MIN_CIRCLE_SIZE)
})
3/建立组件间联动关系:
Circle()
  .width(this.circleWH)
  .height(this.circleWH)
  .onAreaChange((_, newArea) => {
    // 更新关联组件位置
    this.sizeEditIconWH = newArea.width * 0.1
  })

根据鸿蒙文档,实现长按后拖动组件来改变绿圈宽高的功能,需要结合手势处理和相关事件回调。
实现方案
在RelativeContainer中,长按拖动图标来改变绿圈(Circle或Rect)的宽高,可以通过使用手势组(GestureGroup)组合长按手势(LongPressGesture)和拖动手势(PanGesture)来实现。文档中提到,拖拽事件通常涉及长按500毫秒后开始拖动,但如果您希望更直接地控制长按和拖动的顺序,使用手势组可以避免手势冲突。
关键步骤:
- 设置手势组:将长按手势和拖动手势组合成顺序手势(GestureMode.Sequence),确保长按后才触发拖动。
- 处理拖动更新:在PanGesture的onActionUpdate回调中,根据拖动偏移量(offsetX和offsetY)实时更新绿圈的宽高。
- 使用animateTo平滑动画:为了平滑的尺寸变化,使用animateTo并设置合适的曲线。
代码修改建议:
在您的代码中,拖拽图标(Image组件)的gesture修饰符应改为使用GestureGroup,如下所示:
.gesture(
  GestureGroup(
    GestureMode.Sequence, // 顺序手势:先长按后拖动
    LongPressGesture()
      .onAction(() => {
        // 长按触发时的操作(可选),例如显示提示或开始拖动准备
        console.log("LongPress triggered");
      }),
    PanGesture({ fingers: 1 })
      .onActionStart(() => {
        // 拖动开始时的操作(可选),例如记录初始状态
      })
      .onActionUpdate((event: GestureEvent) => {
        // 根据拖动偏移量更新绿圈尺寸
        animateTo({ curve: curves.interpolatingSpring(0, 1, 400, 38) }, () => {
          if (this.geoFenceInfo?.shape === GeoFenceShape.CIRCLE) {
            // 对于圆形,取offsetX和offsetY的最小值作为偏移距离,以保持圆形比例
            let offsetDistance = Math.min(event.offsetX, event.offsetY);
            this.circleWH = Math.max(this.circleWH + offsetDistance, 0);
          } else {
            // 对于矩形,分别更新宽度和高度
            this.rectangleW = Math.max(this.rectangleW + event.offsetX, 0);
            this.rectangleH = Math.max(this.rectangleH + event.offsetY, 0);
          }
          this.handleChange(); // 您的自定义处理函数
        });
      })
      .onActionEnd(() => {
        // 拖动结束时的操作(可选),例如重置状态或提交更改
        this.reset();
      })
  )
)
注意事项:
- 手势冲突解决:使用GestureMode.Sequence可以确保长按后才触发拖动,避免单独添加长按手势导致的cancel问题。
- 文档支持:根据文档《arkts-gesture-events-gesture-judge.md》,手势判断可以通过onGestureJudgeBegin处理,但对于简单场景,手势组更直接。
- 性能考虑:拖动过程中频繁更新尺寸可能影响性能,建议使用animateTo优化动画效果。
- 边界处理:确保尺寸不会变为负数(使用Math.max(0, value))。
完整代码上下文:
将上述gesture代码替换到您的拖拽图标Image组件中,其他部分保持不变。例如:
Image($r('app.media.ic_vc_geo_size_edit'))
  // ...其他属性(width、height、alignRules等)
  .gesture(
    GestureGroup(
      GestureMode.Sequence,
      LongPressGesture().onAction(() => {}),
      PanGesture({ fingers: 1 })
        .onActionUpdate((event) => {
          // 更新尺寸逻辑
        })
    )
  )
为什么这样实现?
- 文档中提到拖拽事件需要长按500毫秒,但使用手势组可以更灵活地控制长按时间和拖动触发。
- PanGesture提供了直接的偏移量(offsetX和offsetY),便于计算尺寸变化。
- 如果您需要更系统的拖拽事件(如onDragStart),可以参考文档《ts-universal-events-drag-drop.md》,但对于本地拖动和实时尺寸更新,手势组更简单高效。

在HarmonyOS Next中,实现长按后拖动组件主要使用PanGesture(拖动手势)和LongPressGesture(长按手势)进行组合。
核心步骤:
- 为组件同时绑定
LongPressGesture和PanGesture。 - 在
LongPressGesture的onAction回调中,触发拖动的开始状态(例如,显示拖动效果或记录初始位置)。 - 在
PanGesture的onActionStart、onActionUpdate、onActionEnd回调中,通过event.offsetX和event.offsetY实时更新组件的位置(通常使用绝对定位position或偏移量translate)。 - 通过手势的
responseRegion属性可以调整手势的响应区域。
示例代码片段:
// 使用@State变量记录组件偏移量
@State offsetX: number = 0;
@State offsetY: number = 0;

// 在组件上绑定组合手势
.gesture(
  GestureGroup(
    GestureMode.Exclusive,
    LongPressGesture({ repeat: false })
      .onAction((event: GestureEvent) => {
        // 长按触发,可在此处设置拖动开始状态
        console.info('LongPress onAction');
      }),
    PanGesture()
      .onActionStart((event: GestureEvent) => {
        // 拖动开始
      })
      .onActionUpdate((event: GestureEvent) => {
        // 拖动中,更新位置
        this.offsetX = event.offsetX;
        this.offsetY = event.offsetY;
      })
      .onActionEnd(() => {
        // 拖动结束
      })
  )
)
// 应用偏移到组件
.translate({ x: this.offsetX, y: this.offsetY })
通过组合长按和拖动手势,并实时更新组件位置,即可实现长按后拖动的交互效果。

在HarmonyOS Next中实现长按后拖动组件来改变绿圈大小,核心是正确使用手势组合。你的代码问题在于PanGesture没有与长按手势组合使用。
以下是修改方案:
- 使用手势组合:将长按手势和拖动手势组合起来
.gesture(
  GestureGroup(
    GestureMode.Sequence,
    LongPressGesture({ fingers: 1, repeat: false })
      .onAction(() => {
        // 长按开始,可以在这里显示拖动提示
      }),
    PanGesture({ fingers: 1 })
      .onActionStart(() => {
        // 拖动开始
      })
      .onActionUpdate((event) => {
        // 计算新的尺寸
        if (this.geoFenceInfo?.shape === GeoFenceShape.CIRCLE) {
          // 圆形:根据对角线移动计算直径变化
          let delta = Math.sqrt(event.offsetX ** 2 + event.offsetY ** 2);
          this.circleWH = Math.max(this.circleWH + delta, minSize);
        } else {
          // 矩形:分别处理宽高
          this.rectangleW = Math.max(this.rectangleW + event.offsetX, minWidth);
          this.rectangleH = Math.max(this.rectangleH + event.offsetY, minHeight);
        }
      })
      .onActionEnd(() => {
        // 拖动结束,保存状态
      })
  )
)
- 关键点说明:
GestureMode.Sequence确保先长按后拖动- 圆形缩放应基于对角线距离计算,而不是单独取X或Y偏移
- 需要设置最小尺寸限制防止过度缩小
- 性能优化:
- 移除
animateTo动画,直接更新状态变量 - 使用
@State装饰器确保UI响应式更新 - 避免在onActionUpdate中频繁创建对象
- 相对定位保持: 由于使用RelativeContainer,拖拽图标会自动跟随绿圈位置变化,只需更新绿圈的尺寸变量即可。
这种实现方式既满足了长按触发需求,又保证了拖动的流畅性。