


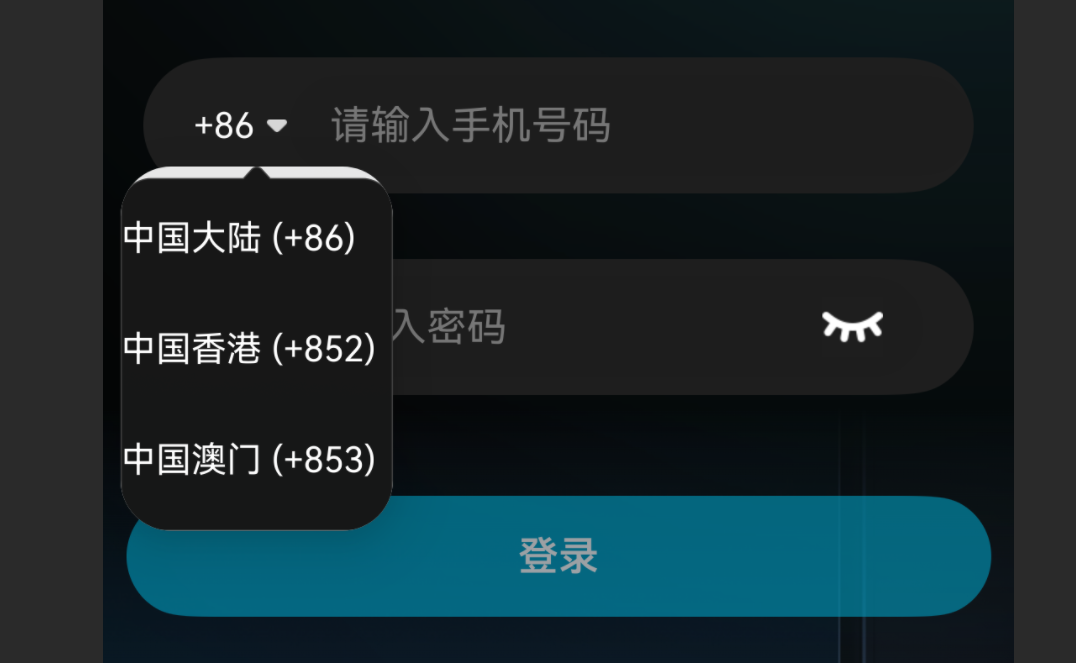
HarmonyOS鸿蒙Next中不规则图片和Image组件之间的缝隙怎么设置成透明色?
HarmonyOS鸿蒙Next中不规则图片和Image组件之间的缝隙怎么设置成透明色? Image组件里面装的是不规则图片,图片和Image组件之间的缝隙无法设置成透明的,给Image组件设置backgroundColor(Color.Transparent)不行,给stack布局设置backgroundColor(Color.Transparent)也不行,关键给这两任意一个改颜色,这个缝隙颜色也会变,改成Color.Red就变成红色,这是为啥,怎么办,求助
代码:
.bindPopup(!!this.showAreaPopup, {
  builder: this.areaPopupBuilder,
  placement: Placement.Bottom,
  enableArrow: false,
  autoCancel: true,
})
@Builder
areaPopupBuilder() {
  Stack(){
    Image($r('app.media.popupbgimg'))
      .width('100%')
      .height('100%')
      .objectFit(ImageFit.Fill)// 强制拉伸
      .backgroundColor(Color.Transparent)

    Column() {
      // 中国大陆选项
      Row() {
        Text('中国大陆 (+86)')
          .fontColor(Color.White)
          .fontSize(14)
          .fontWeight(400)
      }
      .width('100%')
      .height(44)
      .alignItems(VerticalAlign.Center)
      .onClick(() => {
        this.state.areaCode = '+86';
        this.showAreaPopup = false;
      })

      // 中国香港选项
      Row() {
        Text('中国香港 (+852)')
          .fontColor(Color.White)
          .fontSize(14)
          .fontWeight(400)
      }
      .width('100%')
      .height(44)
      .alignItems(VerticalAlign.Center)
      .onClick(() => {
        this.state.areaCode = '+852';
        this.showAreaPopup = false;
      })

      // 中国澳门选项
      Row() {
        Text('中国澳门 (+853)')
          .fontColor(Color.White)
          .fontSize(14)
          .fontWeight(400)
      }
      .width('100%')
      .height(44)
      .alignItems(VerticalAlign.Center)
      .onClick(() => {
        this.state.areaCode = '+853';
        this.showAreaPopup = false;
      })
    }
  }
  .width(108)
  .height(144.5)
  .backgroundColor(Color.Transparent)
}
更多关于HarmonyOS鸿蒙Next中不规则图片和Image组件之间的缝隙怎么设置成透明色?的实战教程也可以访问 https://www.itying.com/category-93-b0.html

@Entry
@Component
export struct Index {
  @State showAreaPopup:boolean = false;
  @Builder
  areaPopupBuilder() {
    Stack(){
      Image($r('app.media.startIcon'))
        .width('100%')
        .height('100%')
        .objectFit(ImageFit.Fill)// 强制拉伸
        // .backgroundColor(Color.Transparent)

      Column() {
        // 中国大陆选项
        Row() {
          Text('中国大陆 (+86)')
            .fontColor(Color.White)
            .fontSize(14)
            .fontWeight(400)
        }
        .width('100%')
        .height(44)
        .alignItems(VerticalAlign.Center)
        .onClick(() => {
          // this.state.areaCode = '+86';
          // this.showAreaPopup = false;
        })

        // 中国香港选项
        Row() {
          Text('中国香港 (+852)')
            .fontColor(Color.White)
            .fontSize(14)
            .fontWeight(400)
        }
        .width('100%')
        .height(44)
        .alignItems(VerticalAlign.Center)
        .onClick(() => {
          // this.state.areaCode = '+852';
          // this.showAreaPopup = false;
        })

        // 中国澳门选项
        Row() {
          Text('中国澳门 (+853)')
            .fontColor(Color.White)
            .fontSize(14)
            .fontWeight(400)
        }
        .width('100%')
        .height(44)
        .alignItems(VerticalAlign.Center)
        .onClick(() => {
          // this.state.areaCode = '+853';
          // this.showAreaPopup = false;
        })
      }
    }
    .width(108)
    .height(144.5)
    // .backgroundColor(Color.Transparent)
  }
 build() {
    Column(){
      Button()
        .onClick(()=>{
          this.showAreaPopup = !this.showAreaPopup;
        })
        .bindPopup(!!this.showAreaPopup, {
          builder: this.areaPopupBuilder,
          placement: Placement.Bottom,
          enableArrow: false,
          autoCancel: true,
          backgroundBlurStyle:BlurStyle.NONE,
          maskColor:Color.Transparent,
          shadow: { radius:0,color: Color.Transparent,offsetX:0,offsetY:0},
          popupColor: Color.Transparent,
        })
      Text('1111111111111111')
    }.height('100%').width('100%').alignItems(HorizontalAlign.Center).justifyContent(FlexAlign.Center)
 }
}
更多关于HarmonyOS鸿蒙Next中不规则图片和Image组件之间的缝隙怎么设置成透明色?的实战系列教程也可以访问 https://www.itying.com/category-93-b0.html


标题
这是一段示例文本,用于展示转换后的Markdown格式。
子标题
- 列表项1
- 列表项2
- 列表项3
加粗文本 和 斜体文本。
引用块示例。
行内代码 示例。
# 代码块示例
def hello_world():
    print("Hello, World!")
表格示例:
| 列1 | 列2 | 列3 |
|---|---|---|
| 数据1 | 数据2 | 数据3 |
| 数据4 | 数据5 | 数据6 |

这个问题通常是由于Image组件默认的渲染行为导致的。在HarmonyOS Next中,Image组件默认会填充其布局边界,即使图片本身是不规则的,组件背景区域仍然会被渲染。
要解决这个问题,可以尝试以下方法:
-
使用
.clip()修饰符: 给Image组件添加.clip(true),这会让组件严格按图片的轮廓进行裁剪,消除背景区域。Image($r('app.media.popupbgimg')) .width('100%') .height('100%') .objectFit(ImageFit.Fill) .clip(true) // 关键:启用裁剪 -
检查图片资源本身: 确保你的不规则图片确实是透明背景的PNG格式。有时图片边缘可能包含半透明像素,这些像素在渲染时会产生视觉上的"缝隙"。
-
调整Stack布局: 如果问题仍然存在,可以尝试在Stack外层添加一个Column或Box,并设置其背景色为透明:
Column() { Stack() { // Image组件 } } .backgroundColor(Color.Transparent) -
使用
.overlay()替代Stack: 对于简单的图片叠加场景,可以考虑使用.overlay()修饰符而不是Stack布局。
你遇到的颜色变化现象是因为Image组件默认会显示其背景色,即使图片本身有透明区域。设置.clip(true)是最直接的解决方案,它会强制组件只显示图片的实际像素区域。