


HarmonyOS鸿蒙Next中项目中咋实现图片压缩?
HarmonyOS鸿蒙Next中项目中咋实现图片压缩? 现在项目中有一个图片上传的功能,目前的问题是直接选择图片或者拍照,都太大了,后台直接拦截了,让给压缩一下,这个应该咋实现?

正好之前搞过,完美体现,看效果吧
使用场景
用户拍摄高清照片后,在上传前自动压缩至指定大小,节省流量并提升上传速度。
实现思路
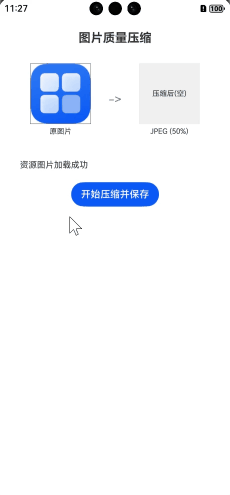
第一步:ImagePacker 初始化。
第二步:先通过 image.createImageSource 从本地读取图片并解码为 PixelMap。
第三步:创建 ImagePacker 实例,调用异步 pack 方法,将 PixelMap 压缩为 ArrayBuffer。
需要注意的是:需要在真机上实现。
完整实现代码
import image from '@ohos.multimedia.image';
import { common } from '@kit.AbilityKit';
import { BusinessError } from '@kit.BasicServicesKit';
import fs from '@ohos.file.fs';

@Entry
@Component
struct ImageCompressPage {
  @State sourceImage: PixelMap | undefined = undefined;
  @State compressedImage: PixelMap | undefined = undefined;
  @State logMsg: string = '准备就绪';

  // 获取 UIAbilityContext
  private getContext(): common.UIAbilityContext {
    return this.getUIContext().getHostContext() as common.UIAbilityContext;
  }

  async aboutToAppear() {
    try {
      const resourceMgr = this.getContext().resourceManager;

      const fileData = await resourceMgr.getMediaContent($r('app.media.startIcon'));


      const buffer = fileData.buffer.slice(fileData.byteOffset, fileData.byteOffset + fileData.byteLength);
    console.log(JSON.stringify(buffer))
      const imageSource = image.createImageSource(buffer);
      this.sourceImage = await imageSource.createPixelMap();

      this.logMsg = '资源图片加载成功';
    } catch (err) {
      const error = err as BusinessError;
      this.logMsg = `加载失败: ${error.code} - ${error.message}`;
      console.error('[ImageCompress] aboutToAppear Error:', JSON.stringify(err));
    }
  }

  async compressImage() {
    if (!this.sourceImage) {
      this.logMsg = '源图片未加载,无法压缩';
      return;
    }

    try {
      this.logMsg = '正在压缩...';
      const context = this.getContext();

      const packer = image.createImagePacker();

      const packOpts: image.PackingOption = {
        format: 'image/jpeg',
        quality: 50
      };

      const buffer: ArrayBuffer = await packer.packing(this.sourceImage, packOpts);

      packer.release();

      // 保存文件
      const targetPath = `${context.filesDir}/compressed_image_${Date.now()}.jpg`;
      const file = fs.openSync(targetPath, fs.OpenMode.CREATE | fs.OpenMode.WRITE_ONLY);
      fs.writeSync(file.fd, buffer);
      fs.closeSync(file);

      // 重新读取压缩后的图片用于展示
      const newImageSource = image.createImageSource(buffer);
      this.compressedImage = await newImageSource.createPixelMap();

      const fileSize = buffer.byteLength;
      this.logMsg = `压缩成功!\n格式: JPEG\n质量: 50%\n大小: ${fileSize} Bytes\n路径: ${targetPath}`;

    } catch (err) {
      const error = err as BusinessError;
      this.logMsg = `压缩失败: Code ${error.code}, Message: ${error.message}`;
      console.error(`[ImageCompress] Error: ${JSON.stringify(err)}`);
    }
  }

  build() {
    Column() {
      Text('图片质量压缩')
        .fontSize(20)
        .fontWeight(FontWeight.Bold)
        .margin({ top: 20, bottom: 10 })

      Flex({ justifyContent: FlexAlign.SpaceAround, alignItems: ItemAlign.Center }) {
        Column() {
          if (this.sourceImage) {
            Image(this.sourceImage)
              .width(100)
              .height(100)
              .objectFit(ImageFit.Cover)
              .border({ width: 1, color: Color.Gray })
          } else {
            Text('原图片(未加载)')
              .width(100)
              .height(100)
              .fontSize(12)
              .textAlign(TextAlign.Center)
              .backgroundColor('#f0f0f0')
          }
          Text('原图片')
            .fontSize(12)
            .margin({ top: 5 })
        }

        Text('->')
          .fontSize(20)
          .fontColor(Color.Gray)

        Column() {
          if (this.compressedImage) {
            Image(this.compressedImage)
              .width(100)
              .height(100)
              .objectFit(ImageFit.Cover)
              .border({ width: 1, color: Color.Gray })
          } else {
            Text('压缩后(空)')
              .width(100)
              .height(100)
              .fontSize(12)
              .textAlign(TextAlign.Center)
              .backgroundColor('#f0f0f0')
          }
          Text('JPEG (50%)')
            .fontSize(12)
            .margin({ top: 5 })
        }
      }
      .width('100%')
      .padding(20)

      Text(this.logMsg)
        .fontSize(14)
        .fontColor('#333')
        .width('90%')
        .margin({ top: 20, bottom: 20 })

      Button('开始压缩并保存')
        .onClick(() => {
          this.compressImage();
        })
    }
    .width('100%')
    .height('100%')
    .padding({ left: 20, right: 20 })
  }
}
更多关于HarmonyOS鸿蒙Next中项目中咋实现图片压缩?的实战系列教程也可以访问 https://www.itying.com/category-93-b0.html

压缩图片代码如下:
我主要是使用packing,但是看最新的API更推荐packToData
import { image } from '@kit.ImageKit';

/**
 * 压缩图片
 * @param sourcePixelMap
 * @param opt
 * @returns
 */
export async function compressedImage(sourcePixelMap: image.PixelMap, opt: options): Promise<ArrayBuffer> {
  return new Promise(async (resolve, reject) => {
    try {
      let compressedImageData: ArrayBuffer = await packing(sourcePixelMap, opt);
      const maxCompressedImageByte = opt.maxSize * 1024;
      if (maxCompressedImageByte > compressedImageData.byteLength) {
        const packingArray: options[] = [];
        const DICHOTOMY_ACCURACY = 10;
        for (let i = 0; i <= 100; i += DICHOTOMY_ACCURACY) {
          packingArray.push({
            quality: i,
            maxSize: opt.maxSize,
            format: opt.format,
            reduceScale: opt.reduceScale
          });
        }
        let left = 0;
        let right = packingArray.length - 1;
        while (left <= right) {
          const mid = Math.floor((left + right) / 2);
          opt = packingArray[mid];
          compressedImageData = await packing(sourcePixelMap, opt);
          if (compressedImageData.byteLength <= maxCompressedImageByte) {
            left = mid + 1;
            if (mid === packingArray.length - 1) {
              break;
            }
            compressedImageData = await packing(sourcePixelMap, packingArray[mid + 1]);
            if (compressedImageData.byteLength > maxCompressedImageByte) {
              compressedImageData = await packing(sourcePixelMap, packingArray[mid]);
              break;
            }
          } else {
            right = mid - 1;
          }
        }
      } else {
        let imageScale = 1;
        while (compressedImageData.byteLength > maxCompressedImageByte) {
          if (imageScale > 0) {
            imageScale = imageScale - opt.reduceScale;
            await sourcePixelMap.scale(imageScale, imageScale, image.AntiAliasingLevel.HIGH);
            compressedImageData = await packing(sourcePixelMap, opt);
          } else {
            break;
          }
        }
      }
      resolve(compressedImageData)
    } catch (e) {
      reject(e)
    }
  })
}

async function packing(sourcePixelMap: image.PixelMap, opt: options): Promise<ArrayBuffer> {
  return new Promise(async (resolve, reject) => {
    try {
      const imagePackerApi = image.createImagePacker();
      const packOpts: image.PackingOption = { format: opt.format, quality: opt.quality };
      let compressedImageData = await imagePackerApi.packing(sourcePixelMap, packOpts);
      resolve(compressedImageData)
    } catch (e) {
      reject(e)
    }
  })
}

export class options {
  maxSize: number = 2;
  format: string = "";
  quality: number = 80;
  reduceScale: number = 1;
}

1. 核心实现方案:ImagePacker 压缩
这是最通用的做法。通过调整 quality 参数,可以将图片压到指定的大小(例如 200KB 以内)。
代码示例 (ArkTS):
import { image } from '@kit.ImageKit';
import { fileIo as fs } from '@kit.CoreFileKit';

async function compressImage(sourceUri: string, targetPath: string) {
  // 1. 获取图片源
  let file = fs.openSync(sourceUri, fs.OpenMode.READ_ONLY);
  const imageSource = image.createImageSource(file.fd);

  // 2. 设置压缩参数 (例如压缩为 JPEG,质量设为 30)
  let packOpts: image.PackingOption = {
    format: "image/jpeg",
    quality: 30 // 质量范围 0-100,值越小压缩率越高
  };

  // 3. 开始打包压缩
  const imagePacker = image.createImagePacker();
  let arrayBuffer = await imagePacker.packing(imageSource, packOpts);

  // 4. 将压缩后的数据写入新文件
  let targetFile = fs.openSync(targetPath, fs.OpenMode.READ_WRITE | fs.OpenMode.CREATE);
  fs.writeSync(targetFile.fd, arrayBuffer);
  fs.closeSync(file.fd);
  fs.closeSync(targetFile.fd);
}
2. 进阶优化:先缩放,后质量压缩
如果原图是 4000x3000 的大图,仅调低质量可能还是很大,或者图片会变虚。最好的方案是先降低分辨率。
- 采样缩放 (Decoding with SampleSize): 在解码时设置
sampleSize。例如设置sampleSize: 2,宽高都会缩小到原来的 1/2,内存和体积直接降为 1/4。
let decodingOptions: image.DecodingOptions = {
    sampleSize: 2, // 缩放倍数
    editable: true,
    desiredSize: { width: 1080, height: 1920 } // 也可以直接指定目标宽高
};
let pixelMap = await imageSource.createPixelMap(decodingOptions);
3. 如何精准压到 X KB 以下?
后台拦截通常有硬性规定(如 1MB)。你可以写一个递归/循环方法:
- 先尝试
quality: 80。 - 检查生成的
ArrayBuffer长度是否超过阈值。 - 如果超过,递减
quality(如每次减 10)再次尝试,直到满足要求。
注意:
quality降低到一定程度(如低于 20)图片会严重失真,此时应优先考虑通过sampleSize减小图片尺寸。

在鸿蒙应用中实现图片压缩上传功能,需结合图片选择、压缩处理和后台上传三个核心环节。以下是完整实现方案:
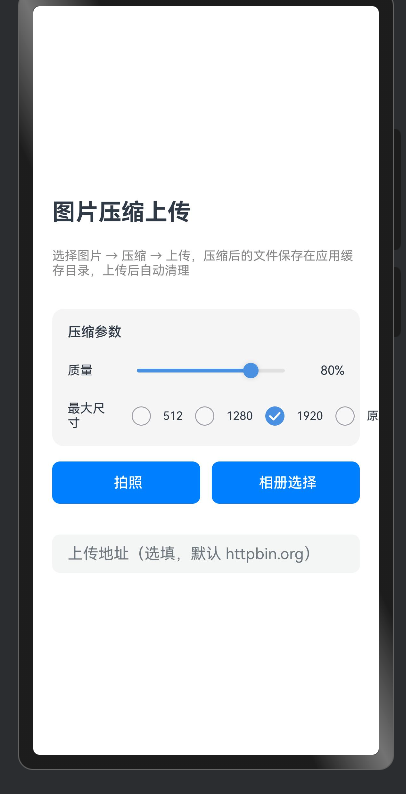
一、图片选择(PhotoViewPicker组件)
使用鸿蒙photoAccessHelper模块选择图片:
import photoAccessHelper from '[@ohos](/user/ohos).file.photoAccessHelper';

// 拉起相册选择图片
try {
  const photoSelectOptions = new photoAccessHelper.PhotoSelectOptions();
  photoSelectOptions.MIMEType = photoAccessHelper.PhotoViewMIMETypes.IMAGE_TYPE; // 仅选择图片
  photoSelectOptions.maxSelectNumber = 5; // 最大选择数量
  const photoPicker = new photoAccessHelper.PhotoViewPicker();

  photoPicker.select(photoSelectOptions).then((photoSelectResult) => {
    this.addImages(photoSelectResult.photoUris); // 获取选中图片URI
  }).catch((err) => { /* 错误处理 */ });
} catch (err) { /* 异常处理 */ }
二、图片压缩(@ohos.image模块) 通过ImageSource和ImagePacker实现压缩:
import image from '[@ohos](/user/ohos).image';
import fs from '[@ohos](/user/ohos).file.fs';

// 质量压缩函数
async function compressImageByQuality(uri: string, quality: number): Promise<string> {
  const file = fs.openSync(uri, fs.OpenMode.READ_ONLY);
  const imageSource = image.createImageSource(file.fd);
  const options: image.DecodingOptions = {
    desiredSize: { width: 1024, height: 1024 } // 尺寸压缩(可选)
  };
  const pixelMap = await imageSource.createPixelMap(options);

  const packOpts: image.PackingOption = {
    format: "image/jpeg", // 支持JPEG/WEBP/PNG
    quality: quality     // 压缩质量(0-100)
  };
  const imagePacker = image.createImagePacker();
  const arrayBuffer = await imagePacker.packing(pixelMap, packOpts);

  // 保存压缩后图片
  const compressedPath = `${getContext().cacheDir}/compressed_${Date.now()}.jpg`;
  fs.writeFileSync(compressedPath, arrayBuffer);
  return compressedPath;
}
关键参数说明:
desiredSize:按比例缩小原图尺寸(建议不超过1080px)quality:质量参数(推荐60-80平衡画质与体积)format:优先使用WebP格式(体积比JPEG小30%)
三、后台上传(request.agent模块) 使用后台任务避免阻塞UI:
import request from '[@ohos](/user/ohos).request';

async function backgroundUpload(compressedPaths: string[]) {
  const context = getContext(this) as common.UIAbilityContext;
  const config: request.agent.Config = {
    url: 'https://your-server.com/upload', // 替换为实际URL
    data: { files: compressedPaths },      // 压缩后的文件路径
    mode: request.agent.Mode.BACKGROUND    // 后台模式
  };

  try {
    const task = await request.agent.create(context, config);
    await task.start(); // 触发后台上传
    // 监听任务状态
    task.on('progress', (progress) => { /* 更新进度 */ });
  } catch (err) { /* 错误处理 */ }
}
四、完整流程整合
- 选择图片 → 2. 批量压缩 → 3. 后台上传
// 示例:整合调用链
photoPicker.select().then(async (uris) => {
  const compressedPaths = [];
  for (const uri of uris) {
    const path = await compressImageByQuality(uri, 75); // 质量75%
    compressedPaths.push(path);
  }
  backgroundUpload(compressedPaths);
});
五、注意事项
- 权限声明:
"requestPermissions": [
  { "name": "ohos.permission.INTERNET" },
  { "name": "ohos.permission.READ_MEDIA" },
  { "name": "ohos.permission.WRITE_MEDIA" }
]
-
压缩效果:
- 高质量(80%):体积减少约60%,画质无损
- 平衡模式(70%):体积减少75%-85%
- 极限压缩(50%):体积减少90%,画质略有损失
-
后台任务管理:
- 使用
request.agent.search()查询任务状态 - 通过
pause()/resume()控制任务生命周期 - 对于社交类应用,建议默认采用70%质量压缩+尺寸缩放至1080px以内,可确保图片体积控制在300KB-800KB之间,兼顾传输效率和视觉体验。
- 使用

图片压缩主要是通过packToData和scale实现图片压缩,通过对图片进行缩放或者设置编码参数进行压缩。具体实现可以参考以下几种方案。
方案一:质量压缩
通过修改编码质量参数quality,该参数仅对JPEG图片生效。WebP、PNG等图片均为无损编码。
/**
 * 质量压缩
 */
async qualityCompressionMethod(quality: number) {
  const qualityCompressionMethod = await this.compressionMethod.compressionMethod(100, quality);
  this.showPixelMap = qualityCompressionMethod[0];
  this.savePixelMap = qualityCompressionMethod[1];
  this.afterCompressionSize = qualityCompressionMethod[2];
  this.showCompressFormat = qualityCompressionMethod[3];
}

/**
 * 压缩
 */
async compressionMethod(imageScaleVal: number,
  imageQualityVal: number): Promise<[PixelMap, PixelMap, string, string]> {
  const ALBUM_PATH: string = this.uris[0];
  const file = fs.openSync(ALBUM_PATH, fs.OpenMode.READ_ONLY);
  let buffer = new ArrayBuffer(fs.statSync(file.fd).size);
  fs.readSync(file.fd, buffer);
  fs.closeSync(file);
  const decodingOptions: image.DecodingOptions = { editable: true };
  const imageSource: image.ImageSource = image.createImageSource(buffer);
  return new Promise<[PixelMap, PixelMap, string, string]>((resolve) => {
    imageSource.createPixelMap(decodingOptions).then(async (originalPixelMap: image.PixelMap) => {
      if (AppStorage.get('sizeFlag') != undefined) {
        this.sizeFlag = AppStorage.get('sizeFlag')!;
      }
      if (this.sizeFlag) {
        // 使用scale对图片进行缩放。入参分别为图片宽高的缩放倍数
        await originalPixelMap.scale(imageScaleVal / 100, imageScaleVal / 100);
        // savePixelMap用于把压缩后的图片保存到图库时使用。由于保存图片时调用的packToFile内部会做类似packing的处理,所以这里只保存scale缩放尺寸后的PixelMap。
        this.savePixelMap = originalPixelMap;
        this.imageQuality = imageScaleVal;
      }
      // savePixelMap用于把压缩后的图片保存到图库时使用。
      this.savePixelMap = originalPixelMap;
      if (AppStorage.get('outputCompressFmt') != undefined) {
        this.afterCompressFmt = AppStorage.get('outputCompressFmt')!;
      }

      // packing压缩图片
      let compressedImageData: ArrayBuffer =
        await this.packing(originalPixelMap, imageQualityVal, this.afterCompressFmt);
      // 压缩后的ArrayBuffer数据转PixelMap
      let imageSource = image.createImageSource(compressedImageData);
      let opts: image.DecodingOptions = { editable: true };
      // showPixelMap用于显示压缩后的图片
      const pixelMap: image.PixelMap = await imageSource.createPixelMap(opts);
      this.showPixelMap = pixelMap;
      // showCompressFormat用于显示压缩后的图片格式
      this.showCompressFormat = this.afterCompressFmt;
      // 显示估算packing压缩后的图片大小。该图片在内存中作为ArrayBuffer数据的压缩后大小,这一数值并不直接等同于该图片在最终保存到相册时的实际文件大小。
      this.afterCompressionSize = (compressedImageData.byteLength / BYTE_CONVERSION).toFixed(1);
      resolve([this.showPixelMap, this.savePixelMap, this.afterCompressionSize, this.afterCompressFmt]);
    }).catch((err: BusinessError) => {
      hilog.error(0x0000, TAG, `Failed to create PixelMap, error code: ${err.code}, message: ${err.message}.`);
    });

  });
}
方案二:尺寸压缩
调用scale对图片的宽高进行缩放,缩放后的PixelMap通过packToData进行压缩
/**
 * 尺寸压缩
 */
async sizeCompressionMethod(size: number) {
  this.sizeFlag = true;
  AppStorage.setOrCreate('sizeFlag', this.sizeFlag);
  const sizeCompressionMethod = await this.compressionMethod.compressionMethod(size, 100);
  this.showPixelMap = sizeCompressionMethod[0];
  this.afterCompressionSize = sizeCompressionMethod[2];
  this.showCompressFormat = sizeCompressionMethod[3];
}

通过Image kit相关接口,实现了对图片进行压缩的功能,主要是通过二分法进行图片压缩
demo 参考地址


我是这样弄的
/**
 * 质量压缩PixelMap图片
 * @param pixelMap 原始PixelMap对象
 * @param quality 压缩质量(0-100,100为最佳质量)
 * @returns 压缩后的新PixelMap对象
 */
async compressPixelMapQuality(pixelMap: image.PixelMap, quality: number): Promise<image.PixelMap> {
    try {
        // 1. 创建图像编码器
        const imagePacker = image.createImagePacker();

        // 2. 配置压缩参数(JPEG格式)
        const packOptions: image.PackingOption = {
            format: 'image/jpeg',
            quality: quality // 关键质量参数
        };

        // 3. 执行质量压缩生成ArrayBuffer
        const compressedData: ArrayBuffer = await imagePacker.packToData(pixelMap, packOptions);

        // 4. 创建ImageSource解码压缩后的数据
        const imageSource = image.createImageSource(compressedData);

        // 5. 配置解码参数(保持可编辑状态)
        const decodeOptions: image.DecodingOptions = {
            editable: true,
            desiredPixelFormat: image.PixelMapFormat.RGBA_8888
        };

        // 6. 生成新PixelMap并返回
        return await imageSource.createPixelMap(decodeOptions);
    } catch (error) {
        console.error(`压缩失败: ${JSON.stringify(error)}`);
        return pixelMap
    } finally {
        // 可选:根据业务场景决定是否释放原始PixelMap
        pixelMap.release();
    }
}

鸿蒙原生提供了图片的压缩类(ImagePacker),可以使用其中packtoFile函数进行压缩。官方示例代码如下:
import { BusinessError } from '@kit.BasicServicesKit';
import { fileIo as fs } from '@kit.CoreFileKit';

async function PackToFile(context: Context) {
  const resourceMgr = context.resourceManager;
  const rawFile = await resourceMgr.getRawFileContent("test.jpg");
  let ops: image.SourceOptions = {
    sourceDensity: 98,
  }
  let imageSource: image.ImageSource = image.createImageSource(rawFile.buffer as ArrayBuffer, ops);
  let commodityPixelMap: image.PixelMap = await imageSource.createPixelMap();
  let pictureObj: image.Picture = image.createPicture(commodityPixelMap);

  let funcName = "PackToFile";
  const imagePackerObj: image.ImagePacker = image.createImagePacker();
  if (imagePackerObj != null) {
    const filePath: string = context.filesDir + "/test.jpg";
    let file = fs.openSync(filePath, fs.OpenMode.CREATE | fs.OpenMode.READ_WRITE);
    let packOpts: image.PackingOption = {
      format: "image/jpeg",
      quality: 98,
      desiredDynamicRange: image.PackingDynamicRange.AUTO,
      needsPackProperties: true};
    await imagePackerObj.packToFile(pictureObj, file.fd, packOpts).then(() => {
      console.info(funcName, 'Succeeded in packing the image to file.');
    }).catch((error: BusinessError) => {
      console.error(funcName, `Failed to pack the image to file.code ${error.code},message is ${error.message}`);
    });
  }
}
修改其中quality参数可以修改生成图像的大小,如果对图像格式有要求,需要使用专业的C语言库采用native方式进行压缩。
鸿蒙Next中,使用@ohos.multimedia.image模块实现图片压缩。通过image.createImagePacker()创建打包器,设置质量参数(quality)进行有损压缩,或指定输出格式(如JPEG、PNG)。也可调用image.compressImage()直接压缩已有图片。

在 HarmonyOS Next 中可通过 image 模块实现图片压缩:使用 ImageSource 解码时指定 desiredSize 缩小尺寸,再用 ImagePacker 设置 quality 控制压缩质量。核心步骤如下:
import image from '@ohos.multimedia.image';
import fs from '@ohos.file.fs';

async function compressImage(filePath: string): Promise<ArrayBuffer> {
  let file = fs.openSync(filePath, fs.OpenMode.READ_ONLY);
  let imageSource = image.createImageSource(file.fd);
  let decodingOptions: image.DecodingOptions = {
    desiredSize: { width: 1080, height: 2340 }, // 根据需求调整
    desiredPixelFormat: image.PixelFormat.RGBA_8888
  };
  let pixelMap = await imageSource.createPixelMap(decodingOptions);
  let packer = image.createImagePacker();
  let packOpts: image.PackingOptions = {
    format: "image/jpeg",
    quality: 80  // 1-100,越小压缩越强
  };
  let data = await packer.packing(pixelMap, packOpts);
  pixelMap.release();
  fs.closeSync(file);
  return data;
}
压缩后的 ArrayBuffer 可直接用于上传,尺寸和质量按需调整即可满足后台要求。