




HarmonyOS鸿蒙Next中关于Navigation组件和Tabs组件的问题
HarmonyOS鸿蒙Next中关于Navigation组件和Tabs组件的问题 我想实现一个底部有tabbar,点击可以切换,在每个tab的content区域里可以点击按钮跳转到二三级页面,路由使用Navigation组件。
现在的问题是,如果我在Index.ets中的最外层使用一个Navigation控制,在切换tab时,顶部的标题不会改变;如果为每个tabContent单独给一个Navigation控制,跳转到二级页后,tabbar依然存在。
像这种典型的app结构,应该怎么写可以实现。
@Entry
@Component
struct Index {
  private homePathStack: NavPathStack = new NavPathStack();
  private msgPathStack: NavPathStack = new NavPathStack();
  private minePathStack: NavPathStack = new NavPathStack();

  build() {
    Tabs({barPosition:BarPosition.End}){
      TabContent(){
        Navigation(this.homePathStack){
          Column(){
            List({space:10}){
              ListItem(){
                Text('列表项')
              }
              .width('100%')
              .height(100)
              .backgroundColor(Color.Orange)

              ListItem(){
                Text('列表项')
              }
              .width('100%')
              .height(100)
              .backgroundColor(Color.Orange)
              ListItem(){
                Text('列表项')
              }
              .width('100%')
              .height(100)
              .backgroundColor(Color.Orange)
              ListItem(){
                Text('列表项')
              }
              .width('100%')
              .height(100)
              .backgroundColor(Color.Orange)
              ListItem(){
                Text('列表项')
              }
              .width('100%')
              .height(100)
              .backgroundColor(Color.Orange)
              ListItem(){
                Text('列表项')
              }
              .width('100%')
              .height(100)
              .backgroundColor(Color.Orange)
              ListItem(){
                Text('列表项')
              }
              .width('100%')
              .height(100)
              .backgroundColor(Color.Orange)
              ListItem(){
                Text('列表项')
              }
              .width('100%')
              .height(100)
              .backgroundColor(Color.Orange)
              ListItem(){
                Text('列表项')
              }
              .width('100%')
              .height(100)
              .backgroundColor(Color.Orange)
              ListItem(){
                Text('列表项')
              }
              .width('100%')
              .height(100)
              .backgroundColor(Color.Orange)
              ListItem(){
                Text('列表项')
              }
              .width('100%')
              .height(100)
              .backgroundColor(Color.Orange)
              ListItem(){
                Text('列表项')
              }
              .width('100%')
              .height(100)
              .backgroundColor(Color.Orange)
              ListItem(){
                Text('列表项')
              }
              .width('100%')
              .height(100)
              .backgroundColor(Color.Orange)
              ListItem(){
                Text('列表项')
              }
              .width('100%')
              .height(100)
              .backgroundColor(Color.Orange)

            }
            .width('100%')
            .layoutWeight(1)
            Button('跳转到二级页面')
              .onClick(() => {
                this.homePathStack.pushPath({name:'PageA'})
              })
          }
        }
        .title('首页')
        .hideToolBar(true)


      }.tabBar('首页')
      TabContent(){
        Navigation(this.msgPathStack){
          Column(){
            Text('消息')
            Image($r('sys.media.ai_recognize'))
              .width(100)
            Button('跳转到消息二级页').onClick((event: ClickEvent) => {
              this.msgPathStack.pushPath({name:'MsgSecondPage'})
            })
          }
          .width('100%')
          .height('100%')
          .backgroundColor(Color.Green)
          .alignItems(HorizontalAlign.Center)
          .justifyContent(FlexAlign.Center)
        }
        .title('消息')
        .hideToolBar(true)


      }.tabBar('消息')
      TabContent(){
        Navigation(this.minePathStack){
          Column(){
            Text('我的')
          }
          .width('100%')
          .height('100%')
          .backgroundColor(Color.Orange)
          .alignItems(HorizontalAlign.Center)
          .justifyContent(FlexAlign.Center)
        }
        .title('我的')
        .hideToolBar(true)

      }
      .tabBar('我的')

    }

  }
}
更多关于HarmonyOS鸿蒙Next中关于Navigation组件和Tabs组件的问题的实战教程也可以访问 https://www.itying.com/category-93-b0.html

喜欢哪种就用哪种方法:
@Entry
@Component
struct Index {
    private pathStack: NavPathStack = new NavPathStack();
    @State currentIndex: number = 0
    // 1. 定义与 Tab 顺序对应的标题数组
    private readonly tabTitles: string[] = ['首页', '消息', '我的']
    private tabsController: TabsController = new TabsController()
    build() {
        Navigation(this.pathStack) {
            Tabs({ barPosition: BarPosition.End, controller: this.tabsController, index: this.currentIndex }) {
                TabContent() {
                    NavDestination() {
                        Column() {
                            Button('跳转到二级页面')
                                .onClick(() => {
                                    this.pathStack.pushPath({ name: 'PageA' })
                                })
                        }
                    }.width('100%')
                    .height('100%')
                    .title("首页")
                    .hideBackButton(true)
                }.tabBar('首页')
                TabContent() {
                    NavDestination() {
                        Column() {
                            Text('消息')
                            Image($r('sys.media.ai_recognize'))
                                .width(100)
                            Button('跳转到消息二级页').onClick((event: ClickEvent) => {
                                this.pathStack.pushPath({ name: 'MsgSecondPage' })
                            })
                        }
                    }.width('100%')
                    .height('100%')
                    .title("消息")
                    .hideBackButton(true)
                }.tabBar('消息')
                TabContent() {
                    NavDestination() {
                        Column() {
                            Text('我的')
                        }
                        .width('100%')
                        .height('100%')
                        .backgroundColor(Color.Orange)
                        .alignItems(HorizontalAlign.Center)
                        .justifyContent(FlexAlign.Center)
                    }.width('100%')
                    .height('100%')
                    .title("我的")
                    .hideBackButton(true)
                }
                .tabBar('我的')
            }
            .onChange((index: number) => {
                this.currentIndex = index
            })
        }
        // .title(this.tabTitles[this.currentIndex])
        .hideBackButton(true)
        .titleMode(NavigationTitleMode.Mini)
        .title({
            builder: undefined,
            height: 0//目的是为了backgroundColor延伸到状态栏
        })
    }
}
更多关于HarmonyOS鸿蒙Next中关于Navigation组件和Tabs组件的问题的实战系列教程也可以访问 https://www.itying.com/category-93-b0.html

你这个场景里,更推荐的典型写法是:
推荐结构
- 最外层只保留一个
Navigation Tabs只作为一级首页容器- 二级、三级页面统一走最外层
Navigation的NavPathStack - 不要在每个
TabContent里再套一个独立Navigation
也就是:
Navigation(rootPathStack) {
  TabsPage({ rootPathStack })
}
而不是:
Tabs {
  TabContent {
    Navigation(tabPathStack) { ... }
  }
}
为什么你现在这两种写法都会有问题
1. Tabs 外面套多个 Navigation
你现在的写法是:
Tabs {
  TabContent {
    Navigation(this.homePathStack) { ... }
  }
}
这种结构下,二级页只是替换了当前 Tab 的内容区,但 Tabs 本身还在最外层,所以:
- 底部
tabBar一定还在 - 这正是你现在看到的现象
2. 最外层只放一个 Navigation 再包 Tabs
这种结构下,Navigation.title() 是整个导航容器的标题,不是每个 Tab 的标题,所以:
- 切换 Tab 不会自动变标题
- 因为
Navigation不知道你只是切了 tab index
这也是正常现象。
典型 App 的推荐实现
如果你的目标是这种常见效果:
- 底部有
tabBar - Tab 之间切换一级页面
- 在某个 tab 里点按钮进入二级页
- 进入二级页后 隐藏 tabBar
- 返回后回到原 tab
那推荐这样做:
结构分层
一级
一个根 Navigation
首页
根 Navigation 的首页内容是一个 TabsPage
二级/三级页
都 push 到根 Navigation 上
这样一来:
- 一级页显示
Tabs - 二级页压在
TabsPage上面 tabBar自然就看不到了
推荐代码思路
1. 根页面只保留一个 NavPathStack
@Entry
@Component
struct Index {
  private rootPathStack: NavPathStack = new NavPathStack();

  build() {
    Navigation(this.rootPathStack) {
      TabsPage({
        rootPathStack: this.rootPathStack
      })
    }
    .hideToolBar(true)
    .hideTitleBar(true)
  }
}
这里我建议:
- 根
Navigation把默认标题栏先隐藏 - 一级 tab 页的标题自己画
- 二级页再用
NavDestination单独配置标题
2. Tabs 页面只负责一级内容,不再放 Navigation
@Component
struct TabsPage {
  @Prop rootPathStack: NavPathStack
  @State currentIndex: number = 0

  build() {
    Column() {
      this.HeaderBuilder()

      Tabs({ barPosition: BarPosition.End, index: this.currentIndex }) {
        TabContent() {
          this.HomeTabBuilder()
        }.tabBar('首页')

        TabContent() {
          this.MsgTabBuilder()
        }.tabBar('消息')

        TabContent() {
          this.MineTabBuilder()
        }.tabBar('我的')
      }
      .onChange((index: number) => {
        this.currentIndex = index
      })
      .layoutWeight(1)
    }
    .width('100%')
    .height('100%')
  }

  @Builder
  HeaderBuilder() {
    Row() {
      Text(this.currentIndex === 0 ? '首页' : this.currentIndex === 1 ? '消息' : '我的')
        .fontSize(24)
        .fontWeight(FontWeight.Bold)
    }
    .width('100%')
    .padding(16)
  }

  @Builder
  HomeTabBuilder() {
    Column() {
      List({ space: 10 }) {
        ListItem() {
          Text('列表项')
        }
        .width('100%')
        .height(100)
        .backgroundColor(Color.Orange)
      }
      .layoutWeight(1)

      Button('跳转到二级页面')
        .onClick(() => {
          this.rootPathStack.pushPath({ name: 'PageA' })
        })
    }
    .width('100%')
    .height('100%')
  }

  @Builder
  MsgTabBuilder() {
    Column() {
      Text('消息页')
      Button('跳转到消息二级页')
        .onClick(() => {
          this.rootPathStack.pushPath({ name: 'MsgSecondPage' })
        })
    }
    .width('100%')
    .height('100%')
    .justifyContent(FlexAlign.Center)
    .alignItems(HorizontalAlign.Center)
  }

  @Builder
  MineTabBuilder() {
    Column() {
      Text('我的')
    }
    .width('100%')
    .height('100%')
    .justifyContent(FlexAlign.Center)
    .alignItems(HorizontalAlign.Center)
  }
}
这样做的效果
一级页
- 显示
Tabs - 底部
tabBar可切换
二级页
rootPathStack.pushPath(...)后- 根导航压入新页面
TabsPage整体被盖住- 底部
tabBar自然不显示
这就是大多数 App 的典型结构。
标题怎么处理
这是你刚才的另一个痛点。
一级 Tab 页标题
不要依赖 Navigation.title() 自动切换。
因为 tab 切换不是导航切换,所以最稳妥的方法是:
- 在
TabsPage里自己做顶部标题区域 - 根据
currentIndex切换标题文本
也就是上面 HeaderBuilder() 这种写法。
二级/三级页标题
交给 Navigation / NavDestination 去管。
也就是:
- 一级 tabs 页:自定义 header
- 二级详情页:导航标题栏
这是最清晰的分工。
如果你特别想“每个 Tab 都有独立返回栈”怎么办
那就是另一种结构了:
- 每个 Tab 一个独立
NavPathStack - 每个 TabContent 内部一个
Navigation - 同时自己控制底部
tabBar的显示隐藏
但这套结构会复杂很多,因为你要自己解决:
- 某个 Tab 进入二级页后是否隐藏 tabBar
- 切别的 tab 时是否保留栈
- 返回时 tabBar 是否恢复
- 顶部标题如何跟各 tab 栈同步
也就是说:
它适合“每个 tab 独立导航栈”的产品需求,但不适合你现在这个“典型 app 结构”诉求。
你的问题描述里,更像是想要:
- 一级有 tab
- 二级页隐藏 tabBar
那就别给每个 tab 单独套 Navigation。
一句话建议
你这种场景,最推荐:
- 一个根
Navigation - 一个
TabsPage作为首页 - 所有二三级页都 push 到根
NavPathStack - 一级 tab 标题自己画,不依赖
Navigation.title()
你现在应该怎么改
把这三份:
private homePathStack: NavPathStack = new NavPathStack();
private msgPathStack: NavPathStack = new NavPathStack();
private minePathStack: NavPathStack = new NavPathStack();
先收敛成一个:
private rootPathStack: NavPathStack = new NavPathStack();
然后:
TabContent里去掉Navigation(...)- 按钮点击统一改成:
this.rootPathStack.pushPath({ name: 'PageA' })


Navigation.title(this.tabTitles[this.currentIndex]) 动态绑定,Tabs.onChange切换时,标题展示确实有点延迟,改为Tabs.onTabBarClick就没有延迟了:
@Entry
@Component
struct Index {
    private pathStack: NavPathStack = new NavPathStack();
    @State currentIndex: number = 0
    // 1. 定义与 Tab 顺序对应的标题数组
    private readonly tabTitles: string[] = ['首页', '消息', '我的']
    private tabsController: TabsController = new TabsController()

    build() {
        Navigation(this.pathStack) {
            Tabs({ barPosition: BarPosition.End, controller: this.tabsController, index: this.currentIndex }) {
                TabContent() {
                    Column() {
                        Button('跳转到二级页面')
                            .onClick(() => {
                                this.pathStack.pushPath({ name: 'PageA' })
                            })
                        }
                }.tabBar('首页')

                TabContent() {
                    Column() {
                        Text('消息')
                        Image($r('sys.media.ai_recognize'))
                                .width(100)
                        Button('跳转到消息二级页').onClick((event: ClickEvent) => {
                                this.pathStack.pushPath({ name: 'MsgSecondPage' })
                        })
                    }
                }.tabBar('消息')

                TabContent() {
                    Column() {
                            Text('我的')
                    }
                    .width('100%')
                    .height('100%')
                    .backgroundColor(Color.Orange)
                    .alignItems(HorizontalAlign.Center)
                    .justifyContent(FlexAlign.Center)
                }
                .tabBar('我的')
            }
            .animationDuration(0)
            .onChange((index: number) => {
                    // this.currentIndex = index
            })
            .onTabBarClick((index: number) => {
                    this.currentIndex = index
            })
        }
        .title(this.tabTitles[this.currentIndex])
        .hideBackButton(true)
        .titleMode(NavigationTitleMode.Mini)

    }
}

这个延迟多半不是 Navigation.title 不能更新,而是 Tabs 切换动画和 onChange/onSelected 触发时机带来的视觉差。建议仍保留一个外层 Navigation,一级页标题由 currentIndex 驱动,二级页在各自 NavDestination 里设 title。如果希望标题和 Tab 内容同帧变化,可以隐藏 Navigation 一级 title,自己在 Tabs 上方渲染 Text(titles[currentIndex]) 作为标题栏;二级页继续用同一个 NavPathStack push,这样 TabBar 也不会在二级页露出。

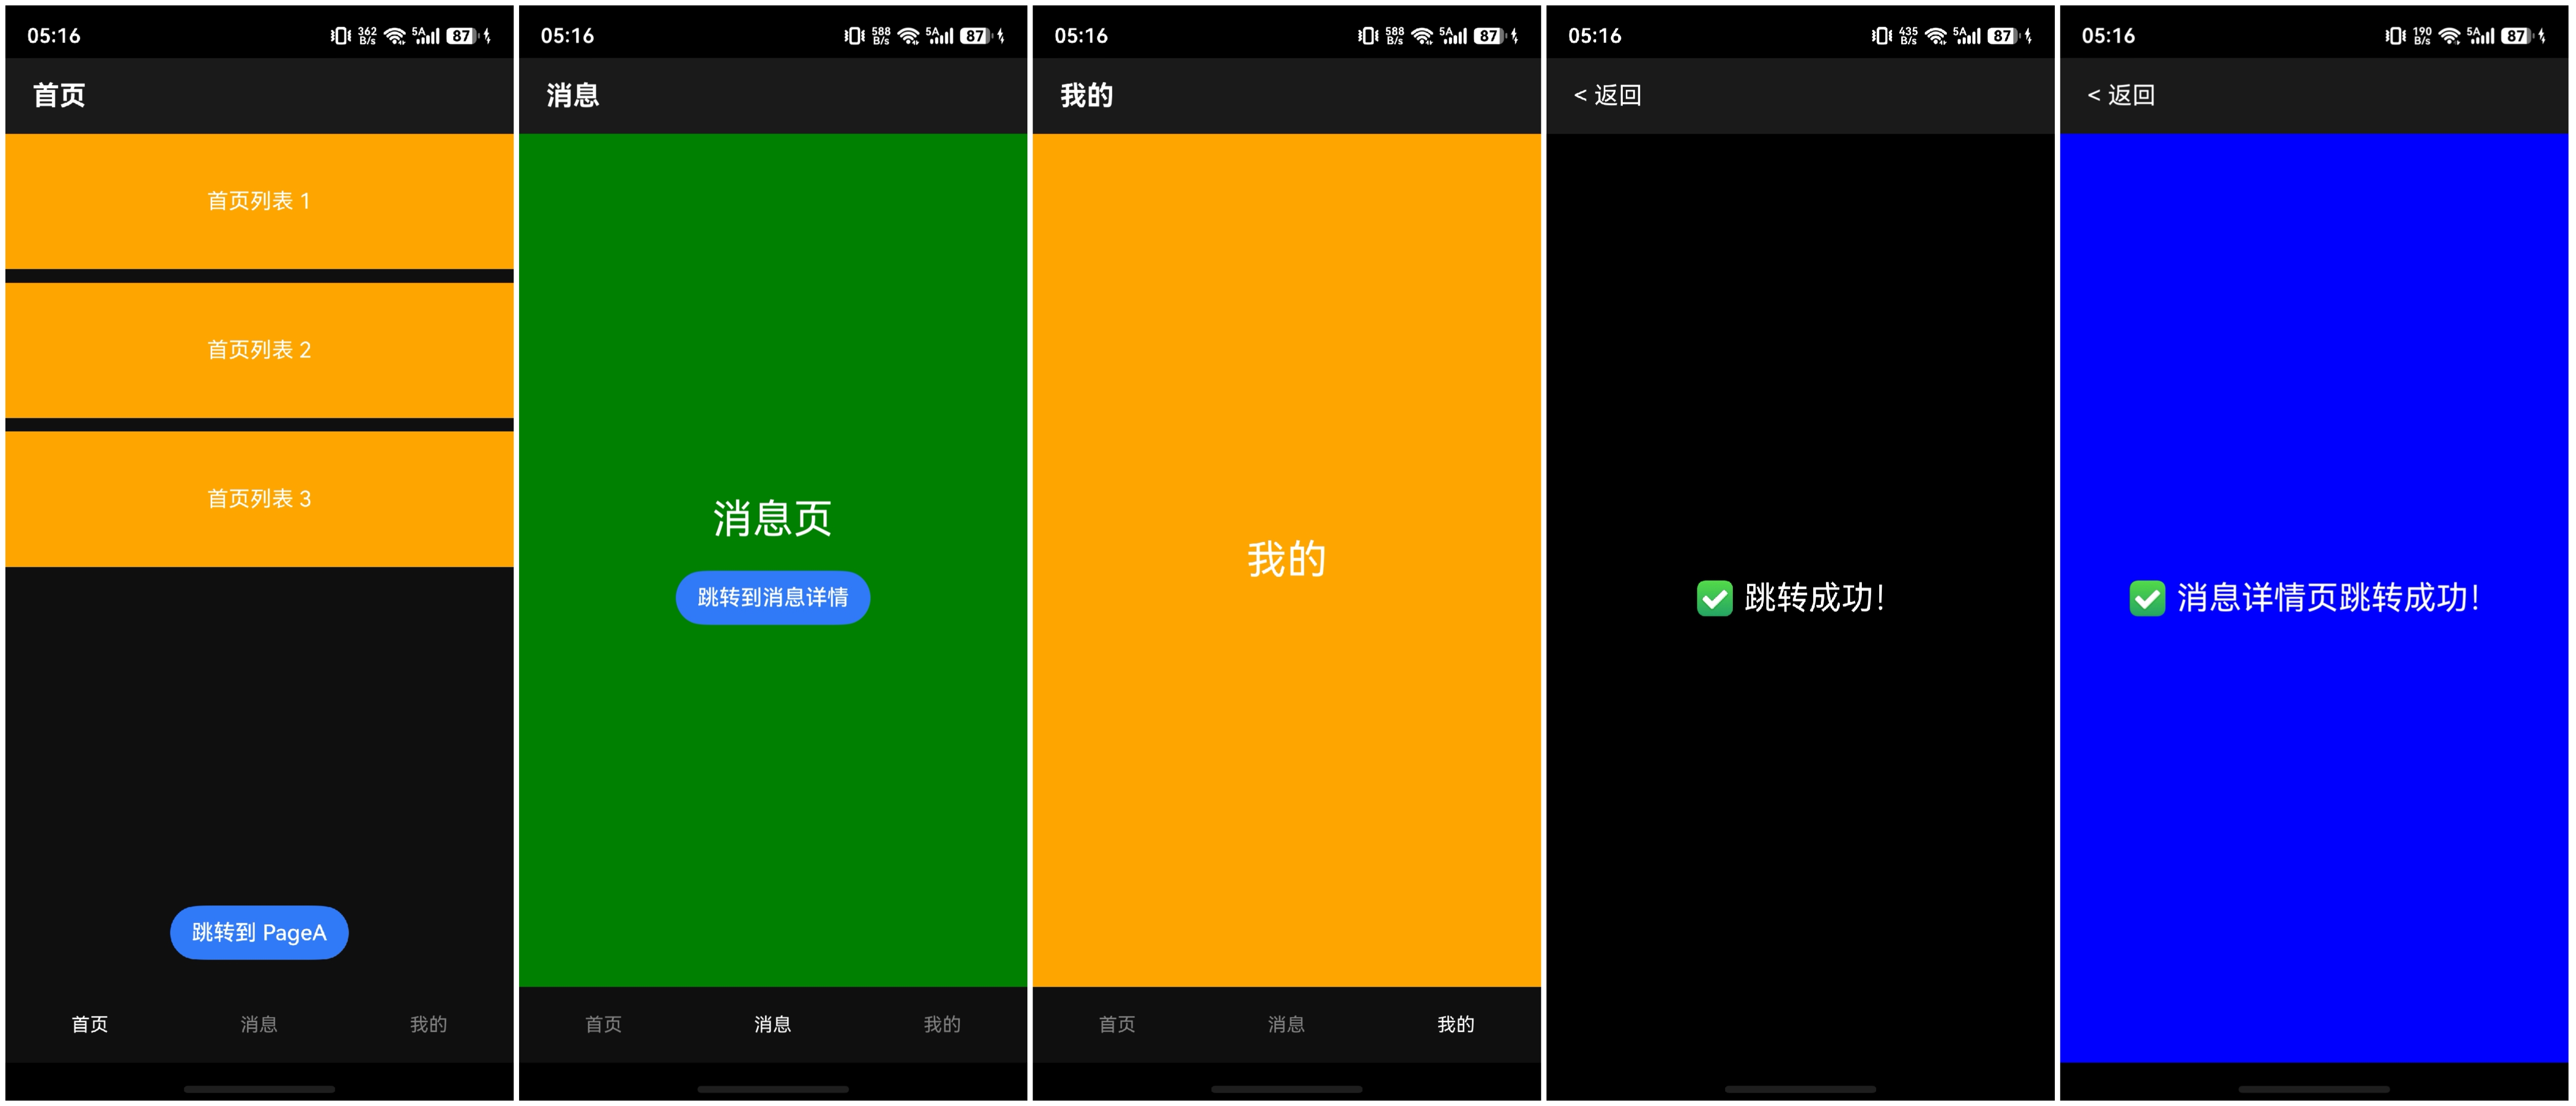
Index.ets
// ✅ 必须加这一行导入 router
import router from '@ohos.router'

@Entry
@Component
struct Index {
  @State currentTitle: string = '首页'
  @State currentIndex: number = 0

  build() {
    Column() {
      // 顶部标题栏
      Row() {
        Text(this.currentTitle)
          .fontSize(20)
          .fontWeight(FontWeight.Bold)
          .fontColor(Color.White)
      }
      .width('100%')
      .height(56)
      .padding({ left: 20 })
      .backgroundColor('#1A1A1A')

      // Tabs 内容
      Tabs({ barPosition: BarPosition.End, index: this.currentIndex }) {
        // Tab 1:首页
        TabContent() {
          Column() {
            List({ space: 10 }) {
              ForEach([1, 2, 3], (item: number) => {
                ListItem() {
                  Text(`首页列表 ${item}`)
                    .fontColor(Color.White)
                }
                .width('100%')
                .height(100)
                .backgroundColor(Color.Orange)
              })
            }
            .layoutWeight(1)

            // 跳转按钮(简化版)
            Button('跳转到 PageA')
              .onClick(() => {
                // 核心跳转代码
                router.pushUrl({ url: 'pages/PageA' })
              })
              .margin({ bottom: 20 })
          }
          .width('100%')
          .height('100%')
        }
        .tabBar(this.TabBarBuilder('首页', 0))

        // Tab 2:消息
        TabContent() {
          Column() {
            Text('消息页')
              .fontSize(30)
              .fontColor(Color.White)
            Button('跳转到消息详情')
              .onClick(() => {
                router.pushUrl({ url: 'pages/MsgSecondPage' })
              })
              .margin({ top: 20 })
          }
          .width('100%')
          .height('100%')
          .backgroundColor(Color.Green)
          .justifyContent(FlexAlign.Center)
        }
        .tabBar(this.TabBarBuilder('消息', 1))

        // Tab 3:我的
        TabContent() {
          Column() {
            Text('我的')
              .fontSize(30)
              .fontColor(Color.White)
          }
          .width('100%')
          .height('100%')
          .backgroundColor(Color.Orange)
          .justifyContent(FlexAlign.Center)
        }
        .tabBar(this.TabBarBuilder('我的', 2))
      }
      .onChange((index: number) => {
        const titles = ['首页', '消息', '我的']
        this.currentTitle = titles[index]
        this.currentIndex = index
      })
      .layoutWeight(1)
    }
    .width('100%')
    .height('100%')
    .backgroundColor('#0F0F0F')
  }

  @Builder
  TabBarBuilder(title: string, index: number) {
    Column() {
      Text(title)
        .fontSize(14)
        .fontColor(this.currentIndex === index ? Color.White : Color.Gray)
    }
    .width('100%')
    .height(56)
    .justifyContent(FlexAlign.Center)
  }
}
PageA.ets(二级页)
// ✅ 必须加这一行导入 router
import router from '@ohos.router'

@Entry
@Component
struct PageA {
  build() {
    Column() {
      // 返回按钮
      Row() {
        Text("< 返回")
          .fontSize(18)
          .fontColor(Color.White)
          .onClick(() => {
            router.back()
          })
        Blank()
      }
      .width('100%')
      .height(56)
      .padding({ left: 20 })
      .backgroundColor('#1A1A1A')

      // 内容
      Column() {
        Text('✅ 跳转成功!')
          .fontSize(24)
          .fontColor(Color.White)
      }
      .layoutWeight(1)
      .justifyContent(FlexAlign.Center)
    }
    .width('100%')
    .height('100%')
    .backgroundColor(Color.Black)
  }
}
MsgSecondPage.ets(消息二级页)
// ✅ 必须加这一行导入 router
import router from '@ohos.router'

@Entry
@Component
struct MsgSecondPage {
  build() {
    Column() {
      Row() {
        Text("< 返回")
          .fontSize(18)
          .fontColor(Color.White)
          .onClick(() => {
            router.back()
          })
        Blank()
      }
      .width('100%')
      .height(56)
      .padding({ left: 20 })
      .backgroundColor('#1A1A1A')

      Column() {
        Text('✅ 消息详情页跳转成功!')
          .fontSize(24)
          .fontColor(Color.White)
      }
      .layoutWeight(1)
      .justifyContent(FlexAlign.Center)
    }
    .width('100%')
    .height('100%')
    .backgroundColor(Color.Blue)
  }
}
典型底部 Tab + 二级页结构,建议只保留一个外层 Navigation,把 Tabs 作为首页内容放进去;二级页通过同一个 NavPathStack push 到 Navigation 栈里,这样二级页会覆盖整个内容区,TabBar 不会继续露在页面底部。标题可以两种处理:一级 Tab 页面用 Navigation.title(this.tabTitles[this.currentIndex]) 动态绑定;二级页则在各自 NavDestination 里设置 title。不要给每个 TabContent 再套一个独立 Navigation,除非你明确希望每个 Tab 内部独立维护栈且二级页仍保留底部栏。如果要“每个 Tab 独立栈 + 进入二级隐藏底部栏”,需要根据当前 tab 的 pathStack.size() 条件渲染/隐藏 Tabs。

我试了Navigation.title(this.tabTitles[this.currentIndex]) 动态绑定,感觉在切换时,标题展示有点延迟,效果没有上面那个兄弟的方法好

在Index.ets中的最外层使用一个Navigation控制,
每个tabContent单独给一个NavDestination控制。
Navigation(this.pageInfos) {
  //Tabs
}
.hideBackButton(true)
.titleMode(NavigationTitleMode.Mini)
.mode(NavigationMode.Stack)
.title({
        builder: undefined,
        height: 0//目的是为了backgroundColor延伸到状态栏
}, { backgroundColor: $r('app.color.theme') })
大概这样子。
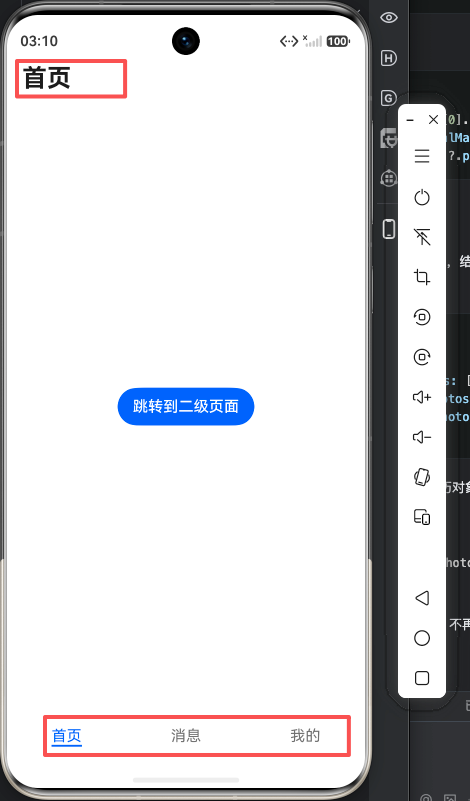
如果不需要显示Navigation的title没问题,现在需要显示,在切换tabbar的时候,顶部的标题就不会变,我现在用动态赋值的方法处理了
@Entry
@Component
struct Index {
  private pathStack: NavPathStack = new NavPathStack();
  @State currentIndex: number = 0
  // 1. 定义与 Tab 顺序对应的标题数组
  private readonly tabTitles: string[] = ['首页','消息', '我的']
  private tabsController: TabsController = new TabsController()
  build() {
    Navigation(this.pathStack) {
      Tabs({ barPosition: BarPosition.End ,controller: this.tabsController, index: this.currentIndex}) {
        TabContent() {
          Column() {
            Button('跳转到二级页面')
              .onClick(() => {
                this.pathStack.pushPath({ name: 'PageA' })
              })
          }
        }.tabBar('首页')

        TabContent() {
          Column() {
            Text('消息')
            Image($r('sys.media.ai_recognize'))
              .width(100)
            Button('跳转到消息二级页').onClick((event: ClickEvent) => {
              this.pathStack.pushPath({ name: 'MsgSecondPage' })
            })
          }
        }.tabBar('消息')

        TabContent() {
          Column() {
            Text('我的')
          }
          .width('100%')
          .height('100%')
          .backgroundColor(Color.Orange)
          .alignItems(HorizontalAlign.Center)
          .justifyContent(FlexAlign.Center)
        }
        .tabBar('我的')
      }
      .onChange((index: number) => {
        this.currentIndex = index
      })
    }
    .title(this.tabTitles[this.currentIndex])
    .hideBackButton(true)
    .titleMode(NavigationTitleMode.Mini)

  }
}

Navigation组件用于管理页面栈路由和导航跳转,支持单页或多层页面切换。Tabs组件实现标签式内容切换,每个Tab对应独立子页面内容。两者可组合使用:用Tabs作为一级导航,内部子页面再用Navigation管理二级路由。注意Tabs的barPosition控制标签位置,Navigation需搭配NavPathStack管理路由栈。
对于你的典型应用结构,核心解决方案是:在 Tabs 内部,为每个 TabContent 使用独立的 Navigation,并必须设置 mode: NavigationMode.Stack。
当前你的代码已经为每个 Tab 配置了独立的 NavPathStack,这是正确的。问题在于没有显式指定导航模式,导致跳转到二级页面时 Navigation 组件未能全屏覆盖,进而导致底部的 TabBar 未被隐藏。
修改后代码示例如下:
@Entry
@Component
struct Index {
  private homePathStack: NavPathStack = new NavPathStack();
  private msgPathStack: NavPathStack = new NavPathStack();
  private minePathStack: NavPathStack = new NavPathStack();

  build() {
    Tabs({ barPosition: BarPosition.End }) {
      TabContent() {
        // 关键点:设置 mode 为 Stack,实现页面跳转时带过场动画并全屏覆盖
        Navigation(this.homePathStack) {
          Column() {
            // ... 你的列表和按钮代码
            Button('跳转到二级页面')
              .onClick(() => {
                this.homePathStack.pushPath({ name: 'PageA' })
              })
          }
        }
        .mode(NavigationMode.Stack) // 必须显式指定
        .title('首页')
        .hideToolBar(true)
      }.tabBar('首页')

      TabContent() {
        Navigation(this.msgPathStack) {
          Column() {
            Text('消息')
            Button('跳转到消息二级页').onClick(() => {
              this.msgPathStack.pushPath({ name: 'MsgSecondPage' })
            })
          }
        }
        .mode(NavigationMode.Stack)
        .title('消息')
        .hideToolBar(true)
      }.tabBar('消息')

      TabContent() {
        Navigation(this.minePathStack) {
          Column() {
            Text('我的')
          }
        }
        .mode(NavigationMode.Stack)
        .title('我的')
        .hideToolBar(true)
      }.tabBar('我的')
    }
  }
}
原理说明:NavigationMode.Stack 模式下,每个 Tab 内的导航栈变化时,推送的新页面会以一个完整的页面栈形式覆盖整个屏幕,自然地遮挡住底部的 Tabs 组件。返回一级页时,TabBar 又会重新出现,符合常见 App 的交互预期。
