




HarmonyOS鸿蒙Next中像这种动态图标是怎么实现的
HarmonyOS鸿蒙Next中像这种动态图标是怎么实现的
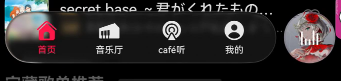
这种播放音乐添加可动的波形图怎么做,代表正在播放
更多关于HarmonyOS鸿蒙Next中像这种动态图标是怎么实现的的实战教程也可以访问 https://www.itying.com/category-93-b0.html
2 回复

动态图标可通过ArkUI的显式动画(如animateTo)或隐式动画(属性animation)实现,支持对缩放、旋转、透明度等属性做过渡。复杂动效可加载Lottie动画(.json文件)或使用Canvas组件自定义绘制。
更多关于HarmonyOS鸿蒙Next中像这种动态图标是怎么实现的的实战系列教程也可以访问 https://www.itying.com/category-93-b0.html

在 HarmonyOS Next 中实现动态波形图,通常使用 Canvas 组件 配合定时器/动画循环,持续修改波形数据并重绘。
核心思路:用 CanvasRenderingContext2D 绘制多条竖线,每条竖线的高度由 @State 数组控制。通过 setInterval 或 requestAnimationFrame 定时随机生成新高度值,触发 Canvas 重绘,形成波动效果。
示例代码:
@Entry
@Component
struct WaveAnimation {
  @State waveHeights: number[] = new Array(20).fill(50);
  private timer: number = -1;

  aboutToAppear() {
    // 每200ms随机更新高度
    this.timer = setInterval(() => {
      this.waveHeights = this.waveHeights.map(() => Math.random() * 100);
    }, 200);
  }

  aboutToDisappear() {
    clearInterval(this.timer);
  }

  build() {
    Canvas({ width: '100%', height: 100 })
      .onReady((canvas, ctx) => {
        const barWidth = ctx.width / this.waveHeights.length;
        ctx.lineWidth = 2;
        ctx.strokeStyle = '#007AFF';
        const draw = () => {
          ctx.clearRect(0, 0, ctx.width, ctx.height);
          this.waveHeights.forEach((h, i) => {
            const x = i * barWidth;
            const barH = (h / 100) * ctx.height;
            ctx.fillStyle = '#007AFF';
            ctx.fillRect(x, ctx.height - barH, barWidth - 2, barH);
          });
          requestAnimationFrame(draw);
        };
        draw();
      })
  }
}
也可以使用 属性动画 单独控制每条竖线高度变化,但用 Canvas 循环绘制性能更好且更易控制波形随机性。若需要平滑过渡,可将高度值插值后再绘制。
另一种轻量方案:将波形做成 多帧图片(如 PNG 序列),通过 Image 组件配合 animateTo 切换图片索引实现动画,但灵活性不如 Canvas。
