


Flutter key:LocalKey、GlobalKey
Flutter key:LocalKey、GlobalKey对应教程 https://www.bilibili.com/video/BV1S4411E7LY/?p=45
我们平时一定接触过很多的 Widget,比如 Container、Row、Column 等,它们在我们绘制界面的过程中发挥着重要的作用。但是不知道你有没有注意到,在几乎每个 Widget 的构造函数中,都有一个共同的参数,它们通常在参数列表的第一个,那就是 Key。
在Flutter中,Key是不能重复使用的,所以Key一般用来做唯一标识。组件在更新的时候,其状态的保存主要是通过判断组件的类型或者key值是否一致。因此,当各组件的类型不同的时候,类型已经足够用来区分不同的组件了,此时我们可以不必使用key。但是如果同时存在多个同一类型的控件的时候,此时类型已经无法作为区分的条件了,我们就需要使用到key。
一、Flutter没有 Key 会发生什么奇怪现象
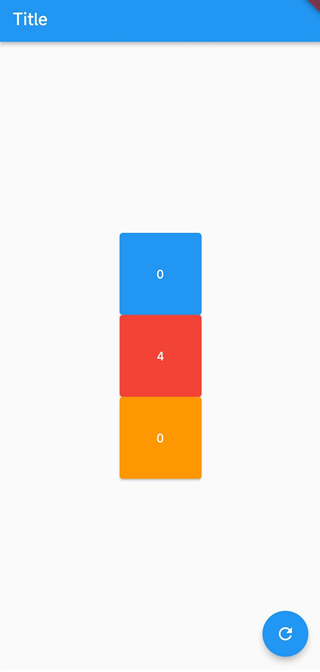
如下面例: 定义了一个StatefulWidget的Box,点击Box的时候可以改变Box里面的数字,当我们重新对Box排序的时候Flutter就无法识别到Box的变化了, 这是什么原因呢?
import 'package:flutter/material.dart';

void main() {
  runApp(const MyApp());
}

class MyApp extends StatelessWidget {
  const MyApp({Key? key}) : super(key: key);

  // This widget is the root of your application.
  @override
  Widget build(BuildContext context) {
    return MaterialApp(
      title: 'Flutter Demo',
      theme: ThemeData(
        primarySwatch: Colors.blue,
      ),
      home: const MyHomePage(),
    );
  }
}

class MyHomePage extends StatefulWidget {
  const MyHomePage({super.key});

  @override
  State<MyHomePage> createState() => _MyHomePageState();
}

class _MyHomePageState extends State<MyHomePage> {
  List<Widget> list = [
    Box(
      color: Colors.blue,
    ),
    Box(
      color: Colors.red,
    ),
    Box(
      color: Colors.orange,
    )
  ];
  @override
  Widget build(BuildContext context) {
    return Scaffold(
      floatingActionButton: FloatingActionButton(
        onPressed: () {

          setState(() {
            list.shuffle();  //打乱list的顺序
          });
        },
        child: const Icon(Icons.refresh),
      ),
      appBar: AppBar(
        title: const Text('Title'),
      ),
      body: Center(
        child: Column(
          mainAxisAlignment: MainAxisAlignment.center,
          children: list,
        ),
      ),
    );
  }
}

class Box extends StatefulWidget {
  Color color;
  Box({super.key, required this.color});

  @override
  State<Box> createState() => _BoxState();
}

class _BoxState extends State<Box> {
  int _count = 0;
  @override
  Widget build(BuildContext context) {
    return SizedBox(
      height: 100,
      width: 100,
      child: ElevatedButton(
        style: ButtonStyle(
            backgroundColor: MaterialStateProperty.all(widget.color)),
        onPressed: () {
          setState(() {
            _count++;
          });
        },
        child: Center(
          child: Text("$_count"),
        ),
      ),
    );
  }
}
运行后我们发现改变list Widget顺序后,Widget颜色会变化,但是每个Widget里面的文本内容并没有变化,为什么会这样呢?当我们List重新排序后Flutter检测到了Widget的顺序变化,所以重新绘制List Widget,但是Flutter 发现List Widget 里面的元素没有变化,所以就没有改变Widget里面的内容。
把List 里面的Box的颜色改成一样,这个时候您重新对list进行排序,就很容易理解了。重新排序后虽然执行了setState,但是代码和以前是一样的,所以Flutter不会重构List Widget里面的内容, 也就是Flutter没法通过Box里面传入的参数来识别Box是否改变。如果要让FLutter能识别到List Widget子元素的改变,就需要给每个Box指定一个key。
   List<Widget> list = [
    Box(
      color: Colors.blue,
    ),
    Box(
      color: Colors.blue,
    ),
    Box(
      color: Colors.blue,
    )
  ];
二、Flutter key:LocalKey、GlobalKey
在Flutter中,Key是不能重复使用的,所以Key一般用来做唯一标识。组件在更新的时候,其状态的保存主要是通过判断组件的类型或者key值是否一致。因此,当各组件的类型不同的时候,类型已经足够用来区分不同的组件了,此时我们可以不必使用key。但是如果同时存在多个同一类型的控件的时候,此时类型已经无法作为区分的条件了,我们就需要使用到key。
Flutter key子类包含LocalKey和GlobalKey。
- 局部键(LocalKey):ValueKey、ObjectKey、UniqueKey
- 全局键(GlobalKey): GlobalKey、GlobalObjectKey
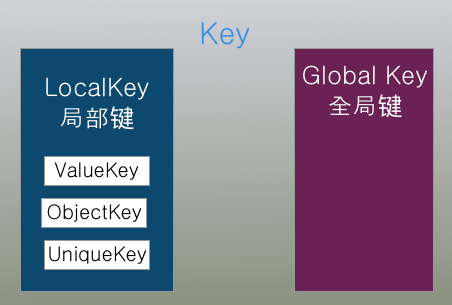
ValueKey(值key)把一个值作为key ,UniqueKey(唯一key)程序生成唯一的Key,当我们不知道如何指定ValueKey的时候就可以使用UniqueKey,ObjectKey(对象key)把一个对象实例作为key。
GlobalKey(全局key),GlobalObjectKey(全局Objec key,和ObjectKey有点类似)
2.1 LocalKey改造上面的例子
import 'package:flutter/material.dart';

void main() {
  runApp(const MyApp());
}

class MyApp extends StatelessWidget {
  const MyApp({Key? key}) : super(key: key);

  // This widget is the root of your application.
  @override
  Widget build(BuildContext context) {
    return MaterialApp(
      title: 'Flutter Demo',
      theme: ThemeData(
        primarySwatch: Colors.blue,
      ),
      home: const MyHomePage(),
    );
  }
}

class MyHomePage extends StatefulWidget {
  const MyHomePage({super.key});

  @override
  State<MyHomePage> createState() => _MyHomePageState();
}

class _MyHomePageState extends State<MyHomePage> {
  List<Widget> list = [
    Box(
      key: const ValueKey(1),
      color: Colors.blue,
    ),
    Box(
      key: ObjectKey(Box(color: Colors.red)),
      color: Colors.red,
    ),
    Box(
      key:UniqueKey(), //程序自动生成一个key
      color: Colors.orange,
    )
  ];
  @override
  Widget build(BuildContext context) {

    return Scaffold(
      floatingActionButton: FloatingActionButton(
        onPressed: () {
          setState(() {
            list.shuffle();  //打乱list的顺序
          });
        },
        child: const Icon(Icons.refresh),
      ),
      appBar: AppBar(
        title: const Text('Title'),
      ),
      body: Center(
        child: Column(
          mainAxisAlignment: MainAxisAlignment.center,
          children: list,
        ),
      ),
    );
  }
}

class Box extends StatefulWidget {
  Color color;
  Box({super.key, required this.color});

  @override
  State<Box> createState() => _BoxState();
}

class _BoxState extends State<Box> {
  int _count = 0;
  @override
  Widget build(BuildContext context) {
    return SizedBox(
      height: 100,
      width: 100,
      child: ElevatedButton(
        style: ButtonStyle(
            backgroundColor: MaterialStateProperty.all(widget.color)),
        onPressed: () {
          setState(() {
            _count++;
          });
        },
        child: Center(
          child: Text("$_count"),
        ),
      ),
    );
  }
}
2.2 GlobalKey的使用
如果把LocalKey比作局部变量, GlobalKey就类似于全局变量
下面使用了LocalKey,当屏幕状态改变的时候把 Colum换成了Row,Box的状态就会丢失。
import 'package:flutter/material.dart';

void main() {
  runApp(const MyApp());
}

class MyApp extends StatelessWidget {
  const MyApp({Key? key}) : super(key: key);

  // This widget is the root of your application.
  @override
  Widget build(BuildContext context) {
    return MaterialApp(
      title: 'Flutter Demo',
      theme: ThemeData(
        primarySwatch: Colors.blue,
      ),
      home: const MyHomePage(),
    );
  }
}

class MyHomePage extends StatefulWidget {
  const MyHomePage({super.key});

  @override
  State<MyHomePage> createState() => _MyHomePageState();
}

class _MyHomePageState extends State<MyHomePage> {
  List<Widget> list = [
    Box(
      key: const ValueKey(1),
      color: Colors.blue,
    ),
    Box(
      key: ObjectKey(Box(color: Colors.red)),
      color: Colors.red,
    ),
    Box(
      key:UniqueKey(), //程序自动生成一个key
      color: Colors.orange,
    )
  ];
  @override
  Widget build(BuildContext context) {
    print(MediaQuery.of(context).orientation);
    return Scaffold(
      floatingActionButton: FloatingActionButton(
        onPressed: () {
          setState(() {
            list.shuffle();  //打乱list的顺序
          });
        },
        child: const Icon(Icons.refresh),
      ),
      appBar: AppBar(
        title: const Text('Title'),
      ),
      body: Center(
        child: MediaQuery.of(context).orientation==Orientation.portrait?Column(
          mainAxisAlignment: MainAxisAlignment.center,
          children: list,
        ):Row(
          mainAxisAlignment: MainAxisAlignment.center,
          children: list,
        ),
      ),
    );
  }
}

class Box extends StatefulWidget {
  Color color;
  Box({super.key, required this.color});

  @override
  State<Box> createState() => _BoxState();
}

class _BoxState extends State<Box> {
  int _count = 0;
  @override
  Widget build(BuildContext context) {
    return SizedBox(
      height: 100,
      width: 100,
      child: ElevatedButton(
        style: ButtonStyle(
            backgroundColor: MaterialStateProperty.all(widget.color)),
        onPressed: () {
          setState(() {
            _count++;
          });
        },
        child: Center(
          child: Text("$_count"),
        ),
      ),
    );
  }
}
在前面我们介绍过一个Widget状态的保存主要是通过判断组件的类型或者key值是否一致。LocalKey只在当前的组件树有效,所以把Colum换成了Row的时候Widget的状态就丢失了。为了解决这个问题我们就可以使用GlobalKey。
GlobalKey优化,把LocalKey换成GlobalKey,如下:
import 'package:flutter/material.dart';

void main() {
  runApp(const MyApp());
}

class MyApp extends StatelessWidget {
  const MyApp({Key? key}) : super(key: key);

  // This widget is the root of your application.
  @override
  Widget build(BuildContext context) {
    return MaterialApp(
      title: 'Flutter Demo',
      theme: ThemeData(
        primarySwatch: Colors.blue,
      ),
      home: const MyHomePage(),
    );
  }
}

class MyHomePage extends StatefulWidget {
  const MyHomePage({super.key});

  @override
  State<MyHomePage> createState() => _MyHomePageState();
}

class _MyHomePageState extends State<MyHomePage> {
  List<Widget> list = [];
  final GlobalKey _key1 = GlobalKey();
  final GlobalKey _key2 = GlobalKey();
  final GlobalKey _key3 = GlobalKey();
  @override
  void initState() {
    // TODO: implement initState
    super.initState();
    list = [
      Box(
        key: _key1,
        color: Colors.blue,
      ),
      Box(
        key: _key2,
        color: Colors.red,
      ),
      Box(
        key: _key3, //程序自动生成一个key
        color: Colors.orange,
      )
    ];
  }

  @override
  Widget build(BuildContext context) {
    print(MediaQuery.of(context).orientation);
    return Scaffold(
      floatingActionButton: FloatingActionButton(
        onPressed: () {
          setState(() {
            list.shuffle(); //打乱list的顺序
          });
        },
        child: const Icon(Icons.refresh),
      ),
      appBar: AppBar(
        title: const Text('Title'),
      ),
      body: Center(
        child: MediaQuery.of(context).orientation == Orientation.portrait
            ? Column(
                mainAxisAlignment: MainAxisAlignment.center,
                children: list,
              )
            : Row(
                mainAxisAlignment: MainAxisAlignment.center,
                children: list,
              ),
      ),
    );
  }
}

class Box extends StatefulWidget {
  Color color;
  Box({super.key, required this.color});

  @override
  State<Box> createState() => _BoxState();
}

class _BoxState extends State<Box> {
  int _count = 0;
  @override
  Widget build(BuildContext context) {
    return SizedBox(
      height: 100,
      width: 100,
      child: ElevatedButton(
        style: ButtonStyle(
            backgroundColor: MaterialStateProperty.all(widget.color)),
        onPressed: () {
          setState(() {
            _count++;
          });
        },
        child: Center(
          child: Text("$_count"),
        ),
      ),
    );
  }
}
三、 GlobalKey 获取子组件
_globalKey.currentState 可以获取子组件的状态,执行子组件的方法,_globalKey.currentWidget可以获取子组件的属性,_globalKey.currentContext!.findRenderObject()可以获取渲染的属性。
import 'package:flutter/material.dart';

void main() {
  runApp(const MyApp());
}

class MyApp extends StatelessWidget {
  const MyApp({Key? key}) : super(key: key);

  // This widget is the root of your application.
  @override
  Widget build(BuildContext context) {
    return MaterialApp(
      title: 'Flutter Demo',
      theme: ThemeData(
        primarySwatch: Colors.blue,
      ),
      home: const HomePage(),
    );
  }
}

class HomePage extends StatefulWidget {
  const HomePage({super.key});

  @override
  State<HomePage> createState() => _HomePageState();
}

class _HomePageState extends State<HomePage> {
  final GlobalKey _globalKey = GlobalKey();
  @override
  Widget build(BuildContext context) {
    return Scaffold(
      floatingActionButton: FloatingActionButton(
        child: const Icon(Icons.add),
        onPressed: (){
          //1、获取子组件的状态 调用子组件的属性
          var state=(_globalKey.currentState as _BoxState);
          setState(() {
            state._count++;
          });

          //2、获取子组件的属性
           var box=(_globalKey.currentWidget as Box);
           print(box.color);

           //3、获取子组件渲染的属性
          var renderBox= (_globalKey.currentContext!.findRenderObject() as RenderBox);
          print(renderBox.size);

        },
      ),
      appBar: AppBar(
        title: const Text('Title'),
      ),
      body: Center(
        child: Box(
          key: _globalKey,
          color: Colors.red,
        ),
      ),
    );
  }
}


class Box extends StatefulWidget {
  final Color color;
  const Box({Key? key, required this.color}):super(key: key);

  @override
  State<Box> createState() => _BoxState();
}

class _BoxState extends State<Box> {
  int _count = 0;
  run(){
    print("run");
  }
  @override
  Widget build(BuildContext context) {
    return SizedBox(
      height: 100,
      width: 100,
      child: ElevatedButton(
        style: ButtonStyle(
            backgroundColor: MaterialStateProperty.all(widget.color)),
        onPressed: () {
          setState(() {
            _count++;
          });
        },
        child: Center(
          child: Text("$_count"),
        ),
      ),
    );
  }
}
四、 Widget Tree、Element Tree 和 RenderObject Tree
Flutter应用是由是Widget Tree、Element Tree 和 RenderObject Tree组成
Widget可以理解成一个类,Element可以理解成Widget的实例,Widget与Element的关系可以是一对多,一份配置可以创造多个Element实例
| 属性 | 描述 |
|---|---|
| Widget | Widget就是一个类, 是Element 的配置信息。与Element的关系可以是一对多,一份配置可以创造多个Element实例 |
| Element | Widget 的实例化,内部持有Widget和RenderObject。 |
| RenderObject | 负责渲染绘制 |
默认情况下面,当Flutter同一个 Widget的大小,顺序变化的时候,FLutter不会改变Widget的state。
更多关于Flutter key:LocalKey、GlobalKey的实战教程也可以访问 https://www.itying.com/category-92-b0.html