HarmonyOS 鸿蒙Next状态管理之组件状态管理
HarmonyOS 鸿蒙Next状态管理之组件状态管理
组件的状态管理,首先什么是组件?
组件:(1)系统组件,ArkUI框架中默认内置的基础和容器组件,可直接被开发者调用,比如Column、Text、Divider、Button等。
(2)自定义组件,可复用的UI单元,可组合其他组件,如被@Component装饰的struct。
组件状态与组件之间的关系?
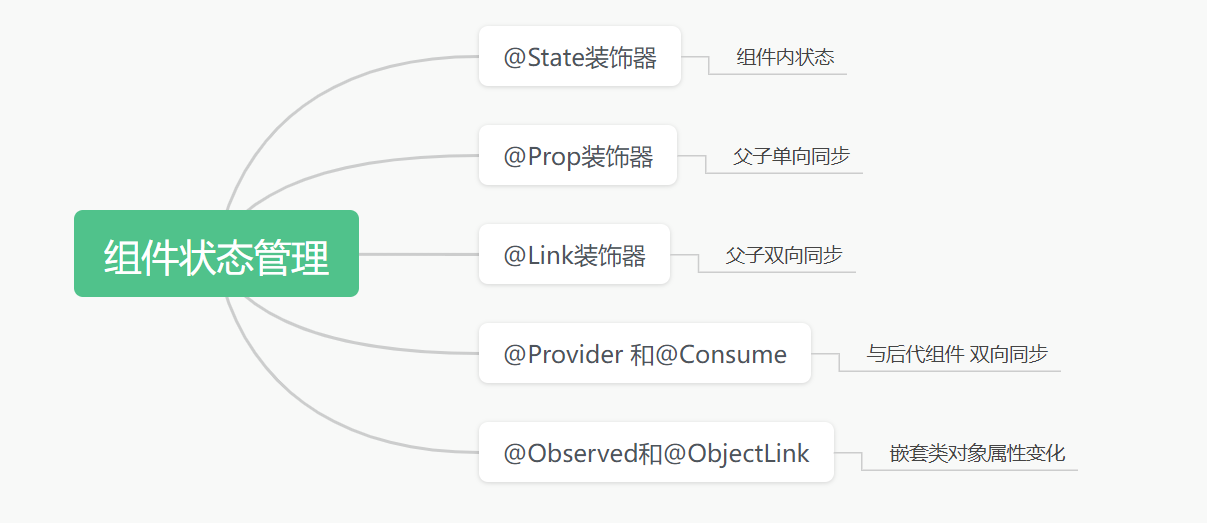
组件展示的UI内容由组件的状态变量来控制。状态变量在不同场景由不同的装饰器来修饰@State、@Prop、@Link、@Provider和@Consume、@Observed和@ObjectLink。
因为状态变量的存在所以页面由静态页面可以变成动态的、有交互的页面。

一、对于简单数据源的状态管理
@State组件内部双向同步数据源
@Component
export struct MyComponent {
@State count: number = 0
build() {
Column() {
Button(当前count:${<span class="hljs-keyword"><span class="hljs-keyword">this</span></span>.count}).onClick(() => {
this.count++
})
}.justifyContent(FlexAlign.Center)
.width(“100%”)
.height(“100%”)
}
}
@Component
@Entry
export struct MyComponent {
@State count: number = 0
build() {
Column() {
Button(当前count:${<span class="hljs-keyword"><span class="hljs-keyword">this</span></span>.count}).onClick(() => {
this.count++
})
ChildComponent({count:this.count})
}.justifyContent(FlexAlign.Center)
.width(“100%”)
.height(“100%”)
}
}
@Component
export struct ChildComponent {
@Prop count: number
build() {
Button(当前count:${<span class="hljs-keyword"><span class="hljs-keyword">this</span></span>.count}).onClick(() => {
this.count++
}).margin(20)
}
}<button style="position: absolute; padding: 4px 8px 0px; cursor: pointer; top: 8px; right: 8px; font-size: 14px;">复制</button>
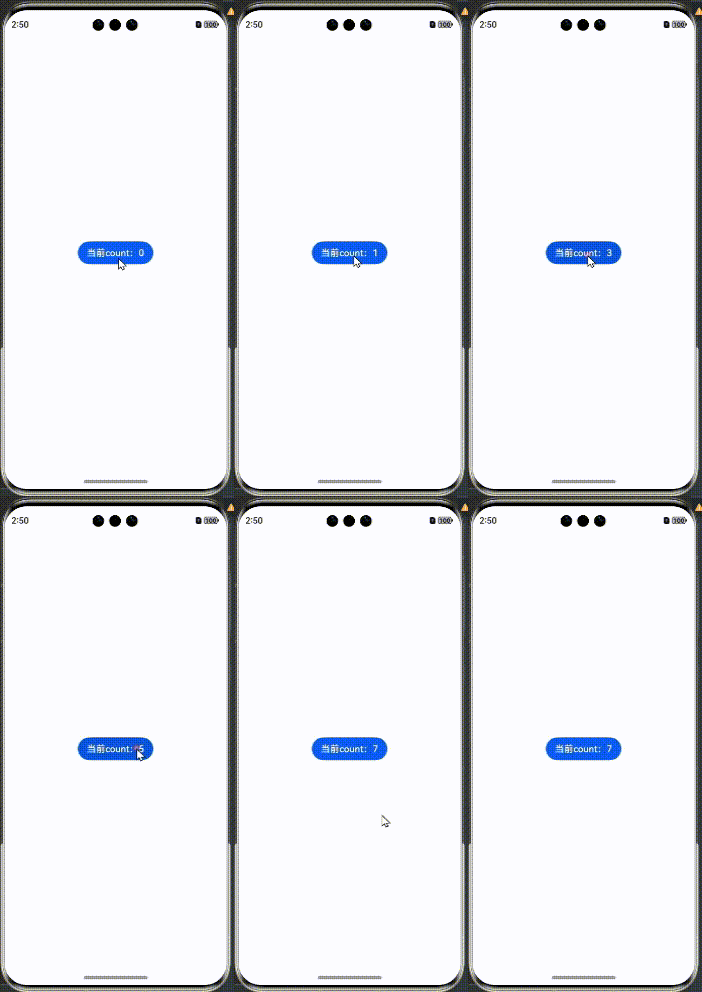
点击父组件中按钮,count加1,子组件的count也加1。
点击子组件中的按钮,子组件中count加1,父组件中count不变化。

@Component
@Entry
export struct MyComponent {
@State count: number = 0
build() {
Column() {
Button(当前count:${<span class="hljs-keyword"><span class="hljs-keyword">this</span></span>.count}).onClick(() => {
this.count++
})
ChildComponent({ count: this.count })
}.justifyContent(FlexAlign.Center)
.width(“100%”)
.height(“100%”)
}
}
@Component
export struct ChildComponent {
@Link count: number
build() {
Button(当前count:${<span class="hljs-keyword"><span class="hljs-keyword">this</span></span>.count}).onClick(() => {
this.count++
}).margin(20)
}
}<button style="position: absolute; padding: 4px 8px 0px; cursor: pointer; top: 8px; right: 8px; font-size: 14px;">复制</button>
点击父组件中按钮,count加1,子组件的count也加1。
点击子组件中的按钮,子组件中count加1,父组件中count也加1。

如果不是仅仅父子两层关系的组件,例如n层关系组件,n>=2,需要使用@Provide和@Consume装饰器来进行双向同步。
@Component
@Entry
export struct MyComponent {
@Provide count: number = 0
build() {
Column() {
Button(当前count:${<span class="hljs-keyword"><span class="hljs-keyword">this</span></span>.count}).onClick(() => {
this.count++
})
ChildComponent()
}.justifyContent(FlexAlign.Center)
.width(“100%”)
.height(“100%”)
}
}
@Component
export struct ChildComponent {
build() {
Column(){
DescendentComponent()
}
}
}
@Component
export struct DescendentComponent {
@Consume count: number
build() {
Column(){
Button(当前count:${<span class="hljs-keyword"><span class="hljs-keyword">this</span></span>.count}).onClick(() => {
this.count++
}).margin(20)
}
}
}<button style="position: absolute; padding: 4px 8px 0px; cursor: pointer; top: 8px; right: 8px; font-size: 14px;">复制</button>
点击父组件按钮,count加1,子组件的子组件count也加1.
点击子组件的子组件的按钮,count加1,父组件count也加1.

二、对于复杂数据源的状态管理
以上都是简单的数据源,如果更为复杂的数据源例如二维数组,数组class,或者class的属性是class等,需要使用@Observed配合ObjectLink来实现双向数据同步。
@Observed观察二维数组的变化
@Observed class MyArray extends Array<Number> { //自定义一个数组类,由@Observed装饰 }@Component @Entry export struct MyComponent { //声明一个数组,元素为自己自定义的数组,来模拟二维数组 @State list: Array<MyArray> = new Array() aboutToAppear(): void { //赋值 let myArray = new MyArray() myArray.push(100) myArray.push(200) myArray.push(300) this.list.push(myArray) }
build() { Column() { Text(
${<span class="hljs-keyword"><span class="hljs-keyword">this</span></span>.list[<span class="hljs-number"><span class="hljs-number">0</span></span>][<span class="hljs-number"><span class="hljs-number">0</span></span>]})//显示自定义数组里的第一个元素 MyCustomView({ myArray: this.list[0] })//将二维数组中的第一个数组传递给自定义组件 Button(“修改数据”).onClick(()=>{ this.list[0][0] = 500 }) }.justifyContent(FlexAlign.Center) .width(“100%”) .height(“100%”) } }
@Component struct MyCustomView { @ObjectLink myArray: MyArray//必须在在定义组件中才能使用@ObjectLink。 build() { Text(${<span class="hljs-keyword"><span class="hljs-keyword">this</span></span>.myArray[<span class="hljs-number"><span class="hljs-number">0</span></span>]})//显示自定义数组里的第一个元素 } }
当点击按钮时,第一个Text没有变化,第二个Text发生变化。
因为第二个Text在自定义组件中,并且变量由@ObjectLink修饰。

@Observed观察对象嵌套对象的变化
@Observed class Student { name: string = ‘’constructor(name: string) { this.name = name } }
class Teacher { student: Student = new Student(“张三”) }
@Component @Entry export struct ClassInClassView { @State teacher:Teacher = new Teacher() build() { Column() { StudentView({student:this.teacher.student}) Button(“修改数据”).onClick(()=>{ this.teacher.student.name = “李四” }) }.justifyContent(FlexAlign.Center) .width(“100%”) .height(“100%”) } }
@Component struct StudentView { @ObjectLink student:Student build() { Text(this.student.name).fontSize(40) } }

更多关于HarmonyOS 鸿蒙Next状态管理之组件状态管理的实战系列教程也可以访问 https://www.itying.com/category-93-b0.html
更多关于HarmonyOS 鸿蒙Next状态管理之组件状态管理的实战系列教程也可以访问 https://www.itying.com/category-93-b0.html
HarmonyOS 鸿蒙Next状态管理之组件状态管理主要涉及几个关键方面:
-
组件状态装饰器:鸿蒙Next提供了多种状态装饰器,如
@State用于组件内部状态管理,当状态变化时,组件会重新渲染。@Provide和@Consume用于父子组件间的状态共享,实现状态的跨组件传递。 -
双向与单向数据绑定:
@Link允许父组件传递状态给子组件,并支持子组件修改该状态(双向绑定),而@Prop则只允许子组件接收父组件的状态(单向传递)。 -
全局状态管理:通过
@ProvideGlobal和@ConsumeGlobal,鸿蒙Next支持全局状态管理,使得状态可以在应用的所有组件中共享。 -
UI状态持久化:鸿蒙Next提供了AppStorage和PersistentStorage等机制,用于持久化存储UI状态,确保应用重启后能够恢复之前的状态。
-
Stage模型:鸿蒙Next引入了Stage模型作为组件间状态管理的基础,通过Stage模型可以灵活地添加或移除子任务,实时同步数据更新,动态呈现UI变化。
如果问题依旧没法解决请联系官网客服,官网地址是:https://www.itying.com/category-93-b0.html。


