HarmonyOS 鸿蒙Next promptAction自定义弹窗无法自定义宽度和弹窗圆角的问题如何解决
HarmonyOS 鸿蒙Next promptAction自定义弹窗无法自定义宽度和弹窗圆角的问题如何解决
【问题现象】
当需要灵活定义弹窗尺寸、圆角以及封装成工具快速调用时,使用当前弹窗方式promptAction.openCustomDialog和CustomDialogController都无法很好的实现。
1、promptAction.openCustomDialog
无法灵活自定义弹窗,宽度无法自定义,弹窗的圆角无法自定义。
2、CustomDialogController
这种方式的问题是使用上很不方便,无法进行工具类封装,需要在调用的地方都实现一次。
【背景知识】
- promptAction.openCustomDialog:openCustomDialog弹窗有限制条件:暂不支持isModal = true与showInSubWindow = true同时使用。弹窗宽度在设备竖屏时默认为 所在窗口宽度 - 左右margin(16vp,设备为2in1时为40vp),最大默认宽度为400vp。
- CustomDialogController__:CustomDialog自定义弹窗只能通过特定的组件触发,无法实现工具封装,适用于单点自定义弹窗,即需要在调用的地方单独实现。
【定位思路】
(1)分析诉求:诉求是需要在多个地方触发显示一个可控制宽高尺寸和可自由设置关闭方式的窗口。
(2)提炼关键功能:窗口、方便调用、尺寸可编辑、关闭方式可控制。
(3)评估方案满足度:
- promptAction.openCustomDialog:不可控制尺寸。
- CustomDialogController:不可封装重复调用。
- 子窗口:可封装接口随处调用,可定制化窗口尺寸、位置、圆角。
【解决方案】
(1)将创建窗口封装成函数实现快速调用创建窗口。
代码示例如下:
// 调用页 index.ets
//步骤1:将创建窗口封装成函数实现快速调用创建窗口。
export  function  createSubWindow(sub:SubWindowClass){
  //1.获取主窗口windowStage 2.创建子窗口 3.设置子窗口属性 4.加载子窗口内容 5.显示子窗口内容
  //获取主窗口windowStage
  windowStage_ = AppStorage.get('windowStage')
  if (windowStage_ == null) {
    console.error("Failed to create the subwindow. Cause the windowStage is null")
  }
  //创建子窗口
  windowStage_?.createSubWindow(sub.windowName,(err:BusinessError,data) => {
    let errCode = err.code
    if (errCode) {
      console.error('Failed to create sub window. Cause:' + JSON.stringify(err))
      return
    }
    sub.subWindowClass= data
    //设置子窗口属性:大小,位置等
    //设置子窗口位置
    sub.subWindowClass.moveWindowTo(sub.PositionX,sub.PositonY,(err:BusinessError,data) => {
      if (err.code) {
        console.error('Failed to move the window.Cause:' + JSON.stringify(err))
        return
      }
      console.info('succeded in moving the sub window')
    })
    // 设置子窗口大小
    sub.subWindowClass.resize(sub.windowWidth,sub.windowHeight,(err:BusinessError,data) => {
      if (err.code) {
        console.error('Failed to set the sub window size.Cause:' + JSON.stringify(err))
        return
      }
      console.info('Succeded in setting the sub window size')
    })
    //设置子窗口是否可触
    sub.subWindowClass.setWindowTouchable(true,(err:BusinessError,data) => {
      if (err.code) {
        console.error('set window touch Failed' + JSON.stringify(err))
        return
      }
      console.info('set window touch succeeded')
    })
    // 设置子窗口是否全屏(能够设置的前提是未设置子窗口的位置和大小)
    sub.subWindowClass.setWindowLayoutFullScreen(true,(err:BusinessError,data) => {
      if (err.code) {
        console.error('set window layout full screen Failed' + JSON.stringify(err))
        return
      }
      console.info('set window layout full screen succeeded')
    })
    //加载子窗口页面
    sub.subWindowClass.setUIContent(sub.windowPath,(err:BusinessError,data) => {
      if (err.code) {
        console.error('set sub ui content Failed. Cause:' + JSON.stringify(err))
        return
      }
      console.info('set sub window ui content succeeded')
    })
    //显示子窗口内容
    sub.subWindowClass.showWindow((err:BusinessError,data) => {
      if (err.code) {
        console.error('show sub window Failed.Cause:' + JSON.stringify(err))
        return
      }
      console.info('show sub window succeeded')
    })
  })
}
(2)将关闭子窗口封装成函数实现任意位置调用关闭任意窗口。
代码示例如下:
// 调用页index.ets
//步骤2:将关闭子窗口封装成函数实现任意位置调用关闭任意窗口。
export  function  destroySubWindow(sub:SubWindowClass){
  sub.subWindowClass?.destroyWindow((err:BusinessError,data) => {
    if (err.code) {
      console.error('destroy sub window Failed.Cause:' + JSON.stringify(err))
      return
    }
    console.info('destroy sub window succeeded')
  })
}
(3)将窗口尺寸、位置通过参数传入创建函数,实现窗口属性可自定义。
代码示例如下:
// 调用页index.ets
//步骤3:将窗口尺寸、位置通过参数传入创建函数,实现窗口属性可自定义。
class SubWindowClass{
  subWindowClass:window.Window|null = null
  windowName:string =''
  windowWidth:number = 0
  windowHeight:number = 0
  PositionX:number = 0
  PositonY:number = 0
  windowPath:string =''
constructor(subWindowClass:window.Window|null,windowName:string,windowWidth:number, windowHeight:number,PositionX:number,PositonY:number ,windowPath:string) {
this.subWindowClass = subWindowClass
this.windowName = windowName
this.windowWidth = windowWidth
this.windowHeight = windowHeight
this.PositionX = PositionX
this.PositonY = PositonY
this.windowPath = windowPath
}
}
(4)被调用页面实现,可自定义圆角。
代码示例如下:
// 被调用页page1.ets
 build() {
     Column(){
       Text(this.message)
       Button(){Text('close sub window1')}
       .onClick(()=>{
         destroySubWindow(sub1)
       })
     }
     .width('100%')
     .height('100%')
     //步骤4:被调用页面实现,可自定义圆角。
     .borderRadius(10)
     .backgroundColor(Color.Pink)
   }
【代码实现】
1、Index.ets调用页
代码示例如下:
// 调用页 index.ets
import {  window } from '@kit.ArkUI'
import { BusinessError } from '@kit.BasicServicesKit'
import { JSON } from '@kit.ArkTS'
let windowStage_:window.WindowStage|null|undefined = null
//步骤3:将窗口尺寸、位置通过参数传入创建函数,实现窗口属性可自定义。
class SubWindowClass{
subWindowClass:window.Window|null = null
windowName:string =’’
windowWidth:number = 0
windowHeight:number = 0
PositionX:number = 0
PositonY:number = 0
windowPath:string =’’
constructor(subWindowClass:window.Window|null,windowName:string,windowWidth:number, windowHeight:number,PositionX:number,PositonY:number ,windowPath:string) {
this.subWindowClass = subWindowClass
this.windowName = windowName
this.windowWidth = windowWidth
this.windowHeight = windowHeight
this.PositionX = PositionX
this.PositonY = PositonY
this.windowPath = windowPath
}
}
let subWindowClass1:window.Window|null = null
let subWindowClass2:window.Window|null = null
export  let sub1 = new SubWindowClass(subWindowClass1,‘mysub1’,500,1000,100,1500,“pages/subWindow”)
let sub2 = new SubWindowClass(subWindowClass2,‘mysub2’,500,1000,610,1500,‘pages/subWindow2’)
//步骤1:将创建窗口封装成函数实现快速调用创建窗口。
export  function  createSubWindow(sub:SubWindowClass){
//1.获取主窗口windowStage 2.创建子窗口 3.设置子窗口属性 4.加载子窗口内容 5.显示子窗口内容
//获取主窗口windowStage
windowStage_ = AppStorage.get(‘windowStage’)
if (windowStage_ == null) {
console.error(“Failed to create the subwindow. Cause the windowStage is null”)
}
//创建子窗口
windowStage_?.createSubWindow(sub.windowName,(err:BusinessError,data) => {
let errCode = err.code
if (errCode) {
console.error(‘Failed to create sub window. Cause:’ + JSON.stringify(err))
return
}
sub.subWindowClass= data
//设置子窗口属性:大小,位置等
//设置子窗口位置
sub.subWindowClass.moveWindowTo(sub.PositionX,sub.PositonY,(err:BusinessError,data) => {
if (err.code) {
console.error(‘Failed to move the window.Cause:’ + JSON.stringify(err))
return
}
console.info(‘succeded in moving the sub window’)
})
// 设置子窗口大小
sub.subWindowClass.resize(sub.windowWidth,sub.windowHeight,(err:BusinessError,data) => {
if (err.code) {
console.error(‘Failed to set the sub window size.Cause:’ + JSON.stringify(err))
return
}
console.info(‘Succeded in setting the sub window size’)
})
//设置子窗口是否可触
sub.subWindowClass.setWindowTouchable(true,(err:BusinessError,data) => {
if (err.code) {
console.error(‘set window touch Failed’ + JSON.stringify(err))
return
}
console.info(‘set window touch succeeded’)
})
// 设置子窗口是否全屏(能够设置的前提是未设置子窗口的位置和大小)
sub.subWindowClass.setWindowLayoutFullScreen(true,(err:BusinessError,data) => {
if (err.code) {
console.error(‘set window layout full screen Failed’ + JSON.stringify(err))
return
}
console.info(‘set window layout full screen succeeded’)
})
//加载子窗口页面
sub.subWindowClass.setUIContent(sub.windowPath,(err:BusinessError,data) => {
if (err.code) {
console.error(‘set sub ui content Failed. Cause:’ + JSON.stringify(err))
return
}
console.info(‘set sub window ui content succeeded’)
})
//显示子窗口内容
sub.subWindowClass.showWindow((err:BusinessError,data) => {
if (err.code) {
console.error(‘show sub window Failed.Cause:’ + JSON.stringify(err))
return
}
console.info(‘show sub window succeeded’)
})
})
}
//步骤2:将关闭子窗口封装成函数实现任意位置调用关闭任意窗口。
export  function  destroySubWindow(sub:SubWindowClass){
sub.subWindowClass?.destroyWindow((err:BusinessError,data) => {
if (err.code) {
console.error(‘destroy sub window Failed.Cause:’ + JSON.stringify(err))
return
}
console.info(‘destroy sub window succeeded’)
})
}
@Entry
@Component
struct Index {
@State message:string = ‘Hello World’
build() {
Column(){
Text(this.message)
Row(){
Text(‘我是主页面’)
}
.width(‘100%’)
.height(300)
.backgroundColor(Color.Gray)
.justifyContent(FlexAlign.Center)
.alignItems(VerticalAlign.Top)
Row(){
Button(){Text(‘open sub window1’)}
.margin({bottom:20,top:20})
.onClick(()=>{
createSubWindow(sub1)
})
Button(){Text(‘open sub window2’)}
.margin({bottom:20,top:20})
.onClick(()=>{
createSubWindow(sub2)
})
}
Row(){
Button(){Text(‘close sub window1’)}
.onClick(()=>{
destroySubWindow(sub1)
})
Button(){Text(‘close sub window2’)}
.onClick(()=>{
destroySubWindow(sub2)
})
}
}
.width(‘100%’)
.height(‘100%’)
.alignItems(HorizontalAlign.Start)
.justifyContent(FlexAlign.Start)
}
}
2、被调用页1
代码示例如下:
import {  destroySubWindow,sub1} from './Index'
[@Entry](/user/Entry)
[@Component](/user/Component)
struct SubWindow {
  [@State](/user/State) message: string = 'Hello World';
build() {
Column(){
Text(this.message)
Button(){Text(‘close sub window1’)}
.onClick(()=>{
destroySubWindow(sub1)
})
}
.width(‘100%’)
.height(‘100%’)
//步骤4:被调用页面实现,可自定义圆角。
.borderRadius(10)
.backgroundColor(Color.Pink)
}
}
3、被调用页2
代码示例如下:
[@Entry](/user/Entry)
[@Component](/user/Component)
struct SubWindow2 {
  [@State](/user/State) message: string = 'mySubWindow2';
build() {
Column(){
Text(‘i am subWindow2’)
}
.width(‘100%’)
.height(‘100%’)
//步骤4:被调用页面实现,可自定义圆角。
.borderRadius(20)
.backgroundColor(Color.Pink)
}
}
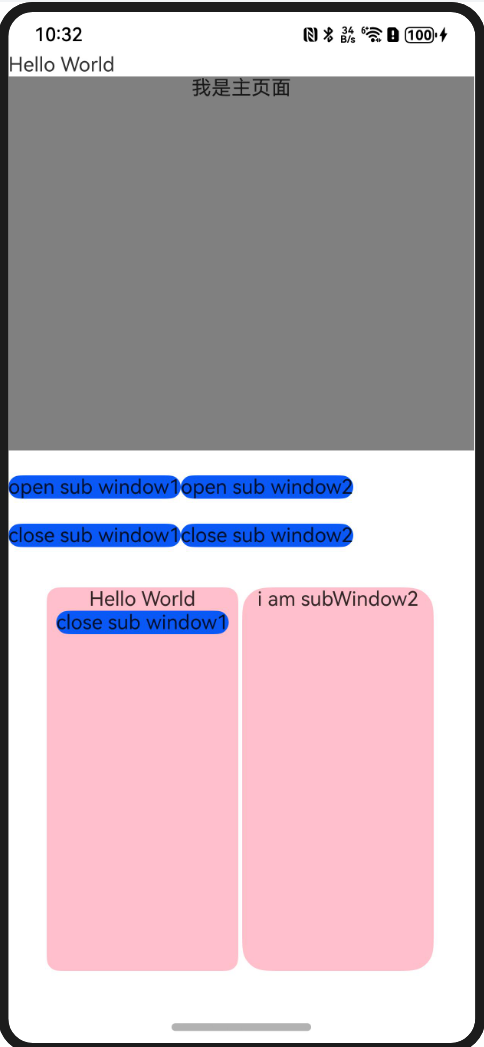
解决问题后截图展示:

针对HarmonyOS鸿蒙Next中promptAction自定义弹窗无法自定义宽度和弹窗圆角的问题,以下是一些解决方案:
- 使用子窗口替代:由于目前openCustomDialog方法暂不支持自定义宽度和圆角,可以考虑使用子窗口(SubWindow)来实现类似弹窗的效果。子窗口提供了更多的自定义选项,包括宽度、圆角等。
- 关注后续版本更新:鸿蒙系统不断更新迭代,后续版本可能会增加对自定义弹窗宽度和圆角的支持。建议关注鸿蒙系统的更新日志,及时获取新功能。
- 动态调整尺寸:在弹窗展示前,根据屏幕尺寸动态计算并设置合适的宽高值,避免直接设置为100%导致超出屏幕。
如果以上方案无法完全满足需求,或者在实际操作中遇到问题,建议直接联系官网客服以获取更专业的技术支持。官网地址是:https://www.itying.com/category-93-b0.html 。


