HarmonyOS 鸿蒙Next 自定义地址选择组件案例
HarmonyOS 鸿蒙Next 自定义地址选择组件案例
HarmonyOS Next应用开发案例(持续更新中……)
本案例完整代码,请访问:https://gitee.com/harmonyos-cases/cases/tree/master/CommonAppDevelopment/feature/customaddresspicker
本案例已上架HarmonyOS NEXT开源组件市场,如需获取或移植该案例,可安装此插件。开发者可使用插件获取鸿蒙组件,添加到业务代码中直接编译运行。
介绍
本示例介绍如何使用bindSheet,changeIndex,onAreaChange实现带切换动效的自定义地址选择组件。
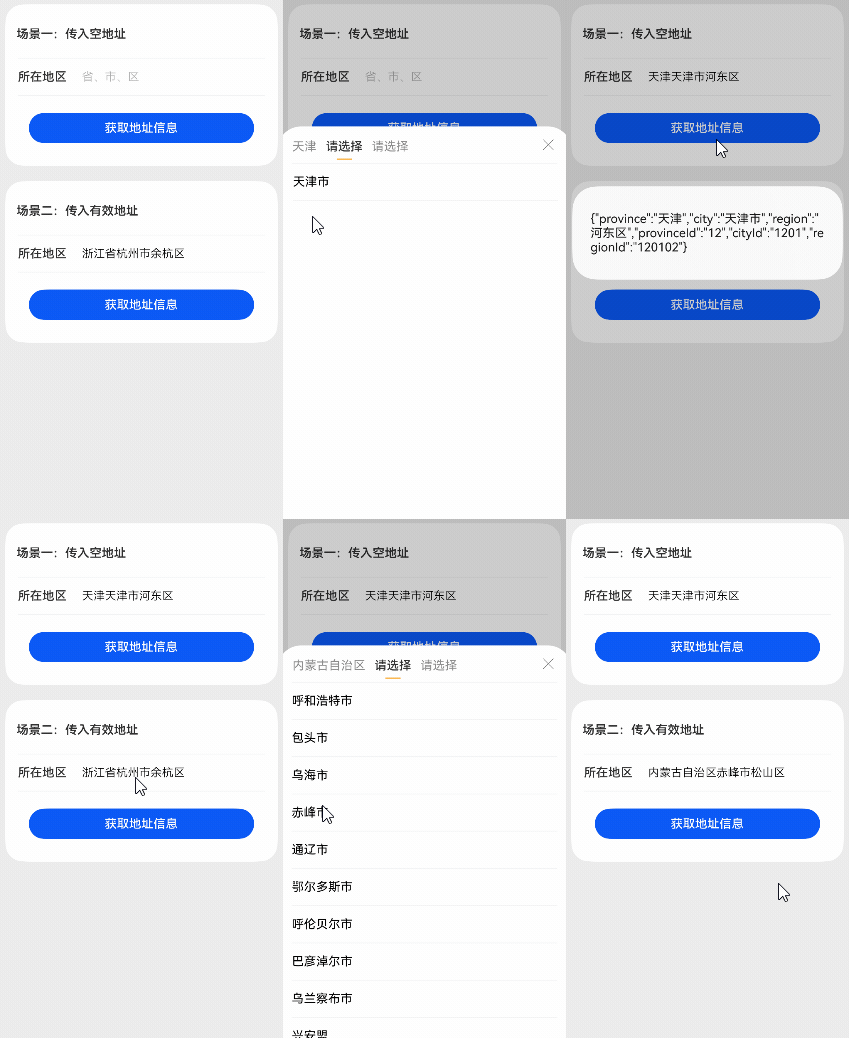
效果图预览

使用说明
进入页面,点击场景一中“所在地区”一栏,可拉起省市区的地址选择弹窗。选择完区后,弹窗自动关闭,“所在地区”一栏显示当前选择的省市区名。
进入页面,点击场景二中的'获取地址信息'按钮,可以查看省市区名和相应的id。点击“所在地区”一栏,在拉起的地址选择弹窗里选择另一个省市区后,再次点击'获取地址信息'按钮,会显示最新选择的省市区的信息。
实现思路
- 使用getRawFileContentSync从rawfile目录下读取省市区json文件数据,使用util.TextDecoder进行解码。源码参考JsonUtils.ets。
getAddressData(): Array<Province> {
  // 从rawfile本地json文件中获取数据
  const value = getContext().resourceManager.getRawFileContentSync(this.jsonFileDir);
  // 解码为utf-8格式
  const textDecoder = util.TextDecoder.create('utf-8', { ignoreBOM: true });
  const textDecoderResult = textDecoder.decodeToString(new Uint8Array(value.buffer));
  const jsonObj: JsonObjType = JSON.parse(textDecoderResult) as JsonObjType;
  const modelBuckets: Array<Province> = [];
  // 映射json数据为model对象
  const modelObj = jsonObj.addressList;
  for (let i = 0; i < modelObj.length; i++) {
  const contactTemp = new Province(modelObj[i].code, modelObj[i].name, modelObj[i].children);
  // 从json中读取每个省数据写入modelBuckets
  modelBuckets.push(contactTemp);
}
return modelBuckets;
}
- 使用bindSheet绑定地址选择半模态弹窗页面。源码参考CustomAddressPicker.ets。
Row() {
  // ...
}
.width($r('app.string.custom_address_picker_full_size'))
.height($r('app.float.custom_address_picker_size_forty_eight'))
.onClick(() => {
  // 显示地址选择半模态弹窗页面
  this.isShow = true;
  this.currentIndex = AddressType.Province;
})
.bindSheet($$this.isShow, this.addressSelectPage(), {
  height: $r('app.string.custom_address_picker_percent_seventy'), // 半模态弹窗高度
  showClose: false, // 设置不显示自带的关闭图标
  dragBar: false,
  onDisappear: () => {
    // 退出地址选择半模态弹窗页面时,重置相关参数
    this.animationDuration = 0;
    // 如果当前省市区没选全,则清空当前选择的地址信息
    if (this.currentSelectInfo.region === '') {
      this.currentSelectInfo.provinceId = '';
      this.currentSelectInfo.cityId = '';
      this.currentSelectInfo.regionId = '';
      this.currentSelectInfo.province = '';
      this.currentSelectInfo.city = '';
      this.currentSelectInfo.region = '';
      this.cityList = [];
      this.regionList = [];
    }
  }
})
- 使用changeIndex控制省市区列表TabContent切换。使用组件区域变化回调onAreaChange获取选择的省市区Text组件宽度,存入textInfos数组,用于后续计算选择省市区名后下方下滑线动画水平偏移量leftMargin。源码参考CustomAddressPicker.ets。
Text(`${params.name === '' ? '请选择' : params.name} `)
  .height($r('app.string.custom_address_picker_full_size'))
  .fontSize($r('app.float.custom_address_picker_size_sixteen'))
  .fontWeight(this.currentIndex === params.index ? Constants.FONT_WEIGHT_FIVE_HUNDRED :
  Constants.FONT_WEIGHT_FOUR_HUNDRED)
  .fontColor(this.currentIndex === params.index ? $r('app.color.custom_address_picker_font_color_black') :
  $r('app.color.custom_address_picker_font_color_gray'))
  .constraintSize({ maxWidth: 'calc(33%)' })
  .textOverflow({ overflow: TextOverflow.Ellipsis })
  .maxLines(Constants.SIZE_ONE)
  .onClick(() => {
    // 使用changeIndex控制省市区列表TabContent切换
    this.controller.changeIndex(params.index);
  })
  .id(params.index.toString())
  .onAreaChange((oldValue: Area, newValue: Area) => {
    // 使用组件区域变化回调onAreaChange获取选择的省市区Text组件宽度,存入textInfos数组,用于后续计算选择省市区名后下方下滑线动画水平偏移量leftMargin
    // 组件区域变化时获取当前Text的宽度newValue.width和x轴相对位置newValue.position.x
    this.textInfos[params.index] = [newValue.position.x as number, newValue.width as number];
    if (this.currentIndex === params.index && params.index === AddressType.Province) {
      // 计算选择的省市区名下方的下滑线偏移量
      this.leftMargin = (this.textInfos[this.currentIndex][1] - Constants.DIVIDER_WIDTH) / 2;
    }
  })
- 在选择完区名后,使用JSON.parse(JSON.stringify(xxx))深拷贝选择的省市区数据,用于后续操作中需要加载上一次选择的完整省市区数据。源码参考CustomAddressPicker.ets。
List() {
  ForEach(this.regionList, (item: CommonAddressList) => {
    ListItem() {
      this.areaNameItem(AddressType.Region, item)
    }.onClick(() => {
      // 记录选择的区信息
      this.currentSelectInfo.regionId = item.code;
      this.currentSelectInfo.region = item.name;
      this.provinceCityRegion =
        this.currentSelectInfo.province + this.currentSelectInfo.city + this.currentSelectInfo.region;
      // 选择区后,退出地址选择半模态弹窗页面
      this.isShow = false;
      // 将当前选中省市区信息保存到lastSelectInfo
      this.lastSelectInfo.provinceId = this.currentSelectInfo.provinceId;
      this.lastSelectInfo.province = this.currentSelectInfo.province;
      this.lastSelectInfo.cityId = this.currentSelectInfo.cityId;
      this.lastSelectInfo.city = this.currentSelectInfo.city;
      this.lastSelectInfo.regionId = this.currentSelectInfo.regionId;
      this.lastSelectInfo.region = this.currentSelectInfo.region;
      // TODO 知识点:在选择完区名后,使用JSON.parse(JSON.stringify(xxx))深拷贝选择的省市区数据,用于后续操作中需要加载上一次选择的完整省市区数据
      // 深拷贝保存到相应的变量中
      this.lastCityList = JSON.parse(JSON.stringify(this.cityList));
      this.lastRegionList = JSON.parse(JSON.stringify(this.regionList));
      this.address = JSON.parse(JSON.stringify(this.lastSelectInfo));
    })
  }, (item: CommonAddressList) => JSON.stringify(item))
}
高性能知识点
本示例中如果当前点击选择的省或者市与之前选择一样,则跳过省、市数据获取,直接调用changeIndex(AddressType.City)切换到下一级地区列表,减少冗余查询以提升性能。
工程结构&模块类型
customaddresspicker                             // har类型
|---pages
|   |---AddressPickerSample.ets                 // 地址选择场景页面
|---customaddresspicker
|   |---constant
|   |   |---Constants.ets                       // 常量定义
|   |---model
|   |   |---AddressModel.ets                    // 地址选择相关类
|   |---utils
|   |   |---JsonUtils.ets                       // json工具类
|   |---view
|   |   |---CustomAddressPicker.ets             // 自定义地址选择组件
模块依赖
本示例依赖路由模块来注册路由。
参考资料
针对HarmonyOS 鸿蒙Next自定义地址选择组件案例,以下是一个简要说明:
在HarmonyOS鸿蒙Next中,自定义地址选择组件可以通过封装自定义组件来实现。首先,需要创建一个新的空项目,并设置好目录结构,例如ets/components/cascade/,用于存放相关的自定义组件文件。
在ets/components/cascade/目录下,可以添加addressObj.ts文件用于存放地址对象,index.ets文件用于初始化弹窗容器,CustomAddress.ets文件用于存放具体的级联选择业务代码,以及Cascade.d.ts文件作为TS声明文件。
接下来,可以实现自定义弹窗,将官网的自定义弹窗示例复制到index.ets中,并进行适当修改,如去掉@Entry页面的入口组件装饰,修改组件命名并用export暴露组件供外部使用。
然后,实现父子组件的通信,使用@State、@Prop、@Link等装饰器来管理组件的状态和属性。通过@Prop传递父组件的状态给子组件,通过@Link或回调函数实现子组件向父组件传递数据。
最后,完善逻辑,实现父组件调用子组件方法唤醒弹窗,父组件传参控制选择地址的层级数量等功能。
如果开发者在实现自定义地址选择组件过程中遇到问题,可以参考官方文档或相关教程进行解决。如果问题依旧没法解决请联系官网客服,官网地址是:https://www.itying.com/category-93-b0.html。


